Configuring SSH access for VirtualBox Host to Guest

I have installed VirtualBox with CentOS. I’ve decided that it would be easier to connect VBox from Host terminal via SSH then using Vbox GUI environment. I’ve found this process a little bit difficult and fortunately have solved it.

Now, I want to share my knowledge with you:

Note: <VBoxName> will be the name of the Virtual Box Machine. To find it type command “hostname” on guest machine.

1. Open up the terminal window on Host machine, and run the following:

$ VBoxManage setextradata <VBoxName> “VBoxInternal/Devices/pcnet/0/LUN#0/Config/ssh/HostPort” 2222


1. 1 If you encounter the following error(if not ignore this section),

VBoxManage: error: Could not find a registered machine named “VBoxName”...
do the following:
$ VBoxManage createvm –name <VBoxName> –register


2.

$ VBoxManage setextradata <VMname> “VBoxInternal/Devices/pcnet/0/LUN#0/Config/ssh/HostPort” 2222

3.

$ VBoxManage setextradata <VMname> “VBoxInternal/Devices/pcnet/0/LUN#0/Config/ssh/GuestPort” 22

4.

$ VBoxManage setextradata <VMname> “VBoxInternal/Devices/pcnet/0/LUN#0/Config/ssh/Protocol” TCP

5.  Close the guest Machine Window (reboot is not enough)


6.
Open up the terminal window on Host machine and run:

$ ssh -l username -p 2222 <localhost>

Where <localhost> is the name of the Host machine.

6.1  If you get the following error(if not ignore this section):

ssh-exchange-identification connection closed by remote host

One of the solution is to start ssh on both HOTS/GUEST machines:

$ /etc/init.d/sshd start

7. That is all, and one more hint: username by which you want to connect to the Guest machine must have password.

Reset root password in CentOS 5.5

If you don’t know the root password and want to login in to the server, follow these instructions:

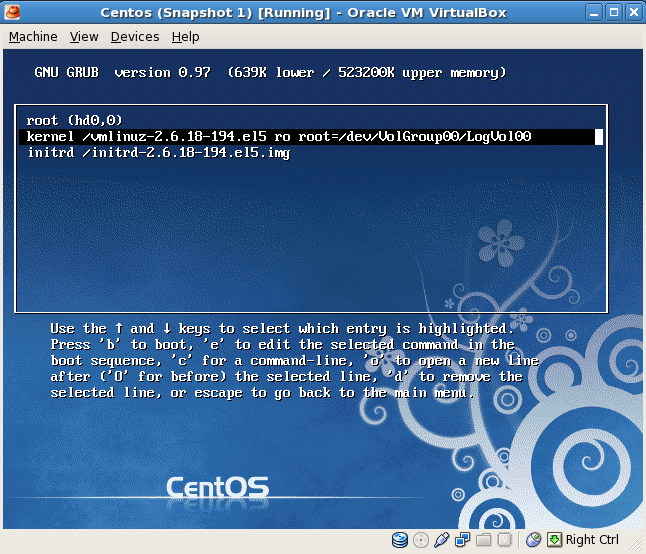
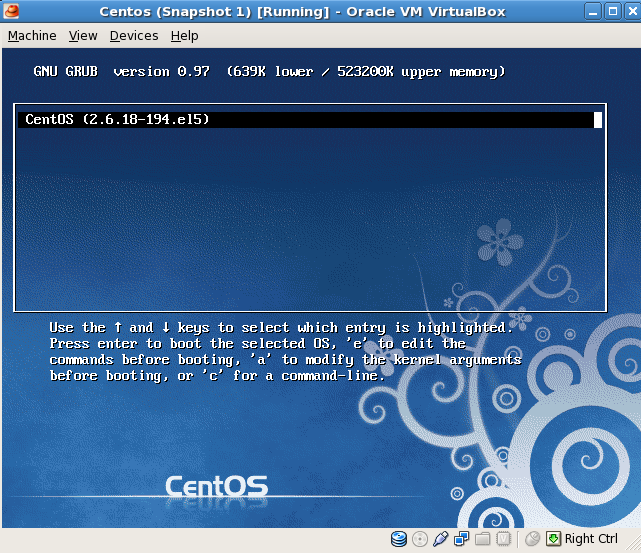
Picture 1: Press “e” to edit.

Centos 5.5 VirtualBox Reset root Password

Picture 2: Press “e” to edit.

Centos 5.5 VirtualBox Reset root Password

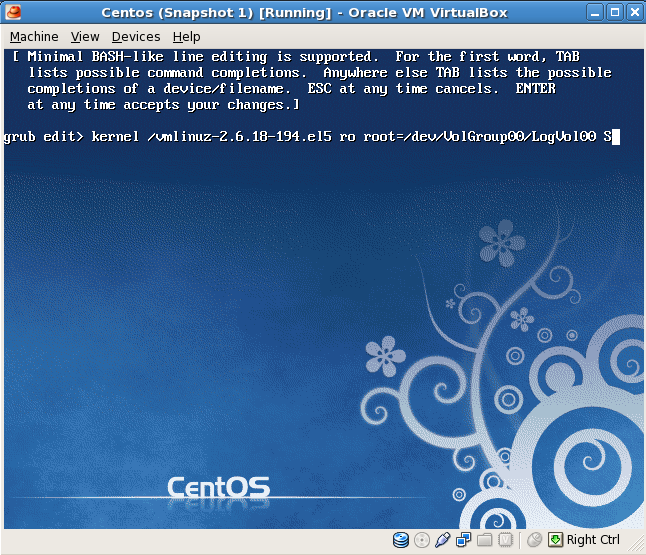
Picture 3: Type “S” at the end of the line. Press Enter.

Centos 5.5 VirtualBox Reset root Password

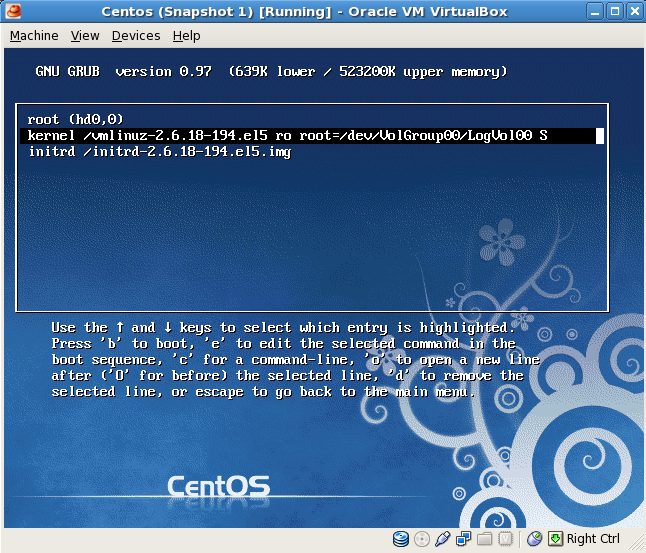
Picture 4: After pressing Enter, you will see the following picture. Press “b” to boot.

Centos 5.5 VirtualBox Reset root Password

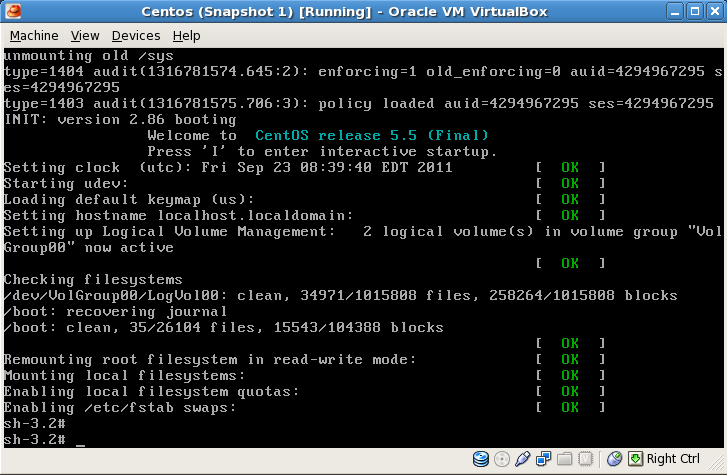
Picture 5: You will see the following picture…

Centos 5.5 VirtualBox Reset root Password

Type “su –” and you will be a root user.

To make it permanent you should edit it in the following file:

vi /boot/grub/menu.lst
default=0
timeout=5
.
.
.
kernel /vmlinuz-2.6.18-194.el5 ro root=/dev/VolGroup00/LogVol00 S
.
.
.

ORA-01466 unable to read data – table definition has changed

This is a time-based read consistency error, which may occur during flashbacking object.

For example, I was running the following statement:

SELECT text
FROM dba_views AS OF TIMESTAMP to_timestamp('8-SEP-2011 6:14:35','DD-MON-YYYY HH24:MI:SS')

ORA-01466: unable to read data - table definition has changed


Let’s check undo_retention parameter:

SQL>  SELECT value/60/60 as Hours
 2    FROM v$parameter
 3    WHERE name='undo_retention';

    HOURS
---------
3.02777777

So my retention period is 3hours…If I want to flashback object to before more than 3 hours I will get ORA-01466.

Oracle 11.2.0.1.0 em.ear file not found

During the installation of Oracle 11.2.0.1.0 you may face the following error:

file not found

%ORACLE_HOME%\oc4j\j2ee\oc4j_applications\applications\em.ear file

image


The database installation package consist of two files:

win32_11gR2_database_1of2
win32_11gR2_database_2of2

To solve the problem: You should extract each of them and place win32_11gR2_database_2of2 content into win32_11gR2_database_1of2 folder before running installer.

Send Mail from SQL Server 2005

Hello Geeks,

I am planning to post very very useful thing.

Once at my work, one co-worker asked me to write such thing:

Retrieve query result from SQL Server 2005, save it as a .csv file and sent it to some recipients everyday at some time.

So let’s start it…

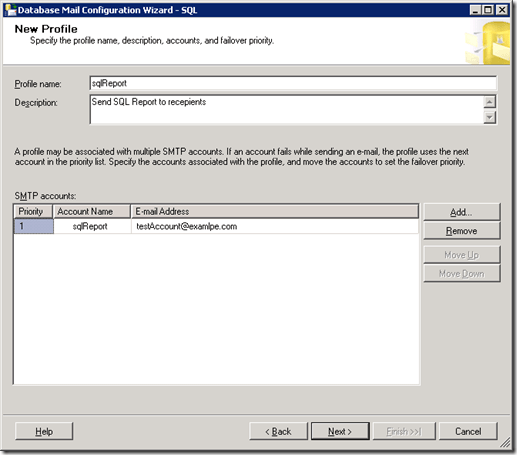
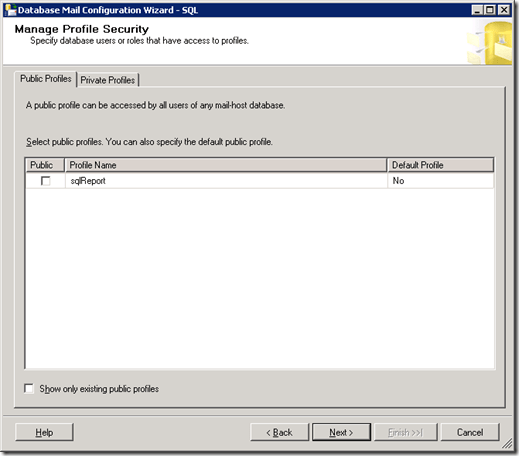
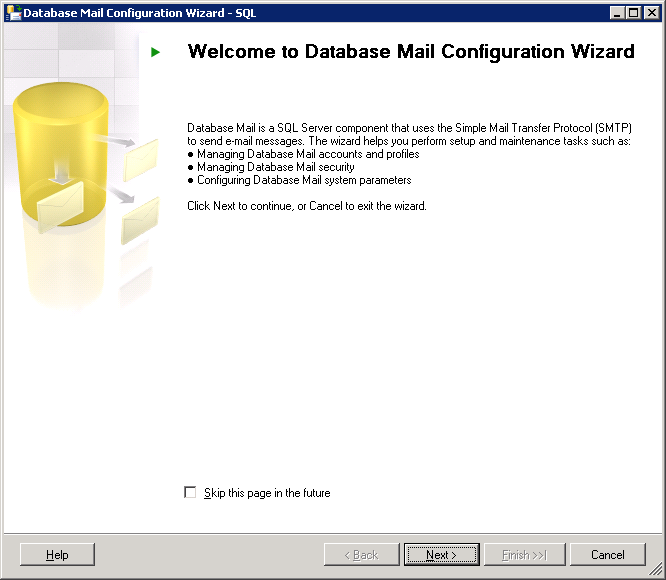
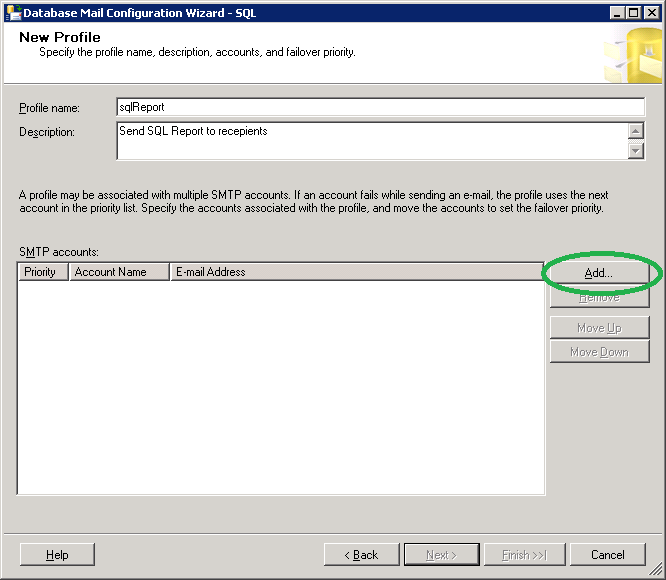
1. First of all you should create Profile and Account.
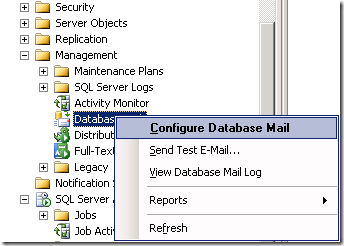
 

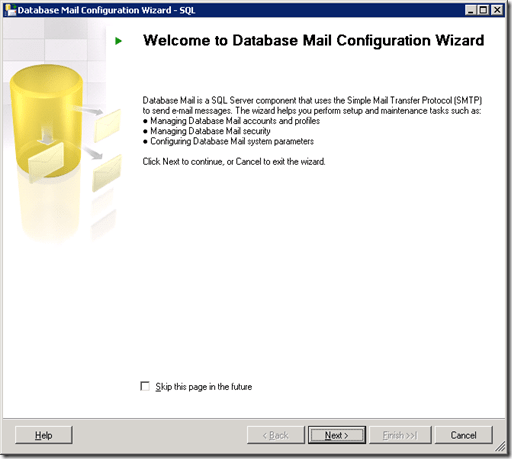
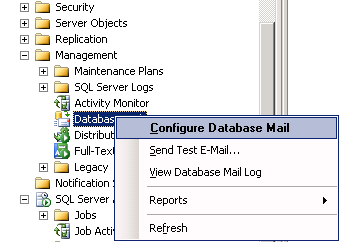
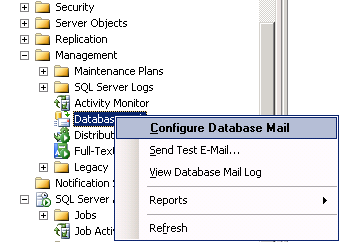
SQL Server Configure Database Mail

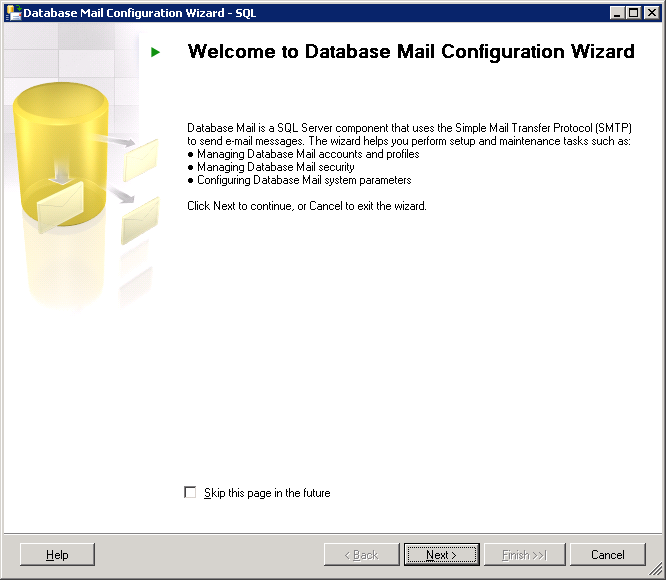
SQL Server  Database Mail Configuration Wizard

Next>

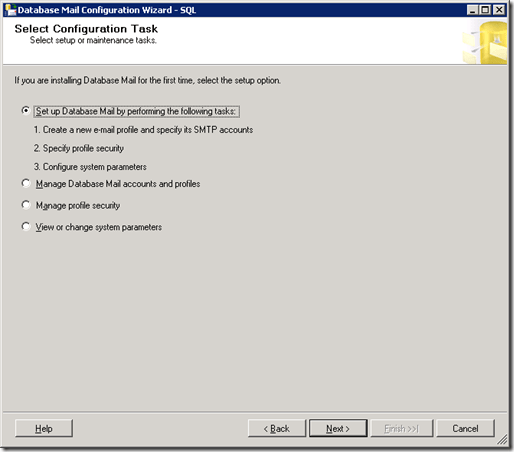
SQL Server  Database Mail Configuration Wizard_Select Configuration_Task

Next>

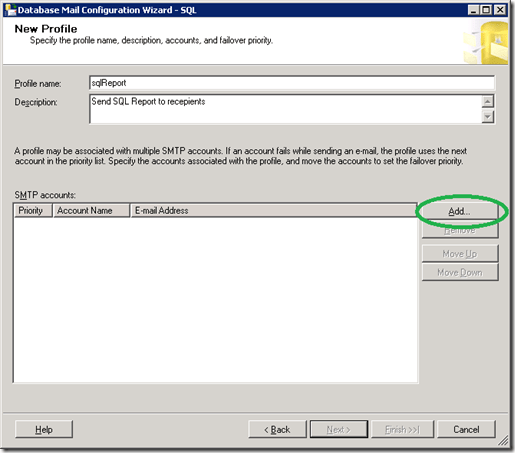
SQL Server  Database Mail Configuration Wizard_New_profile

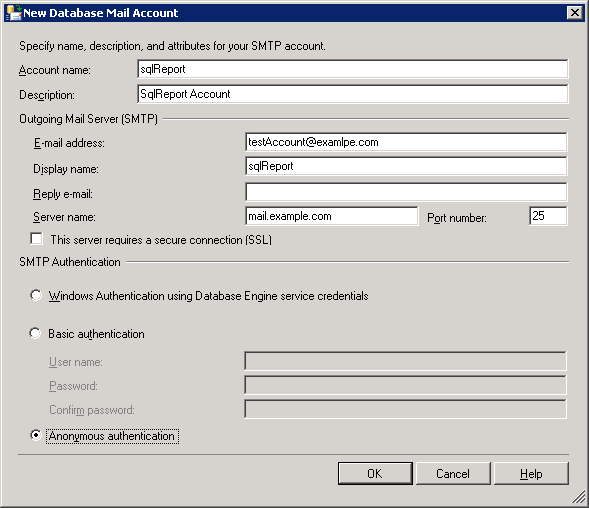
Click Add…

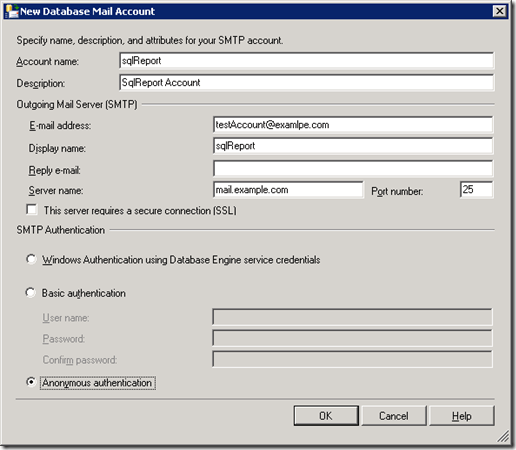
SQL Server Database mail Account

Click OK…

SQL Server Database Mail Configuration Wizard New Profile

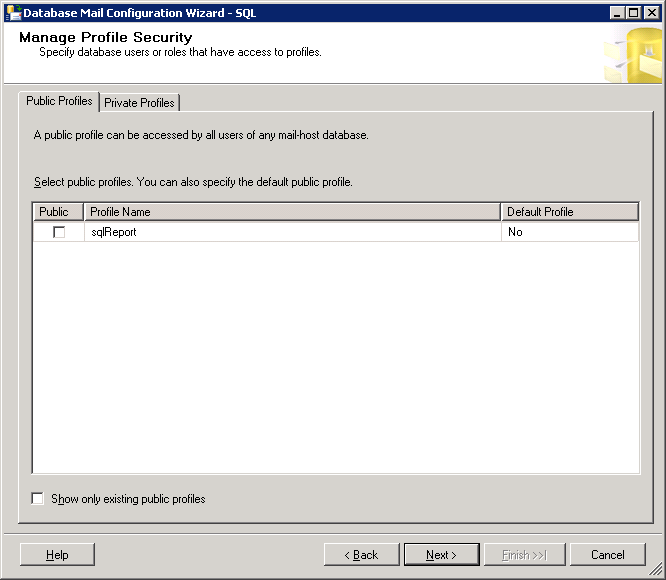
Next>

SQL Server Database Mail Configuration Wizard Manage Profile Security

Next>

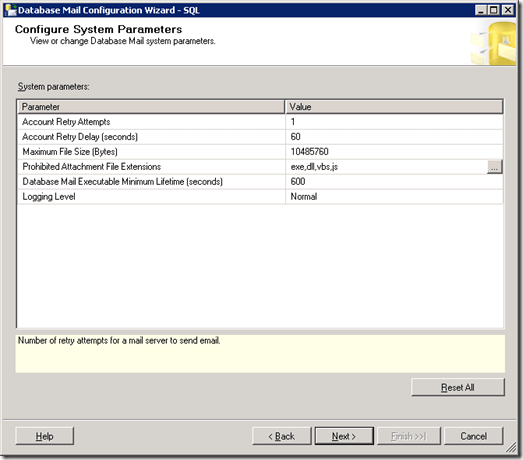
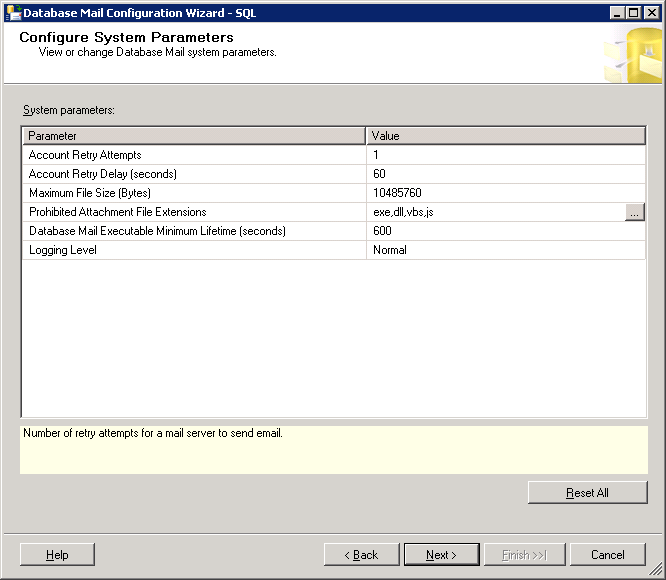
SQL Server Database Mail Configuration Wizard Configure System Parameters

Next>

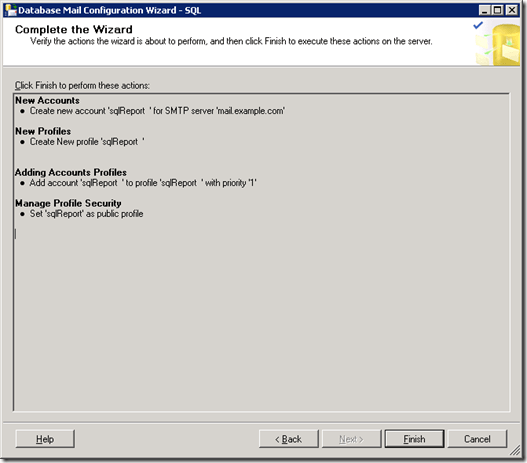
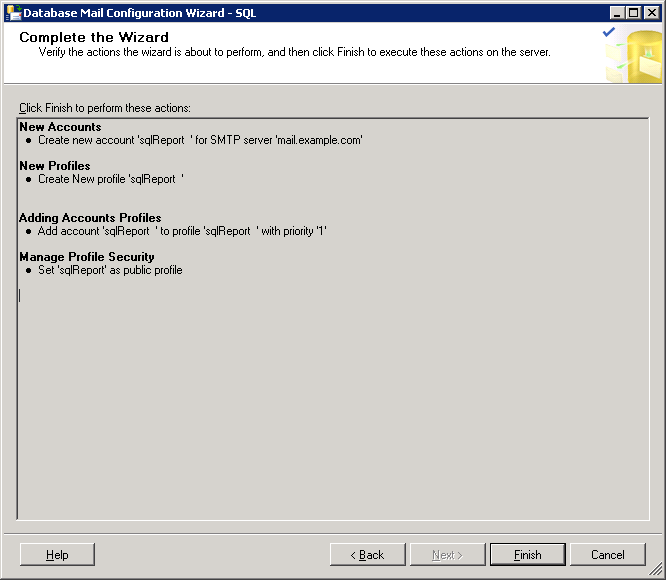
SQL Server Database Mail Configuration Wizard Complete the Wizard

Click Finish…

Everything should be successful.

2. We should enable Database Mail on the server. Using Database Mail XPs.

sp_configure 'show advanced options', 1;
GO
RECONFIGURE;
GO
sp_configure 'Database Mail XPs', 1;
GO
RECONFIGURE
GO
sp_configure 'show advanced options', 0;
GO
RECONFIGURE;
GO

3. Let’s send mail… Using msdb.dbo.sp_send_dbmail procedure… Indicating the following parameters.

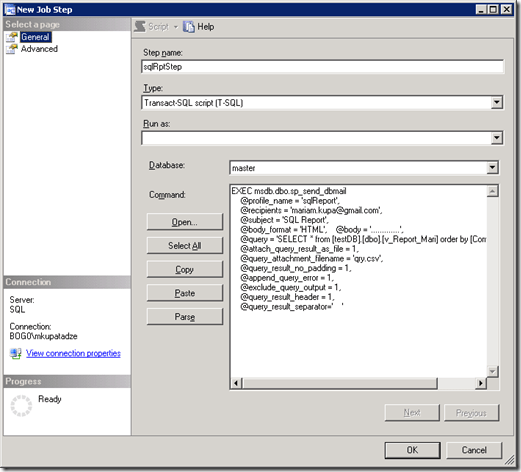
EXEC msdb.dbo.sp_send_dbmail @profile_name = 'sqlReport', @recipients = 'mariam.kupa@gmail.com', @subject = 'SQL Report', @body_format = 'HTML',
@body = '.............', @query = 'SELECT * from [testDB].[dbo].[v_Report_Mari] order by [Computer Name]', @attach_query_result_as_file = 1, @query_attachment_filename = 'qry.csv', @query_result_no_padding = 1, @append_query_error = 1, @exclude_query_output = 1, @query_result_header = 1, @query_result_separator=' '

Let’s discuss each parameter:

[ @profile_name = ]  This is the name of the profile from where message will be sent(We set up it before, 1st step)

[ @recipients = ]       This is a semicolon-delimited list of e-mail addresses to send the message to.

[ @subject = ]           This is the subject of the e-mail message.

[ @body_format = ]   This is the format of the message body. Available values are: TEXT (default) and HTML.

[ @body = ]               This is the body of the e-mail message.

[ @query = ]              This is a query to execute. It’s result can be attached as a file, or included as a text message included in the body . Consider that the query is executed in a separate session and local  variables in the script using sp_send_dbmail can not be used.

[ @attach_query_result_as_file = ] Available values are 1 (YES) and 0 (NO).

[ @query_attachment_filename = ] Name of the attached file.

[ @query_result_no_padding = ]     Available values are 0 (padding) and 1 (no padding). If you indicate 1 it possibly reduce the file size,because there will not be any padding. Default value is 0.

[ @append_query_error = ]             Available values are 0 and 1. If any error occurs in the query indicated in [ @query = ] and that parameter value is 1, then mail will be sent appended with the error message. If the value is 0 then mail will not be sent. Default value is 0.

[ @exclude_query_output = ]        When the value is 1, the execution of the sp_send_dbmail does not print any of the query execution messages on the console. For 0 it is vice versa. The default value is 0.

[ @query_result_header = ]           Specifies whether the query results include column headers. Available values are 1 and 0.

[ @query_result_separator = ]       Indicates by which columns should be separated. Default value is ‘ ’(space). In our example, i ‘ve indicated TAB, just type 2 quotation marks place cursor between of them and press desired key, in our case TAB.

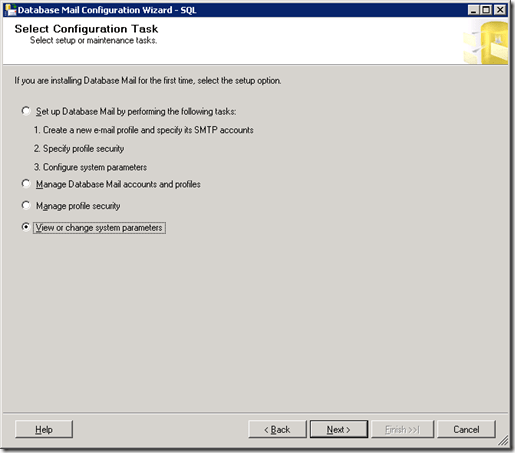
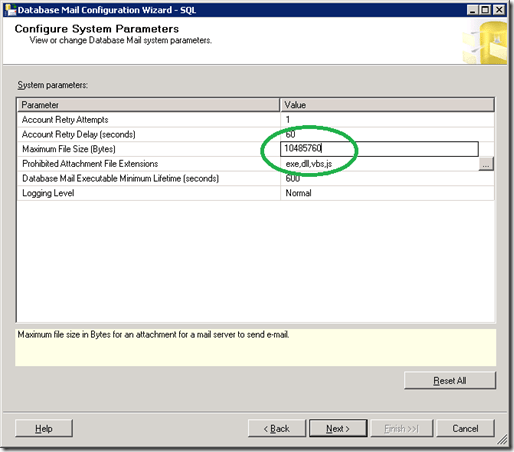
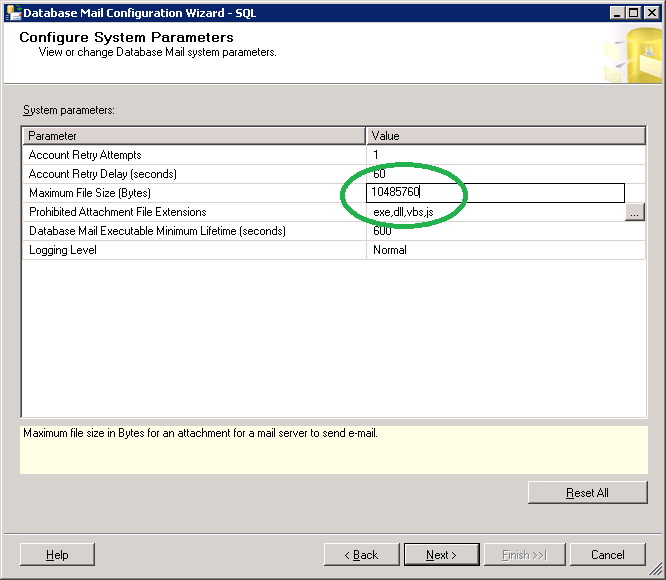
4. Increase the mail size limit from Database Mail. You can do it during setting up the account but I prefer to discuss it separately.
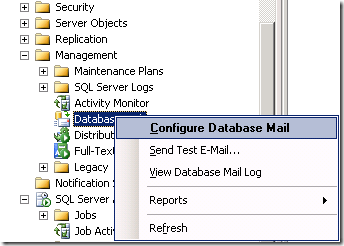
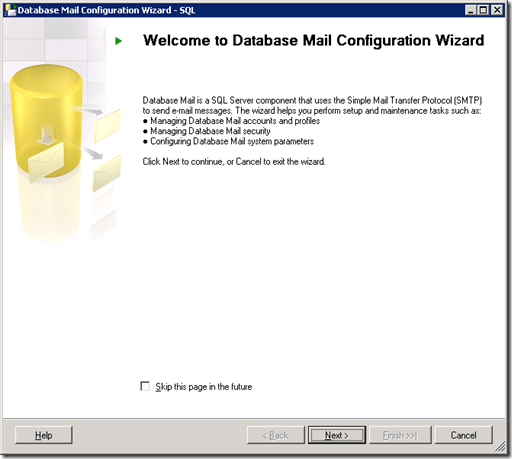
SQL Server Configure Database Mail

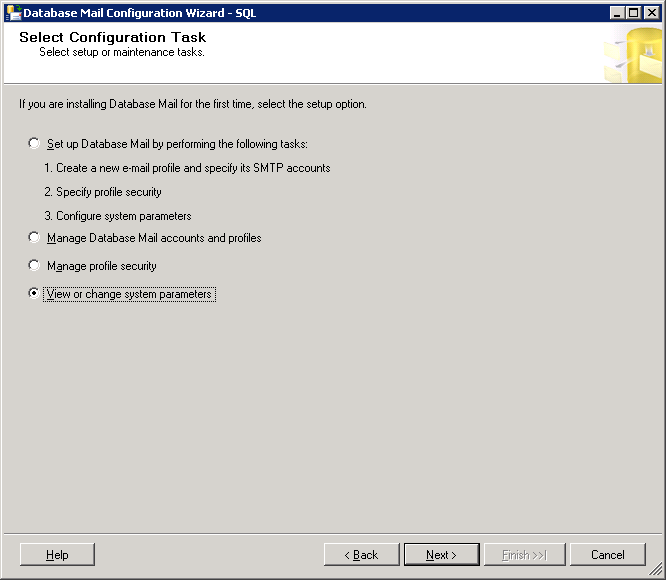
SQL Server  Database Mail Configuration Wizard

Next>

SQL Server  Database Mail Configuration Wizard View Change system parameters

Next>

SQL Server  Database Mail Configuration Wizard View Change system parameters

Next>

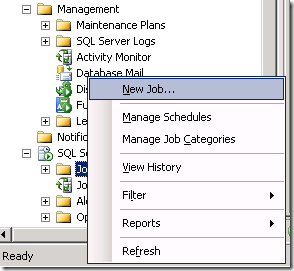
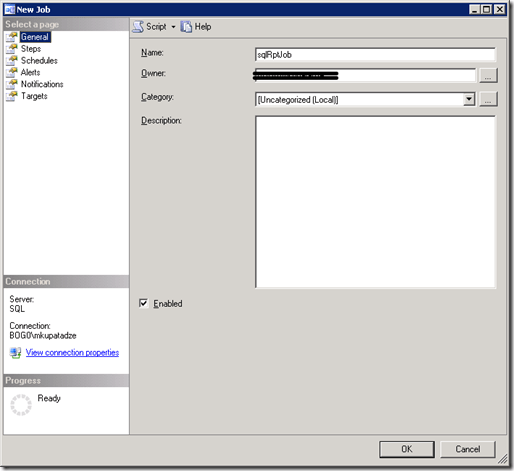
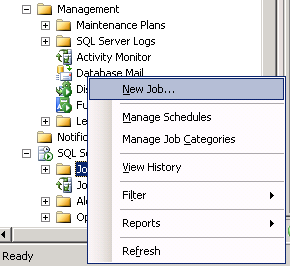
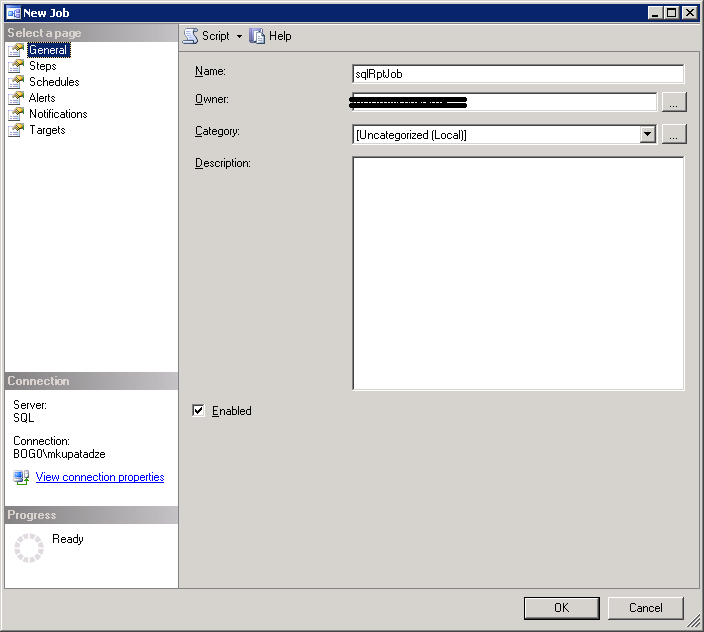
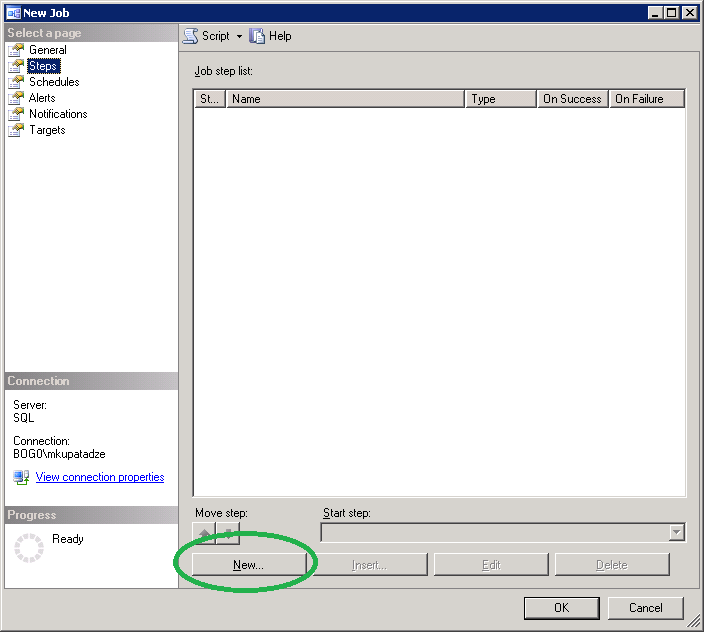
5. Creating job…

SQL Server Create New Job

SQL Server New Job General Tab

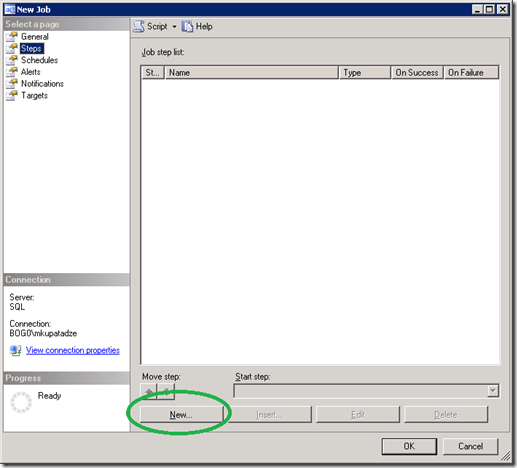
SQL Server New Job Steps Tab

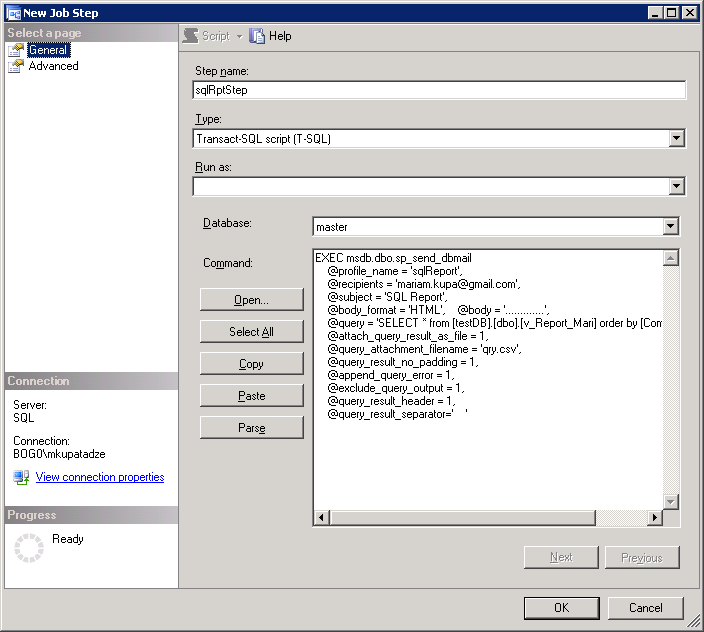
Insert our code in the Command field:
SQL Server New Job Steps General Tab

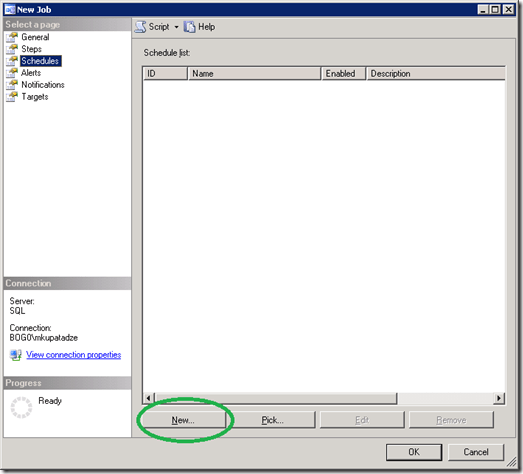
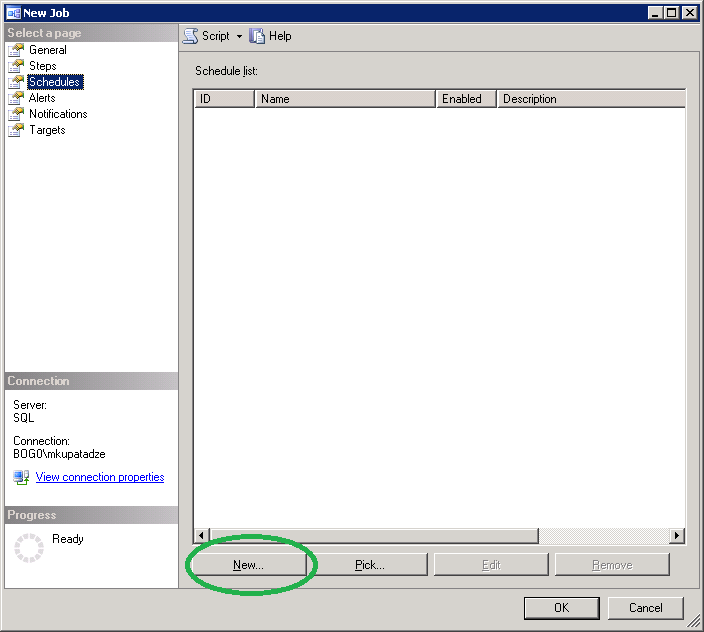
SQL Server New Job Schedules

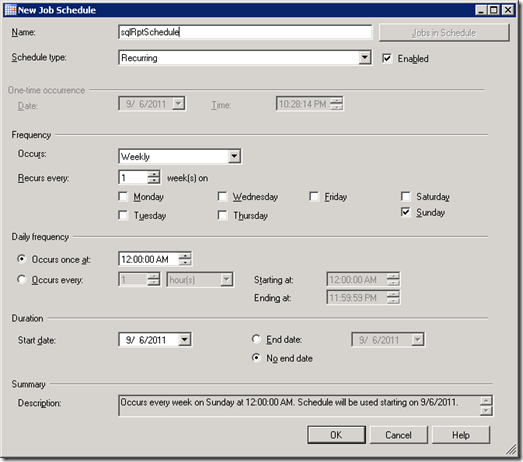
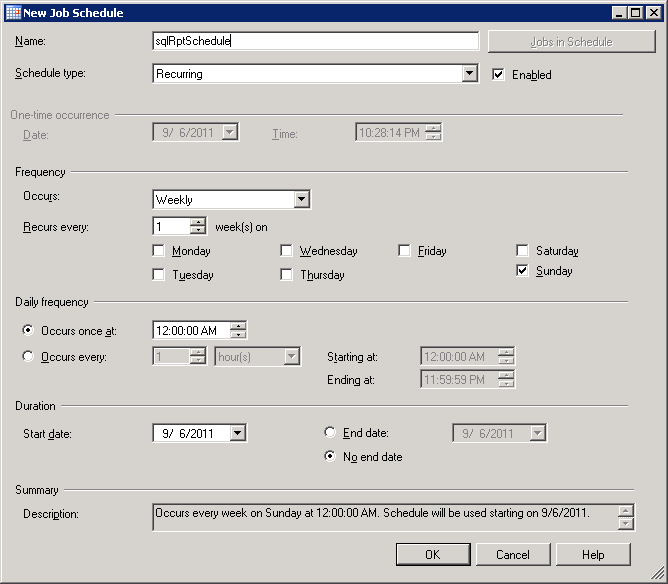
SQL Server New Job Schedules Job Schedule

It is easy to understand, I will not explain… This window is for to schedule job for the specified time. Click OK..OK…

Usefull view for checking email status:

SELECT *
FROM msdb.dbo.sysmail_event_log


That is all..
ORA-20446: The owner of the job is not registered

If you have the following error in EM:

ORA-20446: The owner of the job is not registered ORA-06512: at "SYSMAN.MGMT_JOBS", line 168 ORA-06512: at "SYSMAN.MGMT_JOBS", line 86 ORA-06512: at line 1

It is said to be a bug in  Oracle 11g .

To solve this, you should login as a sys user and run the following command:

execute MGMT_USER.MAKE_EM_USER('USERNAME');

ORA-28221: REPLACE not specified

Very interesting situation. This error occurs, when user’s profile has limit password_verify_function, at the same time user doesn’t have ALTER USER privilege and trying to run the following statement:

ALTER USER my_user IDENTIFIED BY my_password;

* If user doesn’t have that limit in profile, he/she can change its password by this way without any problem.

* If she/he has that limit, it should have ALTER USER privilege to change password by this way without any problem.


There is also another way, if you are not able to change password by the previous command, but you must know old password:

ALTER USER my_user IDENTIFIED BY my_password REPLACE my_old_password;

Just one more trick in Oracle, that you should know…

Recreate Undo Tablespace

–Identify undo tablespace name

SQL> SELECT NAME,VALUE
     FROM v$parameter WHERE name IN ('undo_management','undo_tablespace');

NAME             VALUE
--------------- ----------
undo_management  AUTO
undo_tablespace  UNDOTBS1

–Define how undo tablespace was created

SQL> SELECT dbms_metadata.get_ddl('TABLESPACE','UNDOTBS1')
 FROM dual;

CREATE UNDO TABLESPACE "UNDOTBS1" DATAFILE
 'C:\ORACLE\PRODUCT\10.2.0\ORADATA\ORCL\UNDOTBS01.DBF' SIZE 26214400
AUTOEXTEND ON NEXT 5242880 MAXSIZE 32767M
BLOCKSIZE 8192
EXTENT MANAGEMENT LOCAL AUTOALLOCATE
 ALTER DATABASE DATAFILE
'C:\ORACLE\PRODUCT\10.2.0\ORADATA\ORCL\UNDOTBS01.DBF' RESIZE 28377088

–Create another, substitute undo tablespace

SQL> CREATE UNDO TABLESPACE UNDOTBS2 DATAFILE
      'C:\ORACLE\PRODUCT\10.2.0\ORADATA\ORCL\UNDOTBS02.DBF' SIZE 26214400
     AUTOEXTEND ON NEXT 5242880 MAXSIZE 32767M;

–Change parameter undo_tablespace value to newly created tablespace name. (I have started my DB by spfile)

SQL> ALTER SYSTEM SET undo_tablespace = 'UNDOTBS2' SCOPE=spfile;

–Shutdown database

SQL> shutdown immediate;

–Start the database

SQL> startup;

–Take old undo tbs. into offline mode

SQL> ALTER TABLESPACE UNDOTBS1 OFFLINE;

–Drop undo tbs. including contents and datafiles

SQL> DROP TABLESPACE UNDOTBS1 INCLUDING CONTENTS AND DATAFILES;

Uninstall Oracle Manually

1.Uninstall all Oracle components using the Oracle Universal Installer (OUI).

2.Run regedit.exe and delete the HKEY_LOCAL_MACHINE/SOFTWARE/ORACLE. This contains registry entires for all Oracle products. Delete any references to Oracle services left behind in the following part of the registry:  HKEY_LOCAL_MACHINE/SYSTEM/CurrentControlSet/Services/Ora*   It should be obvious which ones relate to Oracle.

3.Reboot your machine.

4.Delete the “C:\Oracle” directory, or whatever directory is your ORACLE_BASE.

5.Delete the “C:\Program Files\Oracle” directory.

6.Empty the contents of your “c:\temp” directory.

7.Empty your recycle bin.

Install VirtualBox Guest Additions on Centos 5.5

1. Login as a root user:

su –

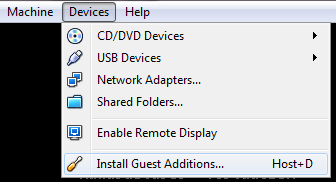
2. Go to the Devices->Install Guest Additions…

Install VirtualBox Guest Additions on Centos 5.5

3. Mount Guest Additions device:

mkdir /media/VGuestAdditions
mount -r /dev/cdrom /media/VGuestAdditions

4. Install the following packages:

yum install gcc
yum install kernel-devel
yum install kernel-headers

5. Install Guest Additions:

cd /media/VGuestAdditions
./VBoxLinuxAdditions.run

6. Restart the system:

reboot