Create Database Link in Another Schema

Creating database link has several restrictions. One of them is that you can’t create DB link in another schema, for example the following script is not correct:

create database link hr.remote_db_link
connect to k identified by k
using 'test'


If you run this then database link will be created with the name “hr.remote_db_link”  in your schema not in HR schema.

To solve this, there can be done the following:

–Create procedure from our user in HR which will execute database creation script

 create procedure hr."db_create_link_proc"
 is
 begin
      execute immediate  'create database link remote_db_link
                          connect to k identified by k
                          using ''test'' ';
 end;

–Execute that procedure from our schema

 begin
      hr."db_create_link_proc";
 end;

–Then you can drop this procedure from our schema

drop procedure hr."db_create_link_proc"

That is all.

Block Media Recovery

You can use Block Media Recovery to recover just corrupted blocks not entire datafile. It has several advantages:

1. It decreases Mean Time To Recover(MTTR). As I mentioned above, you need to recover just corrupted blocks and not all the blocks in datafile.

2. Affected datafile stays online. If you do not use Block Media Recovery you must take datafile offline, which means that affected datafile will be unavailable. During BMR just corrupted blocks are not available.

When you are recovering blocks you must know exact address of the block. Each block is recovered individually.

Also database must be in ARCHIVELOG mode and backup of the database must exist.

I have a table called TEST which is saved in TSTTBS tablespace. I have backuped database, then I’ve opened TSTTBS.DBF datafile by UltraEdit and spoiled block which
belongs to the TEST table. You do not need this steps Smile . I did it for to simulate block corruption.

SQL> select * from a;
select * from a
*
ERROR at line 1:
ORA-01578:ORACLE data block corrupted (file # 5, block # 11)
ORA-01110:data file 5:'C:\ORACLE\PRODUCT\10.2.0\ORADATA\TEST\TSTTBS.DBF'

Error shows that block number 12 is corrupted in datafile 5.

Connect target database by RMAN, and run the following:

RMAN> blockrecover datafile 5 block 11;

It should not take time like 00:00:00 or output shouldn’t be something unusual for example for the firs time I had the following output:

Starting blockrecover at 29-MAR-11
using channel ORA_DISK_1

starting media recovery
media recovery complete, elapsed time: 00:00:00

Finished blockrecover at 29-MAR-11

It was because I have had taken a bad backup. It may also happen when RMAN couldn’t find backup files or you have indicated wrong datafile number or block number.

The followings are restrictions and usage notes of BLOCKRECOVER:

  1. The target database must be mounted or open. You do not have to take a datafile offline if you are performing block media recovery on it.
  2. You can only perform complete media recovery of individual blocks. Point-in-time recovery of individual data blocks is not supported.
  3. You can only perform block media recovery on corrupt blocks.
  4. Blocks marked media corrupt are not accessible until recovery completes.
  5. You cannot perform block media recovery when using a backup control file.
  6. You cannot use proxy backups to perform block media recovery. If the only backups that you have are proxy backups, then you can restore them to a nondefault location on disk, which causes RMAN to view the restored files as datafile copies. You can then use the datafile copies for block media recovery.
  7. You must have a full backup of the file containing the corrupt blocks: block media recovery cannot use incremental backups.
  8. If RMAN fails to access a specific archived redo log file needed for block media recovery, it performs restore failover, trying all other backups listed in the RMAN repository that are suitable for use in this operation, and only fails if no suitable backup is available. See
  9. The datafile header block (block 1) cannot be recovered.
  10. You cannot perform block media recovery in NOARCHIVELOG mode.

Let’s check if corrupted block is recovered.

SQL> select * from a;
select * from a
*
ERROR at line 1:
ORA-01578: ORACLE data block corrupted (file # 5, block # 12)
ORA-01110:data file 5:'C:\ORACLE\PRODUCT\10.2.0\ORADATA\TEST\TSTTBS.DBF'

In our example after recovering block  #11 Oracle raised another error indicating that #12 block is corrupted(When multiple blocks are corrupted error is raised one by one). Let’s repeat above steps:

RMAN> blockrecover datafile 5 block 12;
SQL> select * from a;

VC
------------------
Testing Corruption

Configuring Flashback Database

Connect to your database as sysdba.

1.  Ensure that your database is in ARCHIVELOG mode.

SQL> select log_mode from v$database;

LOG_MODE
————————
NOARCHIVELOG

1.1 My database is not in ARCHIVELOG mode let’s enable it.

SQL> shutdown immediate;

SQL> startup mount;

SQL> alter database archivelog;

SQL> alter database open;

SQL> select log_mode from v$database;

LOG_MODE
——————-
ARCHIVELOG

2. Setting up flash recovery area.

SQL> show parameter db_recovery_file_dest;

NAME                                        TYPE             VALUE
————————————   ———–     ————-
db_recovery_file_dest           string
db_recovery_file_dest_size  big integer 0

First of all, db_recovery_file_dest_size parameter must be set.

SQL> alter system set db_recovery_file_dest_size=2G;

Then db_recovery_file_dest parameter.

SQL> alter system set db_recovery_file_dest=’D:\TEST\FLASHRECOVERY’;

3. Setting up retention period.

Because of flash recovery area is used in circular fashion, after some period of time(indicates db_flashback_retention_target,default is 1day) old data is overwritten. This parameter instructs Oracle to save flashback files for a certain minutes before overwriting.

SQL> alter system set db_flashback_retention_target=720;

In our case flashback data will be retained for 12 hours before overwriting.

4. Enable flashback logging.

SQL> shutdown immediate;

SQL> startup mount;

SQL> alter database flashback on;

At this time RVWR process will be started and flashback buffer will be allocated in SGA.

SQL> alter database open;

5. Check if flashbacking is enabled.

SQL> select flashback_on from v$database;

FLASHBACK_ON
———————–
YES

SQL Profile has higher priority than Hint!

Hints on SQL statement do not work???
You may have a syntax error, double check it. But if the syntax is OK, then this problem may be caused by the SQL profile, which doesn’t let hints to work.

Here, in this post I will explain the situation when there is applied SQL profile for some SQL statement and any attempt to use hints on that statement fails.

To solve this problem you should drop that SQL profile or disable it.

Note: This behavior has advantage. It assures that the SQL plan of the SQL statement will not be changed for future runs.

Let’s start…

–Create test table

create table test (n1 number
, n2 number );

–Insert some values

begin
for i in 1 .. 100000
loop
insert into test values(i,i+1);
commit;
end loop;
end;

–Create index

create index test_idx1 on test(n1);

–Analyze table

analyze table test estimate statistics;

–Run the following SQL statement

select /*+ no_index(test test_idx1) */ *
from test where n1=2;

–Calculate explain plan

explain plan for select /*+ no_index(test test_idx1) */ *
from test where n1=2;

select * from table(dbms_xplan.display);

–Output

————————————————————————-
| Id  | Operation         | Name | Rows  | Bytes | Cost (%CPU)| Time     |
————————————————————————–
|   0 | SELECT STATEMENT  |      |     1 |     8 |    49   (5)| 00:00:01 |
|*  1 |  TABLE ACCESS FULL| TEST |     1 |     8 |    49   (5)| 00:00:01 |
————————————————————————–

–Create SQL tuning task

declare
my_task_name varchar2(30);
my_sqltext   clob;
begin
my_sqltext := ‘select /*+ no_index(test test_idx1) */ * from test where n1=2’;

my_task_name := dbms_sqltune.create_tuning_task(
sql_text    => my_sqltext,
scope       => ‘comprehensive’,
time_limit  => 60,
task_name   => ‘my_sql_tuning_task’);
end;

–Execute SQL tuning task

begin
dbms_sqltune.execute_tuning_task( task_name => ‘my_sql_tuning_task’);
end;

–Generate report

select dbms_sqltune.report_tuning_task( ‘my_sql_tuning_task’)
from dual;

–Output

Recommendation (estimated benefit: 95.87%)
——————————————
– Consider accepting the recommended SQL profile.
execute dbms_sqltune.accept_sql_profile(task_name =>
‘my_sql_tuning_task’, replace => TRUE);

—————————————————————————————–
| Id  | Operation                   | Name      | Rows  | Bytes | Cost (%CPU)| Time     |
—————————————————————————————–
|   0 | SELECT STATEMENT            |           |     1 |     8 |     2   (0)| 00:00:01 |
|   1 |  TABLE ACCESS BY INDEX ROWID| TEST      |     1 |     8 |     2   (0)| 00:00:01 |
|*  2 |   INDEX RANGE SCAN          | TEST_IDX1 |     1 |       |     1   (0)| 00:00:01 |
—————————————————————————————–

–Accept SQL profile

begin
dbms_sqltune.accept_sql_profile(task_name =>’my_sql_tuning_task’
,replace => true
,name => ‘my_profile_name’);
end;

–Calculate explain plan again

explain plan for select /*+ no_index(test test_idx1) */ *
from test where n1=2;

select * from table(dbms_xplan.display);

–Output

—————————————————————————————–
| Id  | Operation                   | Name      | Rows  | Bytes | Cost (%CPU)| Time     |
—————————————————————————————–
|   0 | SELECT STATEMENT            |           |     1 |     8 |     2   (0)| 00:00:01 |
|   1 |  TABLE ACCESS BY INDEX ROWID| TEST      |     1 |     8 |     2   (0)| 00:00:01 |
|*  2 |   INDEX RANGE SCAN          | TEST_IDX1 |     1 |       |     1   (0)| 00:00:01 |
—————————————————————————————–

Note: We have indicated not to use index(/*+ NO_INDEX(TEST TEST_IDX1) */ ), but as explain plan shows, Oracle still uses this index.

If we drop sql profile hint will work. Let’s check it:

begin
dbms_sqltune.drop_sql_profile(name => ‘my_profile_name’);
end;

–Calculate explain plan

explain plan for select /*+ no_index(test test_idx1) */ *
from test where n1=2;

select * from table(dbms_xplan.display);

–Output

————————————————————————–
| Id  | Operation         | Name | Rows  | Bytes | Cost (%CPU)| Time     |
————————————————————————–
|   0 | SELECT STATEMENT  |      |     1 |     8 |    49   (5)| 00:00:01 |
|*  1 |  TABLE ACCESS FULL| TEST |     1 |     8 |    49   (5)| 00:00:01 |
————————————————————————–

So SQL profile has higher priority than hints!!!<- Important

Digital Image Processing using Matlab

Here, in this post I will write a code which will find the area in the picture where the sentence “Digital Image Processing” is written and outlines it.

So the result should be the picture where the sentence “Digital Image Processing” is highlighted.


%Reading image
I = imread(‘img1.jpg’);

%Show the original image
figure; imshow(I); title(‘Original Image’);

% Add some text on the right side of the picture, if you want to place this code in one
%line, remove dots.

text(size(I,2),size(I,1)+15,‘Edited by Mariam Kupatadze’,…
‘FontSize’,…
7,…
‘HorizontalAlignment’,…
‘right’);

Digital_Image_Processing_Original_Image

%Detect edges using sobel method
Isobel = edge(I,‘sobel’);

%Show image
figure; imshow(Isobel); title(‘Edge Detected Image’);

text(size(I,2),size(I,1)+15,‘Edited by Mariam Kupatadze’,…
‘FontSize’,…
7,…
‘HorizontalAlignment’,…
‘right’);

Digital_Image_Processing_Edge_Detected_Image

%Remove objects which are connected to the border
Inobord = imclearborder(Isobel);

%Show Image
figure; imshow(Inobord); title(‘Border Cleared Image 1’);

text(size(I,2),size(I,1)+15,‘Edited by Mariam Kupatadze’,…
‘FontSize’,…
7,…
‘HorizontalAlignment’,…
‘right’);

Digital_Image_Processing_Bordered_Cleared_Image_1

%Creates a disk-shaped structuring element by radius=15
StructEl1 = strel(‘disk’,15);

%Creates a linear structuring elements
StructEl2 = strel(‘line’, 3, 90);
StructEl3 = strel(‘line’, 3, 0);

%Remove the linear gaps from the picture
Idil = imdilate(Inobord, [StructEl2 StructEl3]);

%Because of, there left extra objects, I will dilate it by disk-shaped structuring element for to %make them connect to the border.
Idil = imdilate(Idil, StructEl1);

%Show image
figure; imshow(Idil); title(‘Dilated Image’);

text(size(I,2),size(I,1)+15,‘Edited by Mariam Kupatadze’,…
‘FontSize’,…
7,…
‘HorizontalAlignment’,…
‘right’);

Digital_Image_Processing_Dilated_Image

%Again remove objects which are connected to the border
Inobord1 = imclearborder(Idil);

%Show image
figure; imshow(Inobord1); title(‘Border Cleared Image 2’);

text(size(I,2),size(I,1)+15,‘Edited by Mariam Kupatadze’,…
‘FontSize’,…
7,…
‘HorizontalAlignment’,…
‘right’);

Digital_Image_Processing_Border_Cleared_Image_2

%Fill existing holes in the picture
Ifilled = imfill(Inobord1, ‘holes’);

%Show image
figure; imshow(Ifilled); title(‘Holes Filled Image’);

text(size(I,2),size(I,1)+15,‘Edited by Mariam Kupatadze’,…
‘FontSize’,…
7,…
‘HorizontalAlignment’,…
‘right’);

Digital_Image_Processing_Holes_Filled_Image

%Find perimeter of “Ifilled” image, with default connectivity 4
Ioutlined = bwperim(Ifilled);%The same as bwperim(Ifilled,4);
IOut = I;

%Highlight the desired area
IOut(Ioutlined) = 255;

%Show image
figure; imshow(IOut); title(‘Sentence Highlighted Image’);

text(size(I,2),size(I,1)+15,‘Edited by Mariam Kupatadze’,…
‘FontSize’,…7,…
‘HorizontalAlignment’,…
‘right’);

Digital_Image_Processing_Sentence_Highlighted_Image

Install New Unicode Character Set in Oracle(Locale Builder)

Locale Builder is an utility to view, modify, or define locale-specific data. As well as to create your own formats for language, territory, character set, and linguistic sort.

I will show you how to create .nlb(binary file) from .nlt(text file).

First of all, let’s discuss what NLT file is.

NLT file content is in xml format which can be created by Oracle Locale Builder(located in %ORACLE_HOME%\nls\builders\lbuilder.bat.)

1. Run lbuilder.bat

Choose File->New->Character Set.

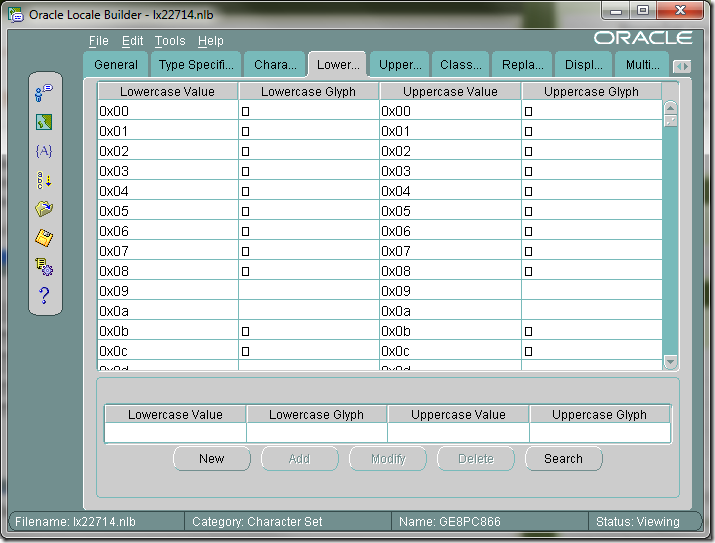
As you can see every field is free, for better understanding let me open already created character set

Oracle_Locale_Builder_General


Oracle_Locale_Builder_Type_Specific


Oracle_Locale_Builder_Character_Data_Mapping

Oracle_Locale_Builder_LowerToUppercase_Mapping

Oracle_Locale_Builder_UpperToLowercase_Mapping

Oracle_Locale_Builder_Character_Classification

Oracle_Locale_Builder_Replacement_Characters

Oracle_Locale_Builder_Display_Width

Oracle_Locale_Builder_Multibyte_Equivalent

And the last one shows the NLT file content.

Oracle_Locale_Builder_Preview_NLT

As you can see content is in XML format.

As I said previously NLT file is a text file, but Oracle needs NLB, binary file. Oracle Locale Builder gives the ability to create NLB file from NLT file. Let’s do it.

I consider the situation when we already have NLT file.

2. Run Locale Builder.

Click Generate NLB icon.

Oracle_Locale_Builder_Generate_NLB

Choose the path where your NLT files are.

Be careful, after browsing the folder path I’ve noticed that something wrong is in the path:

Oracle_Locale_Builder_Generate_NLB_BrowsePath

There, nltfiles folder name is displayed twice. Let’s see what happens if we click OK.

Oracle_Locale_Builder_NLB_Generation_Error

So I decided to delete second nltfiles and click OK.

Note: If you highlight folder where NLT files are, so do not enter inside, and click Open during browsing, everything will be OK.

Oracle_Locale_Builder_Generate_NLB_BrowsePath2

Oracle_Locale_Builder_NLB_Generation_Success

NLB files are located in the same directory where NLT files are so for me it is D:\Install\Gbank\nltfiles.

Just a little advice: Save old lx0boot.nlb and lx1boot.nlb files and then replace them by new one, for to avoid any incompatibility .

Copy all of them and paste into %ORACLE_HOME%\nls\data.

New unicode character set is already installed.To use it, do the following:

1. Start->Run->regedit->HKEY_LOCAL_MACHINE\SOFTWARE\ORACLE\KEY_…-> find and modify NLS_LANG value to AMERICAN_AMERICA.newCharacterSetName(this name can be  found in .nlt file in a  <name> tag for me it is GE8PC866)

2.Open PL/SQL Developer->choose Tools->Preferences…->Fonts->Select-> and then choose Font:.

Retrieve Web-Page Content as XML format in Oracle

In Oracle, there exists a package UTL_HTTP, by which you can make HTTP requests directly from database.
You can use this package if you want to read a webpage.

I will write a simple script, which will send a request to google site and retrieve its content.

declare
v_content  long;
v_url           varchar2(40):=’www.google.com’;
begin
v_content := utl_http.request(v_url);

dbms_output.put_line( v_content );
end;

Note that this code works well if page size is not more than 2GB(Because LONG type saves maximum 2GB).

For larger pages we should use REQUEST_PIECES. By this method you are not limited to 2GB, but  you can indicate maximum bytes by yourself. I will use maximum 100000 bytes.

declare
v_content   utl_http.html_pieces;
v_url            varchar2(25):=’www.google.com’;
begin
v_content := utl_http.request_pieces( v_url,100000);

for i in 1 .. v_content .count
loop
dbms_output.put_line( v_content (i) );
–exit when ( i = 2 );
end loop;
end;

This script will return all content from the web-page. If you want to retrieve just several lines from there, uncomment “exit when ( i = 2 );” and write desired number of lines instead of 2.

Note that the page is returned as an array not as a single variable.

That is all.

LOB datatypes in Oracle

LOBs support storing large, unstructured objects such as audio, video, picture, text, etc.

Before the LOB, there was LONG and LONG RAW datatypes which also were storing large objects. Oracle still supports it, but strongly recommends using LOBs instead of them. LONG and LONG raw have many restrictions and have less opportunity than LOBs. So let’s discuss their differences:

  1. Table can store multiple LOBs, while you are restricted to use only one LONG column per table.
  2. A LOB can store maximum 4GB in Oracle 8, 8TB in Oracle 9i/10g, 128TB in Oracle 11g. While LONG column can store maximum 2GB.
  3. Table containing LOBs can be partitioned, while table with LONG column cannot be partitioned.
  4. When you are using LOBs you are able to access its data randomly, while you must sequentially read LONG type data from beginning to end.
  5. LOBs can be used in user defined data types (except NCLOB), while LONG cannot be used.

LOB datatypes can be stored inline (within a table) or out-of line (within a tablespace, using a LOB locator) or as an external file (BFILE).

BLOB

BLOBs are binary objects, used to store binary, raw data. BLOBs participate into transaction and can be rolled back or committed.

CLOB

CLOBs are character LOBs. Used to store single byte character set (large texts, xml…). They also participate into transactions.

NCLOB

NCLOBs are used to store multi-byte character data, which corresponds to the national character set defined into the database. They also are participating into transactions.

Three of them are types of Internal LOBs; there also exists external LOB called BFILE. It is the single type, which is external.

BFILE

BFILE is short for Binary File, which is stored outside the database. It is stored into the Operating System as a file. It doesn’t participate into transactions. The amount of file is also limited by OS. BFILEs are read only. They only support random reads, means not sequential read. The changes to the BFILEs can be done through OS.


Moving Tables with LOB columns to a diff. tablespace

In the previous post I discussed how to move table and its indexes to a different tablespace, and I also mentioned that moving tables with LOB columns to a different tablespace is performed by the different way. So here it is how to do this.

First of all, let’s create a test table with LOB column.

CREATE TABLE TST_TABLE(
COL_ID          NUMBER CONSTRAINT TEST_PK PRIMARY KEY,
COL_CLOB   CLOB
);

–Insert one row into this table

INSERT INTO TST_TABLE
VALUES(1,’FIRST ROW’);
COMMIT;

–Query it

SELECT * FROM TST_TABLE

–Result

COL_ID   | COL_CLOB
——————————-
1              | <CLOB>

Now let’s check table’s current tablespace.

SELECT TABLE_NAME
,TABLESPACE_NAME
FROM DBA_TABLES
WHERE TABLE_NAME=’TST_TABLE’

–Result

TABLE_NAME  | TABLESPACE_NAME
—————————————————
TST_TABLE     | SYSTEM


Assume that we have already created a test tablespace, let’s say it is called TST_TBS.

–Move table to TST_TBS tablespace

ALTER TABLE TST_TABLE MOVE TABLESPACE TST_TBS

–Let’s check the result

SELECT TABLE_NAME
,TABLESPACE_NAME
FROM DBA_TABLES
WHERE TABLE_NAME=’TST_TABLE’

–Result

TABLE_NAME  | TABLESPACE_NAME
————————————————–
TST_TABLE     | TST_TBS

When you create a table with LOB column, oracle automatically creates LOB segment and LOB index. If you do not indicate their(LOB segment and LOB index) names and where they  should be kept, oracle names them itself and creates in the same tablespace as the table is.

By default, segment name starts with SYS_LOB… and index name starts with SYS_IL…

Let’s check what indexes are already created for our table.

SELECT INDEX_NAME                 AS INDX_NM
,INDEX_TYPE                 AS  INDX_TP
,TABLESPACE_NAME   AS TBS_NM
,STATUS
FROM DBA_INDEXES
WHERE TABLE_NAME=’TST_TABLE’

–Result

INDX_NM                                      | INDX_TP | TBS_NM | STATUS
—————————————————————————————–
SYS_IL0000055912C00002$$| LOB         | SYSTEM  | VALID
TEST_PK                                      | NORMAL | SYSTEM  | UNUSABLE

Or you can query the following to identify segment name and index name.

SELECT COLUMN_NAME           AS CLN_NM
,SEGMENT_NAME        AS SEGMENT
,TABLESPACE_NAME  AS TBS_NM
,INDEX_NAME                AS INDX_NM
FROM USER_LOBS
WHERE TABLE_NAME=’TST_TABLE’

–Result

CLN_NM     |SEGMENT                                         | TBS_NM | INDX_NM
———————————————————————————————————————-
COL_CLOB|SYS_LOB0000055912C00002$$| SYSTEM |SYS_IL0000055912C00002$$

Because of, by default LOB column is stored outside of the table it is still located in the SYSTEM tablespace(was not moved).

In order to move LOB column to a different tablespace, you should run the following command.

ALTER TABLE TST_TABLE MOVE LOB(COL_CLOB)
STORE AS (TABLESPACE TST_TBS);

–Check it

SELECT COLUMN_NAME         AS CLN_NM
,SEGMENT_NAME       AS SEGMENT
,TABLESPACE_NAME AS TBS_NM
,INDEX_NAME               AS INDX_NM
FROM USER_LOBS
WHERE TABLE_NAME=’TST_TABLE’

–Result

CLN_NM     |SEGMENT                                         |TBS_NM  | INDX_NM
———————————————————————————————————————–
COL_CLOB|SYS_LOB0000055912C00002$$|TST_TBS |SYS_IL0000055912C00002$$

Let’s query the following:

SELECT INDEX_NAME               AS INDX_NM
,INDEX_TYPE                AS INDX_TP
,TABLESPACE_NAME AS TBS_NM
,STATUS
FROM DBA_INDEXES
WHERE TABLE_NAME=’TST_TABLE’

–Result

INDX_NM                                       | INDX_TP | TBS_NM | STATUS
——————————————————————————————
SYS_IL0000055912C00002$$ | LOB         | TST_TBS |  VALID
TEST_PK                                       | NORMAL | SYSTEM  | UNUSABLE

As you can see, LOB index was automatically moved to the new tablespace, but normal index still is in the same tablespace. To move it to a different tablespace, run the following:

ALTER INDEX TEST_PK REBUILD TABLESPACE TST_TBS

–Check it

SELECT INDEX_NAME               AS INDX_NM
,INDEX_TYPE                AS INDX_TP
,TABLESPACE_NAME AS TBS_NM
,STATUS
FROM DBA_INDEXES
WHERE TABLE_NAME=’TST_TABLE’

–Result

INDX_NM                                       | INDX_TP | TBS_NM | STATUS
——————————————————————————————
SYS_IL0000055912C00002$$ | LOB         | TST_TBS |  VALID
TEST_PK                                       | NORMAL | TST_TBS |  VALID


After rebuilding an index, it became valid. As I also said in the previous post , if at least one index of the table is not valid DML operations will fail.

Moving tables and indexes to a different tablespace

Moving table to a different tablespace can be done by several ways:

  1. Using Export/Import.
  2. Or by the following clause:

ALTER TABLE schemaName.tableName REBUILD TABLESPACE tablespaceName;

I will discuss the second variant now.

–Let’s create a test table.

CREATE TABLE TESTTABLE(
TESTCOLUMN NUMBER CONSTRAINT TEST_PK PRIMARY KEY
);

–Insert one row into that table

INSERT INTO TESTTABLE
VALUES(1);
COMMIT;

–Let’s see rowid value

SELECT ROWID,TESTCOLUMN
FROM TESTTABLE;

–Result

ROWID                                | TESTCOLUMN
——————————————————–
AAANoRAABAAAPVSAAA  | 1

Before you move table to a different tablespace, you must have created  this tablespace before.

–Now let’s create a test tablespace.

CREATE TABLESPACE testTablespace
DATAFILE   ‘C:\ORACLE\PRODUCT\10.2.0\ORADATA\ORCL\testTablespace01.DBF’
SIZE 5242880
AUTOEXTEND ON NEXT 1310720 MAXSIZE 32767M
LOGGING ONLINE PERMANENT BLOCKSIZE 8192
EXTENT MANAGEMENT LOCAL AUTOALLOCATE
SEGMENT SPACE MANAGEMENT AUTO

–Let’s see table’s current tablespace

SELECT TABLE_NAME,TABLESPACE_NAME
FROM DBA_TABLES
WHERE TABLE_NAME=’TESTTABLE’;

–Result

TABLE_NAME  | TABLESPACE_NAME
—————————————————-
TESTTABLE     | SYSTEM

–Move this table to a test tablespace

ALTER TABLE TESTTABLE MOVE TABLESPACE TESTTABLESPACE;

–See again table’s current tablespace

SELECT TABLE_NAME,TABLESPACE_NAME
FROM DBA_TABLES
WHERE TABLE_NAME=’TESTTABLE’;

–Result

TABLE_NAME  | TABLESPACE_NAME
—————————————————-
TESTTABLE     | TESTTABLESPACE

–Let’s see again rowid value

SELECT ROWID,TESTCOLUMN
FROM TESTTABLE;

–Result

ROWID                                | TESTCOLUMN
——————————————————–
AAANoSAAHAAAAAMAAA | 1

As you can see rowid was changed. It makes indexes of this table unusable. To check it, run the following query.

SELECT INDEX_NAME,TABLE_NAME,STATUS,TABLESPACE_NAME
FROM DBA_INDEXES
WHERE TABLE_NAME=’TESTTABLE’;

–Result

INDEX_NAME | TABLE_NAME | STATUS       | TABLESPACE_NAME
—————————————————————————————–
TEST_PK         | TESTTABLE    | UNUSABLE | SYSTEM

Any DML operation on this table will cause an error, because an index is not valid. Let’s check it:

INSERT INTO TESTTABLE
VALUES(2);
COMMIT;

–Error

ORA-01502: index ‘SYS.TEST_PK’ or partition of such index is in unusable state

This happens because you have moved test table to another tablespace, and this operation changed rowid value. The index still refers to the old rowid value. To solve this, you must rebuild the index.

ALTER INDEX TEST_PK REBUILD TABLESPACE TESTTABLESPACE;

This command will rebuild the index and also moves it to TESTTABLESPACE tablespace. If you want to rebuild index without moving it to another tablespace. Simply, run the following command:

ALTER INDEX TEST_PK REBUILD;

–Let’s check its status

SELECT INDEX_NAME,TABLE_NAME,STATUS
FROM DBA_INDEXES
WHERE TABLE_NAME=’TESTTABLE’

–Result

INDEX_NAME | TABLE_NAME | STATUS  | TABLESPACE_NAME
—————————————————————————————
TEST_PK         | TESTTABLE    | VALID       | TESTTABLESPACE

You must do this action for each index, to make DML operation resumable on this table.

Note that, if table contains LOB columns this variant doesn’t work. Moving tables with LOB columns to another tablespace is discussed here.