Understanding sysobjects table in SQL Server

System tables and views are very useful objects that may be queried in many times by database background processes itself or by DBAs. These objects sometimes contain columns that are not so easy to understand what they are for. Here, in this post I will discuss  mostly used content of SYSOBJECT table.

Take into the consideration, that updating or deleting rows in these tables are not recommended. Background processes do it for you.

The most useful columns in SYSOBJECT table are name, id, xtype, uid, parent_obj, crdate.

As you can guess name column saves the name of the database object. Id column is the unique number for this object. xtype shows the type of this object, where:

  • AF = Aggregate function (CLR)
  • C = CHECK constraint
  • D = Default or DEFAULT constraint
  • F = FOREIGN KEY constraint
  • L = Log
  • FN = Scalar function
  • FS = Assembly (CLR) scalar-function
  • FT = Assembly (CLR) table-valued function
  • IF = In-lined table-function
  • IT = Internal table
  • P = Stored procedure
  • PC = Assembly (CLR) stored-procedure
  • PK = PRIMARY KEY constraint (type is K)
  • RF = Replication filter stored procedure
  • S = System table
  • SN = Synonym
  • SQ = Service queue
  • TA = Assembly (CLR) DML trigger
  • TF = Table function
  • TR = SQL DML Trigger
  • TT = Table type
  • U = User table
  • UQ = UNIQUE constraint (type is K)
  • V = View
  • X = Extended stored procedure

I’ve got this list from the internet,most of them are useful to know.

uid                – saves the user id, which is the owner of this object.
parent_obj – Id of the parent object. For example, for constraint parent_obj will be the ID
                        of the table, on which this constraint was defined.
crdate         -Object creation date.

There are several other tables, which shows the user objects:

–Shows the table columns owned by the current user.

select *
from information_schema.columns

–Shows the tables owned by the current user.

select *
from information_schema.tables

–Shows the list of all functions and procedures owned by the current user.

select *
from information_schema.routines

Real World Scenario

One day, the person came to me and asked if it was possible to find the table name when you just know the column name. I told him yes Smile and wrote the following simple query:

select a.name as columnName
           ,b.name as tablename
from SYSCOLUMNS as a,SYSOBJECTS as b
where a.ID=b.ID
and a.name=’column_name’

I hope this post was useful for you…

Compressing and Combining all .js Files

Most of the people are trying to: make their front-end in Web, port their applications from Desktop to Web, make Rich Internet Applications (RIA) … that’t why webification is a global process. Webifying has a lot of advantages but, of course, rises some problems. One of the problem is a huge amount of web content most of which are JavaScript files. If your application is big enough (>60 files or hundrends of files) then your bottleneck will be load of web site. So, let’s do the tool that minifies the size of JavaScript content. Since a developer is always limited in time and sometimes the time that is given is too small, let’s use existing tools to accomplish our goal.

I chose Closure Compiler. It removes comments, spaces, new lines; does obfuscation and finally size of compressed file is very small. It is very simple to install, the only thing is to run a single .jar file. Let’s download it, extract and get “compiler.jar”. Save this file in “/home/giorgi/jars/” directory (instead of “giorgi” use existing user):

mkdir /home/giorgi/jars
cp compiler.jar /home/giorgi/jars

We will use it in command line and sample command is (make sure that you are in /home/giorgi/jars directory or where you have saved “compiler.jar”):

java -jar compiler.jar --js myJs.js --js_output_file myJs_min.js

As you guess myJs.js is original file and myJs_min.js will be compressed file. We can give multiple .js files to compress and combine in a single file:

java -jar compiler.jar --js myJs.js --js anotherMyJs.js --js_output_file myJs_min.js

If your application is multilanguage then you have to give –charset UTF-8 as parameter.

Writing commands by hand is wasting time, in this case. So, to make Closure Compiler much more useful let’s make a sample script that will generate and execute commands for us. Typically it is needed to compress files under some special directory where are .js files of web application. So, our script must compress files under one directory. Let’t do it by Python. The script must look for .js files under directory and subdirectories, collect their names and then generate a command line. It will look like this:

#!/usr/bin/python
#The above line indicates that this file
#must be run by python interpreter
import os;
import re;
#regular expression that matches .js file
a = re.compile('^.*\.js$')
#initially command looks like this
compress_command = 'java -jar /home/giorgi/jars/compiler.jar'
#get full path of current working directory
#(under which are .js file of our application)
cwd_full = os.getcwd()
#extract the name of current directory
cwd = cwd_full[cwd_full.rindex('/') + 1:]
#in all subdirectories check all
#files if it is .js file then add to command
for root, dirs, files in os.walk('../' + cwd):
    for name in files:
        if a.match(name):
            compress_command += ' --js ' + root + '/' + name

#add output file and charset to command.
#output file will be: nameOfCurrentDirectory + "_min.js"
compress_command += ' --js_output_file ' + cwd + '_min.js --charset UTF-8'
os.system(compress_command) #execute generated command.
  • Let’s save this python script in file and name as “do_js_compression.py”
  • Make it runnable: chmod +x do_js_compression.py
  • Make it global, so that we can execute it from every directory. So copy it to “/bin” directory:
    cp do_js_compression.py /bin
  • Now we are able to run this script for all applications. For this we have to move to application direcotry and run this script:
    cd /home/giorgi/app
    do_js_compression.py

    And we will get the file “app_min.js” that is combined and compressed file of all .js files. And we solved our performance problem by one step…

How to Mount/Unmount Directory in Solaris

Let’s follow the steps.

1. Use format utility to define the disk on which you want to mount directory.

# format

Searching for disks…done

–I have disk named c0d0.
AVAILABLE DISK SELECTIONS:
0. c0d0 <DEFAULT cyl 2085 alt 2 hd 255 sec 63>
/pci@0,0/pci-ide@1,1/ide@0/cmdk@0,0

–Choose the disk number, in my case it is 0.
Specify disk (enter its number): 0

selecting c0d0
Controller working list found
[disk formatted, defect list found]
Warning: Current Disk has mounted partitions.
/dev/dsk/c0d0s0 is currently mounted on /. Please see umount(1M).
/dev/dsk/c0d0s1 is currently used by swap. Please see swap(1M).
/dev/dsk/c0d0s7 is currently mounted on /export/home. Please see umount(1M).

FORMAT MENU:
disk       – select a disk
type       – select (define) a disk type
partition  – select (define) a partition table
current    – describe the current disk
format     – format and analyze the disk
fdisk      – run the fdisk program
repair     – repair a defective sector
show       – translate a disk address
label      – write label to the disk
analyze    – surface analysis
defect     – defect list management
backup     – search for backup labels
verify     – read and display labels
save       – save new disk/partition definitions
volname    – set 8-character volume name
!<cmd>     – execute <cmd>, then return
quit

–Type p to define the partition table.
format> p

PARTITION MENU:
0      – change `0′ partition
1      – change `1′ partition
2      – change `2′ partition
3      – change `3′ partition
4      – change `4′ partition
5      – change `5′ partition
6      – change `6′ partition
7      – change `7′ partition
select – select a predefined table
modify – modify a predefined partition table
name   – name the current table
print  – display the current table
label  – write partition map and label to the disk
!<cmd> – execute <cmd>, then return
quit

Type p to display the current table.
partition>p

Current partition table (original):
Total disk cylinders available: 2085 + 2 (reserved cylinders)

Part      Tag    Flag     Cylinders        Size            Blocks
0       root            wm      70 – 921      6.53GB       (852/0/0)    13687380
1       swap         wu       3   – 69          525.56MB  (67/0/0)      1076355
2     backup        wm     0   – 2084     15.97GB     (2085/0/0)  33495525
3 unassigned   wm     0                    0                   (0/0/0)         0
4 unassigned   wm     0                    0                   (0/0/0)         0
5 unassigned   wm     0                    0                   (0/0/0)         0
6 unassigned   wm     0                    0                   (0/0/0)         0
7 unassigned   wm     0                    0                   (0/0/0)         0

partition>

–Let’s stop here and discuss this situation.

So as you can see, there are several directories that already use some cylinders, but just several of them are mounted. To see what directories or disk slices are mounted you should open /etc/vfstab file:

#device        device        mount        FS    fsck    mount    mount
#to mount    to fsck        point        type    pass    at boot    options
#
fd    –    /dev/fd    fd    –    no    –
/proc    –    /proc    proc    –    no    –
/dev/dsk/c0d0s1    –    –    swap    –    no    –
/dev/dsk/c0d0s0    /dev/rdsk/c0d0s0    /    ufs    1    no    –

/devices    –    /devices    devfs    –    no    –
sharefs    –    /etc/dfs/sharetab    sharefs    –    no    –
ctfs    –    /system/contract    ctfs    –    no    –
objfs    –    /system/object    objfs    –    no    –
swap    –    /tmp    tmpfs    –    yes    –

As you can see, 2 directories are already mounted.
These are:
root (/), mounted on the disk slice 0(c0d0s0),
swap , mounted on the disk slice 1(c0d0s1)

Note that, you should choose free cylinders.If you choose the cylinders that are already in use you may not get the desired result. For example, if we choose cylinders from 71 to 900, that are already in use by root directory, then mount some directory, for example u0, on this slice(which we have allocated on these cylinders). After entering in u0 directory, you will see the files that are located in root directory(So it will not be empty)

Not let’s continue…

–Let’s choose the second slice(It is not mouned)

partition> 2
Part      Tag    Flag     Cylinders        Size            Blocks
2     backup    wm       0 – 2084       15.97GB    (2085/0/0) 33495525

–Type the name for the partition, in our case usr
Enter partition id tag[backup]: usr

–Press enter, leave default
Enter partition permission flags[wm]:

–Type the starting cylinder number, in our case 922
Enter new starting cyl[3]: 922

–I choose 200mb as the partition size
Enter partition size[18683595b, 1163c, 2084e, 9122.85mb, 8.91gb]: 200mb

–To save the changes type label
partition>label

Ready to label disk, continue? y

–Press Ctrl+c to quite
partition> ^C

2. Let’s create the directory, that should be mounted, for example /u0

# cd /
# mkdir u0

3. Open /etc/vfstab file again, but now for editing and enter the following entry:

#device        device        mount        FS    fsck    mount    mount
#to mount    to fsck        point        type    pass    at boot    options
#
fd    –    /dev/fd    fd    –    no    –
/proc    –    /proc    proc    –    no    –
/dev/dsk/c0d0s1    –    –    swap    –    no    –
/dev/dsk/c0d0s0    /dev/rdsk/c0d0s0    /    ufs    1    no    –
/dev/dsk/c0d0s2    /dev/rdsk/c0d0s2    /u0    ufs    1    yes    –
/devices    –    /devices    devfs    –    no    –
sharefs    –    /etc/dfs/sharetab    sharefs    –    no    –
ctfs    –    /system/contract    ctfs    –    no    –
objfs    –    /system/object    objfs    –    no    –
swap    –    /tmp    tmpfs    –    yes    –

Highlighted entry indicates that /u0 directory is mounted on c0d0s2 disk slice. One more thing that you should note is that if you want to mount this directory at startup you should write yes below the “mount at boot” column(If it is not necessary write no instead of yes).

4. Mount directory

# mount /u0

If everything is OK it will show nothing, but if you get the following error:

mount: /dev/dsk/c0d0s2 is not this fstype

Which means that there is no file system on this slice, then let’s create it.

First of all, you should comment, or temporarily remove the following entry from /etc/vfstab

#device        device        mount        FS    fsck    mount    mount
#to mount    to fsck        point        type    pass    at boot    options
#
fd    –    /dev/fd    fd    –    no    –
/proc    –    /proc    proc    –    no    –
/dev/dsk/c0d0s1    –    –    swap    –    no    –
/dev/dsk/c0d0s0    /dev/rdsk/c0d0s0    /    ufs    1    no    –
#/dev/dsk/c0d0s2    /dev/rdsk/c0d0s2    /u0    ufs    1    yes    –
/devices    –    /devices    devfs    –    no    –
sharefs    –    /etc/dfs/sharetab    sharefs    –    no    –
ctfs    –    /system/contract    ctfs    –    no    –
objfs    –    /system/object    objfs    –    no    –
swap    –    /tmp    tmpfs    –    yes    –

Go to the console and run the following command:

newfs /dev/dsk/c0d0s2
newfs: construct a new file system /dev/rdsk/c0d0s2: (y/n)? y

Now uncomment previous entry from /etc/vfstab , and run the following

# mount /u0

To check that it is mounted, again use format utility

# format
Searching for disks…done

AVAILABLE DISK SELECTIONS:
0. c0d0 <DEFAULT cyl 2085 alt 2 hd 255 sec 63>
/pci@0,0/pci-ide@1,1/ide@0/cmdk@0,0
Specify disk (enter its number): 0
selecting c0d0
Controller working list found
[disk formatted, defect list found]
Warning: Current Disk has mounted partitions.
/dev/dsk/c0d0s0 is currently mounted on /. Please see umount(1M).
/dev/dsk/c0d0s1 is currently used by swap. Please see swap(1M).
/dev/dsk/c0d0s2 is currently mounted on /u0. Please see umount(1M).

The highlighted entry shows that /u0 is already mounted on c0d0s2 disk slice.

To unmount directory

# umount /u0

Oracle 10g RAC Single Node Installation on Solaris 10

1. Pre-Installation Tasks

Create oracle user and appropriate groups

First of all, you should have already mounted /u0 on some slice of disk. If you don’t know how to mount directory on disk Smile click here.

Go to the folder /u0 and create the following directories.

cd /u0 mkdir –p app/oracle

Create oinstall and dba groups.

groupadd oinstall groupadd dba

Create oracle user and assign it oinstall and dba groups.

useradd –s /bin/ksh –d /u0/app/oracle –g oinstall –G dba oracle

Where,
-s option  specifies the user default  shell (i.e. Korn shell) ,
-d option specifies the home directory for oracle user (i.e.  /opt/app/oracle ) ,
-g option specifies the primary group (i.e. oinstall)
-G option specifies the secondary  group (i.e. dba)

Make oracle user as the owner of app folder.

chown –R oracle:oinstall app

Change the password for oracle user.

passwd oracle

Configuring SSH

Create RSA and DSA keys on each node.

Log in as the oracle user and go to the ORACLE_BASE directory(For me oracle_base directory is /u0/app/oracle).

mkdir .ssh

Generating RSA and DSA keys.

/usr/bin/ssh-keygen -t rsa /usr/bin/ssh-keygen -t dsa

Add keys to an authorized key file, this file should exist in .ssh directory. If it doesn’t exist, create it. Change your direction to .ssh directory and run the following.

ssh charly1 cat /u0/app/oracle/.ssh/id_rsa.pub >> authorized_keys ssh charly1 cat /u0/app/oracle/.ssh/id_dsa.pub >> authorized_keys

Enabling ssh user equivalency.

/usr/bin/ssh-agent $SHELL /usr/bin/ssh-add

To prevent Oracle clusterware installation errors caused by stty commands, add the following text in oracle user’s profile (you should change your directory to oracle home directory and open “.profile” for editing).

if [ -t 0 ]; then stty intr ^C fi

Network Requirements

We should create second IP interface.
Open or create the file /etc/hostname.e100g1 and enter the following text:

Host1-priv

Add the following entries into /etc/host file:

20.0.0.100           Host1 loghost 192.168.2.117   Host1-priv 20.0.0.105          Host1-vip

Where 192.168.2.117 is a private IP address and 20.0.0.105 is a virtual IP address of the server.

Connect as a root user and create /etc /hosts.equiv file. Then open this file for editing and enter the following text:

Host1 oracle

Configuring Kernel Parameters

To add the system parameters open /etc/system file and add the following entries:

set shmsys:shminfo_shmmax = 4294967295 set shmsys:shminfo_shmmin = 1 set shmsys:shminfo_shmmni = 100 set shmsys:shminfo_shmseg = 10 set semsys:seminfo_semmni = 100 set semsys:seminfo_semmns = 1024 set semsys:seminfo_semmsl = 256 set md:mirrored_root_flag=1 set noexec_user_stack=1

Identifying Required Software Directories

Creating an Oracle Base Directory

mkdir -p /u0/app/oracle chown -R oracle:oinstall /u0/app/oracle chmod -R 775 /u0/app/oracle

Creating the Oracle Clusterware Home Directory

mkdir -p /u0/app/oracle/product/10.2.0/crs chown -R root:oinstall /u0/app/oracle/product/10.2.0/crs chmod -R 775 /u0/app/oracle/product/10.2.0/crs

2. Installing Oracle Clusterware

First of all, you should download Oracle Clusterware from the oracle site.

Verifying Oracle Clusterware Requirements with CVU

Extract downloaded file and run runcluvfy.sh file, which should be located in clusterware/cluvfy folder.

./runcluvfy.sh comp nodecon -n Host1 –verbose

Installing Oracle Clusterware with OUI

Initialize the devices that you want to use for the Oracle Cluster Registry (OCR) and Voting Disk(VD)

1.Voting file– uses by the cluster synchronization service deamons for monitoring information across the cluster. It’s size around 20MB(use format utility and reserve 200MB on 5th slice)

2. Oracle cluster registry(OCR file) it maintain information about the high-availability components such as cluster node list, CRS application profiles(Virtual interconnect protocol address, services). It’s size around 200MB(use format utility and reserve on 7th slice)

For voting disk

dd if=/dev/zero of=/dev/rdsk/c5t200g35A100TK170Ta00ds5 bs=125829120 count=1 chown oracle:dba /dev/rdsk/c5t200g35A100TK170Ta00ds5
chmod 660 /dev/rdsk/c5t200g35A100TK170Ta00ds5

For OCR

dd if=/dev/zero of=/dev/rdsk/c5t200g35A100TK170Ta00ds7 bs=125829120 count=1 chown root:dba /dev/rdsk/c5t200g35A100TK170Ta00ds7
chmod 660 /dev/rdsk/c5t200g35A100TK170Ta00ds7

Connect as the oracle user and run runInstaller.sh, located in CRS installation.

./runInstaller

Specify Inventory Directory and Credentials

Specify Home Details

Product-Specific Prerequisite Checks

Specify Cluster Configuration

Specify Network Interface Usage

Specify OCR Location

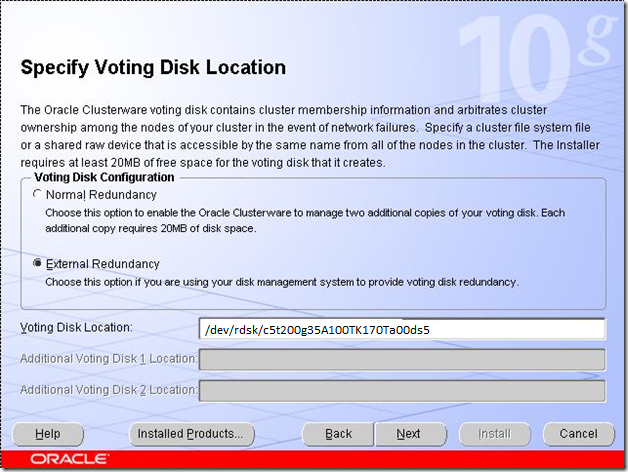
Specify Voting Disk Location

OrainstRoot.sh and root.sh

Run these scripts and then click OK.

OUI-25031

Now we should run ./vipca and configure Host1-vip virtual ip address(20.0.0.105).

Go to the installation window, click ok and retry install failed component.


Installing Oracle database files


Welcome_Oracle_OUI

Select Installation Type

Specify Home Details

Specify Hardware Cluster Installation Node

Product-Specific Prerequisite Ckecks

Select Configuration Option

OUI_Install

Run root.sh script and click OK, then click Exit button.

Configure oracle listener by netca.

Configuring ASM

DBCA Oracle RAC

Configure ASM

ASM diskgroups

ASM Instance

{ORACLE_HOME}/dbs/spfile+ASM error

DBCA will create and start ASM

No diskgroups

Run the following command, for to make oracle user owner for the following disk slice

chown oracle:oinstall /dev/rdsk/c5156D778A145a11d0s6

DG_DATA Disk group Name

Choose Disk group

Perform Another Operation Alert

Creating database using DBCA


DBCA RAC Database

DBCA Create a Database

Choose Node

DBCA general purpose

Global Database Name

Click Next>> and check/uncheck Configure the Database with Enterprise Manager.

Specific Passwords for accounts

ASM

SYS password for ASM Alert

Choose Disk Group

Use OMF

Enable Archiving

Sample Schemas

DBCA Memory tab

DBCA General tab

DBCA Create Database

Enabling/disabling MPxIO(multipathing) for Solaris 10

In this post, there is  discussed the steps how to enable or disable multipathing for Sun Solaris with HP storage systems.

Solaris MPxIO enables the storage device to be accessed by multiple host controller interfaces from a single OS interface. If one of the I/O controller fails MPxIO architecture automatically switches to another available one.

1. The file to enable or disable multipathing in Solaris 10 is /kernel/drv/ scsi_vhci.conf.

The following entry in this file, means that mpxio is enabled.

mpxio-disable="no";

If you want to disable it, write “yes” instead of “no”.

mpxio-disable="yes";

2. Enter the devfsadm command to build the appropriate device files.

#devfsadm –C

3. Run the following command.

# stmsboot –e

4. Reboot the system.

To check if everything is OK, use format utility or run the following command.

# stmsboot –L

It will show you non-STMS device names and its appropriate  STMS device names.

Installing Solaris 10 on VirtualBox(In Win7)

For test purposes you may need to install Solaris on virtual box. Here is very simple steps how to do this:

1. First of all, you should have installed VirtualBox. Or download it from here VirtualBox.

2. Then download VirtualBox Appliance Image Solaris 10 10/09 . For this you may need free registration.

Extract downloaded file. In an extracted folder you should see the file named Solaris_10_u8.ovf

Open VirtualBox, from the menu bar choose File->Import Appliance(Or simply click Ctrl+I), click Choose button and select Solaris_10_u8.ovf file, click Next and you will see the following picture:

Appliance_Import_Wizard_Settings

Click Finish and wait for a while.

If importing fails by the following error (or similar):

Virtual Box Error

It means that you may have a corrupted Solaris_10_u8.ovf  file. Delete existing file and  redownload it, or retry to extract.

If everything is OK, you should see the following picture:

Oracle_VM_Virtual_Manager


 Solaris 10 Installation


Solaris_10installation_on_VirtualBox_keyboard_layout

Click Esc-2 to continue or F2 it depends.

Type the network interface name, or leave the default(press Enter).

Solaris_10installation_on_VirtualBox_Network_Connectivity

Click F2.

Solaris_10installation_on_VirtualBox_DHCP_for

Click F2.

Type the name of the host, in our example hostname is host1.

Solaris_10installation_on_VirtualBox_Hostname_for

Click F2.

Type the IP of the server.

Solaris_10installation_on_VirtualBox_IP_Address

Click F2.

My system is part of a subnet, that’s why I am indicating option YES.

Solaris_10installation_on_VirtualBox_Subnet

Click F2.

Type the netmask.

Solaris_10installation_on_VirtualBox_Netmask

Click F2.

Solaris_10installation_on_VirtualBox_IPv6

Click F2.

Choose Specify One  to type  IP address of the default route yourself.

Solaris_10installation_on_VirtualBox_Default_Route

Click F2.

Type the IP address of the default route.

Solaris_10installation_on_VirtualBox_Default_Route_IP

Click F2.

Confirm the information, if it is correct and click F2.

Solaris_10installation_on_VirtualBox_Confirm_Information

Solaris_10installation_on_VirtualBox_Security_Policy

Click F2, Confirm the following information and click F2.

Choose the name service, I am choosing None.

Solaris_10installation_on_VirtualBox_Name_Service

Click F2, Confirm the following information and click F2.

Solaris_10installation_on_VirtualBox_NFSv4_Domain_Name

Click F2, Confirm the following information and click F2.

Choose your time zone, I am choosing Asia:

Solaris_10installation_on_VirtualBox_Time_Zone

Click F2 and choose your country or region, I am choosing Georgia.

Solaris_10installation_on_VirtualBox_Country_Region

Click F2, Confirm the following informations and click again F2.

Type the password of the server.

Solaris_10installation_on_VirtualBox_Root_Password

Click F2. It will reboot itself.

After a reboot, type root as a login name and its password(which we have set before).

That’s is all. I hope it was helpful for you, or partially helpful.

Fine-Grained Auditing

As I discussed in “Oracle Database Auditing” post oracle auditing is a very powerful utility. Using this option you are able to identify users’ activities, object access and so on..

As we know there exist four types of auditing: statement, object, privilege and fine-grained auditing. I will discuss fine-grained auditing, because previous three options are clarified in “Oracle Database Auditing” post. FGA can be defined only for table and optionally on column.

Fine-grained auditing uses PL/SQL package DBMS_FGA, which has the following methods: creating , dropping, enabling and disabling policies. We will identify which policies are created in the database and also see the audit logs.

Creating FGA Policy

DBMS_FGA.ADD_POLICY method is used for creating FGA policy. Which has the following parameters:

[object_schema] -Username, which owns the object that should be audited.Default is NULL, means current schema.

object_name -Name of the object that should be audited.

policy_name -Unique name for the policy.

[audit_condition] -If the condition, indicated here, evaluates to true or null(both of them are default) audit entry will be created. Note that this condition cannot directly use the following functions: USERENV, USER, SYSDATE, UID. It cannot use sequences or subqueries. Also it can not reference LEVEL, PRIOR, or ROWNUM pseudocolumns.

[audit_column] -List of columns, delimited by comma, on which audit option will be identified. The default value is NULL, means that any column.

[handler_schema] -Username, which owns event handler procedure. The default value is NULL, means current schema.

[handler_module] -The procedure name, which handles the event. The default is NULL, means not to use event handler procedure.If the procedure is in package, then you should indicate the whole name, for example, DBMSOBJG.GET_TAB_SPACE.

[enable] -Values are true or false. Indicates if this policy should be enabled or disabled. The default is TRUE.

[statement_types]-Values are SELECT, INSERT, UPDATE, and DELETE(comma delimited list). Indicates which DML statement should be audited.The default is SELECT.

[audit_trail] -Value DBMS_FGA.DB_EXTENDED(default) indicates that  database should record sql text and bind variables also. Other available value is and DBMS_FGA.DB indicates that db should not save sql text and bind variables.

[audit_column_ops]– Value DBMS_FGA.ALL_COLUMNS indicates that all columns listed in AUDIT_COLUMN parameter must be referenced in order to create audit record. Other value is DBMS_FGA.ANY_COLUMNS(default) means that if any column will be referenced audit record will be created.

Note that parameters that are enclosed by ‘[‘ and ‘]’ are optional, others are mandatory.

For example:

–Assume we are connected as sys user.

BEGIN
    DBMS_FGA.ADD_POLICY(
        object_schema=>'HR'
        ,object_name=>'EMPLOYEES'
        ,policy_name=>'EMPTABLE_AUD'
        ,audit_column=>'SALARY, COMMISSION_PCT'
        ,enable=>FALSE
        ,statement_types=>'SELECT,DELETE,INSERT');
END;

Enabling FGA Policy

If the policy is already enabled, enabling it once more will not give you an error. DBMS_FGA.ENABLE_POLICY is a method which enables it.

For example:

BEGIN
   DBMS_FGA.ENABLE_POLICY(
        object_schema=>'HR'
        ,object_name=>'EMPLOYEES'
        ,policy_name=>'EMPTABLE_AUD');
END;

Disabling FGA Policy

DBMS_FGA.DISABLE_POLICY is a method for disabling policy.

For example:

BEGIN
   DBMS_FGA.DISABLE_POLICY(
        object_schema=>'HR'
        ,object_name=>'EMPLOYEES'
        ,policy_name=>'EMPTABLE_AUD');
END;

Dropping FGA Policy

DBMS_FGA.DROP_POLICY is a method for dropping policy.

For example:

BEGIN
   DBMS_FGA.DROP_POLICY(
        object_schema=>'HR'
        ,object_name=>'EMPLOYEES'
        ,policy_name=>'EMPTABLE_AUD');
END;

Identifying FGA Policies in the Database

DBA_AUDIT_POLICIES it a view which shows all FGA policies enabled in your database.

–Query this

SELECT object_schema||'.'||object_name as Audited_Object
       ,policy_column
       ,policy_name
       ,enabled
       ,audit_trail
FROM dba_audit_policies;

–Result

AUDITED_OBJECT | POLICY_COLUMN | ENABLED | AUDIT_TRAIL
-------------------------------------------------------
HR.EMPLOYEES   | SALARY        | YES     |DB+EXTENDED

Viewing FGA logs

DBA_FGA_AUDIT_TRAIL is a view which shows audited logs, that have been written to the database.

–Query this

SELECT db_user
       ,timestamp
       ,userhost
       ,sql_text
FROM dba_fga_audit_trail
WHERE policy_name='EMPTABLE_AUD'

–Result

DB_USER|TIMESTAMP            |USERHOST  |SQL_TEXT
-------------------------------------------------------------
SCOTT  |2/16/2011 10:05:16 AM|ADA0\SCOTT|select * from employees

Renaming Logfiles

Renaming logfiles in Oracle database requires several steps to be performed. If you want to move logfile to another destination or you just want to give it the meaningful name  you should do the logfile renaming.

Note that before renaming logfile, target online redo log should exist. Operating system file is not renamed just control file is updated and pointed to the new redo logfile.

First of all, let’s identify existing redo logfiles.

–Query this:

select member
from v$logfile

–My result

MEMBER
------------------------------------------------
C:\ORACLE\PRODUCT\10.2.0\ORADATA\ORCL\REDO04.LOG
C:\ORACLE\PRODUCT\10.2.0\ORADATA\ORCL\REDO02.LOG
C:\ORACLE\PRODUCT\10.2.0\ORADATA\ORCL\REDO01.LOG

You can’t directly rename it you should do the following steps:

1. Shutdown the database

SQL>shutdown immediate;

2. Copy/rename logfile to the new location by using OS command.

3. Mount the database.

SQL>startup mount;

4. Rename the logfile in the controlfile.

SQL>alter database rename
file 'C:\ORACLE\PRODUCT\10.2.0\ORADATA\ORCL\REDO04.LOG'
to 'C:\ORACLE\PRODUCT\10.2.0\ORADATA\ORCL\REDO03.LOG';

5. Open the database

SQL>alter database open;

6. It is recommended to backup the controlfile.

To check that logfile was given the desired name, do the following.

–Query this:

select member
from v$logfile

–My result

MEMBER
------------------------------------------------
C:\ORACLE\PRODUCT\10.2.0\ORADATA\ORCL\REDO03.LOG
C:\ORACLE\PRODUCT\10.2.0\ORADATA\ORCL\REDO02.LOG
C:\ORACLE\PRODUCT\10.2.0\ORADATA\ORCL\REDO01.LOG

Another way is to add lofile member by desired name and location, then drop the existing logfile member.

Adding a Member

alter database add logfile member
'C:\ORACLE\PRODUCT\10.2.0\ORADATA\ORCL\REDO03.LOG'
to ('C:\ORACLE\PRODUCT\10.2.0\ORADATA\ORCL\REDO04.LOG');

This script adds lofile member to the same redo log group and the size will be same as REDO04.LOG.

–To see the result

select group#
       ,member
from v$logfile

–Result

GROUP#|MEMBER
---------------------------------------------------------
3     | C:\ORACLE\PRODUCT\10.2.0\ORADATA\ORCL\REDO04.LOG
3     | C:\ORACLE\PRODUCT\10.2.0\ORADATA\ORCL\REDO03.LOG
2     | C:\ORACLE\PRODUCT\10.2.0\ORADATA\ORCL\REDO02.LOG
1     | C:\ORACLE\PRODUCT\10.2.0\ORADATA\ORCL\REDO01.LOG

Deleting a Member

Take into the consideration that you can only drop redo log members that are not in the current or active redo log group.

Current redo log group is the group in which redo data is being written right now.
Active redo log group is the group that are required for instance recovery.
The other one is inactive group, you can only drop member from inactive group.

You can switch between redo log groups and make redo log member inactive. Remember that log switching forces archiver to archive redo log group and also makes log group not current.

alter system switch logfile;

Note that this is the manual switch. In general switching between redo log groups happens in the following cases:

* When the redo log file is full.
* When the instance is shut down with normal, transactional, or immediate.
* When a tablespace is put into backup mode or is changed to read-only.

–To drop the member

alter database drop logfile member
'C:\ORACLE\PRODUCT\10.2.0\ORADATA\ORCL\REDO04.LOG';

Note that OS file is not removed you should manually delete it.

Identifying Unused Objects in Database

Sometimes in the database, there exist objects that have never been used. As you can guess they are junk objects and are waisting necessary space in the database. So we should identify them and remove from the DB. Oracle offers us some useful techniques to do this.

First of all, you should turn on monitoring process on that objects that are the most candidates of junk.

For example:

Assume that index sal_indx is considered to be the object, which has never been used. For to identify it, let’s turn on monitoring on that index.

–In your schema

alter index sal_indx monitoring usage;

–In other schema

alter index schemaName.sal_indx monitoring usage;

To check if it is monitored, query the following view

select index_name
       ,table_name
       ,monitoring as mon
       ,used
       ,start_monitoring
from v$object_usage;

–The Result

INDEX_NAME | TABLE_NAME | MON | USED | START_MONITORING
-----------------------------------------------------------
SAL_INDX   | SALARY     | YES | NO   | 02/13/2011 21:48:25

Note: the result shows that this index has not been used since we tuned on monitoring, but it still doesn’t mean that this object is junk. It depends on what is the maximum period of time in which this object should be used. For example, if you know that this object should be used minimum once in a day, let it to be monitored till tomorrow, then query again v$object_usage view and you will see if this object has been used since yesterday or not and identify its necessity.

For example, someone run the following query:

select *
from salary
where id=1;

Assume that index sal_indx is created on id column of salary table.

–Check again the v$object_usage view

select index_name
       ,table_name
       ,monitoring as mon
       ,used
       ,start_monitoring
from v$object_usage;

–The Result

INDEX_NAME | TABLE_NAME | MON | USED | START_MONITORING
-----------------------------------------------------------
SAL_INDX   | SALARY     | YES | YES  | 02/13/2011 21:48:25

From here you can identify that this index is necessary and should not be removed from database.

Turning Off Monitoring

–In your schema

alter index sal_indx nomonitoring usage;

–In other schema

alter index schemaName.sal_indx nomonitoring usage;

–Check if the monitoring is disabled

select index_name
       ,table_name
       ,monitoring as mon
       ,used
       ,start_monitoring
from v$object_usage;

–The Result

INDEX_NAME | TABLE_NAME | MON | USED | START_MONITORING
-----------------------------------------------------------
SAL_INDX   | SALARY     | NO  | YES  | 02/13/2011 21:48:25

Oracle Database Auditing

Oracle auditing is a very powerful thing. It gives you the ability to track of users’ activities.
You can simply identify what they are doing to your DB:).

Audit records can be stored in Operating System files on in Database. Initialization parameter audit_trail identifies where audit logs should be saved.

–To save it in OS, open initSID.ora parameter file and add/change the following parameter:

*.audit_trail = OS

–To save it in Database:

*.audit_trail = DB

There exists additional option when you are saving logs in the database. If you set audit_trail parameter to db_extended, it will tell the database to record audit records in the database together with bind variables (SQLBIND) and also (SQLTEXT).

*.audit_trail = DB_EXTENDED

–To see if it is enabled, query the following:

select name,value
from v$parameter
where name='audit_trail' ;

–My result is:

NAME        VALUE
------------------
audit_trail DB

Note you should reboot the database for the change to take effect.

In my case logs will be recorded in SYS.AUD$ table. But if you set audit_trail=OS, then you should also indicate where to save log files. Initialization parameter audit_file_dest indicates it. Default is:

–In Windows

%ORACLE_BASE%\ADMIN\ORCL\ADUMP

–In Unix

$ORACLE_HOME/rdbms/audit

There are four levels of auditing: statement, privilege, object, and fine-grained access.

1. Statement Auditing

This auditing involves monitoring of execution of SQL statements.

For example:

audit create table;
audit drop table;
audit truncate table;

–Or simply

audit table;

You also have the ability to audit statements executed by some special user.

For example:

audit create table by mkupatadze;

Or you can audit statements executed by some special user whenever this SQL statement fails or successes.

For example:

audit create table by mkupatadze whenever not successful;

or

audit create table by mkupatadze whenever successful;

Default is both of them successful and not successful.

Other options which you can use in auditing are by access and by session.
By access – one audit record will be created for each executed statement.
By session -oracle will try to merge multiple audit entries into one record when the session and the action audited match. But it only works for SQL statements other than DDL.

If statement is DDL then oracle behaves as if you indicated by access option. So one audit record will be created for each executed DDL statement doesn’t matter which option you indicated.(It is very important to note)

For example:

audit create table by mkupatadze by access whenever successful;

So one audit record will be created for each executed create table statement by mkupatadze user whenever it is successful.

1.1 Identifying Enabled Statement Auditing Options

–Query the following view:

select user_name
       ,audit_option
       ,success
       ,failure
from dba_stmt_audit_opts

–My result

USER_NAME   | AUDIT_OPTION | SUCCESS    | FAILURE
--------------------------------------------------------
MKUPATADZE  | CREATE TABLE | BY ACCESS  | BY ACCESS

1.2 Disabling Statement Auditing

noaudit table;
noaudit create table by mkupatadze;

Note that whenever successful or whenever not successful options is not necessary.

2. Privilege Auditing

This audit option audits privileges, for example, select any table,create any table… and so on..

Audit Example:

audit create any table;
audit create any table by mkupatadze;
audit create any table by mkupatadze by access;
audit create any table by mkupatadze by access whenever successful;

In the first example, one audit record will be created for each executed create any table statement. The second one specifies the user…Other examples are self-explanatory.

2.1 Identifying Enabled Privilege Auditing Options

–Query this

select user_name
       ,privilege
       ,success
       ,failure
from dba_priv_audit_opts

–My result

USER_NAME |PRIVILEGE       |SUCCESS  |FAILURE
----------------------------------------------
NULL      |CREATE ANY TABLE|BY ACCESS|BY ACCESS
MKUPATADZE|CREATE ANY TABLE|BY ACCESS|BY ACCESS

2.2 Disabling Privilege Auditing

noaudit create any table;
noaudit create any table by mkupatadze;
noaudit create any table by mkupatadze whenever successful;

Note that if you have enabled auditing for some user,in my case mkupatadze, you must indicate by username clause to disable it. As you have seen in previous section, two different records were created in dba_priv_audit_opts for mkupatadze and for other users.

Also note that by access or by session clauses must not be specified, or it gives an error.

3. Object Auditing

Auditing the execution of SQL statements that require a specific object privilege, such as SELECT, INSERT, UPDATE, DELETE, or EXECUTE. It is enabled for all users or no users, means that you can not specify special user like it was in previous auditing options.

For example:
audit select on hr.employees;
audit select on hr.employees by access;
audit select on hr.employees by session whenever successful;

3.1 Identifying Enabled Object Auditing Options

–Query this

select owner
        , object_name
        , object_type
        , del
        , sel
from dba_obj_audit_opts

–My result

OWNER     |OBJECT_NAME|OBJECT_TYPE|DEL|SEL
------------------------------------------
MKUPATADZE|EMPLOYEES  |TABLE      |-/-|S/A

Note that I have selected just DEL and SEL, there are many. DEL means delete object privilege, SEL means select object privilege.
The symbol “-” means that no audit option is enabled.
“A” means by access.
“S” means by session.
From “S/A” means that by session auditing is enables when it is successful and by access auditing is enabled when it is not successful.
So first place is for successful and second one for not successful auditing.

3.2 Disabling Object Auditing

noaudit select on hr.employees;
noaudit select on hr.employees whenever successful;

Note that by access or by session must not be specified.

See Audit Logs

The view dba_audit_trail is based on the SYS.AUD$ table. So if you query from this view, you will see the content of SYS.AUD$ table.

select username, timestamp, action_name
from dba_audit_trail

or

select * from sys.aud$

Purging Audit Logs

You can manually delete records from sys.aud$ table or create a job which periodically purges the table. SYS.AUD$ table is created in SYSTEM tablespace by default.

To manually purge audit records older than 60 days, execute the following as user SYS:

delete from sys.aud$ where timestamp# < sysdate-60;
Some aspects in this post is from Sybex.OCA.Oracle.10g.Administration.I.Study.Guide.1Z0-042 book.