Oracle 10g RAC Single Node Installation on Solaris 10
February 21, 2011 Leave a comment
1. Pre-Installation Tasks
Create oracle user and appropriate groups
First of all, you should have already mounted /u0 on some slice of disk. If you don’t know how to mount directory on disk ![]() click here.
click here.
Go to the folder /u0 and create the following directories.
cd /u0
mkdir –p app/oracle
Create oinstall and dba groups.
groupadd oinstall
groupadd dba
Create oracle user and assign it oinstall and dba groups.
useradd –s /bin/ksh –d /u0/app/oracle –g oinstall –G dba oracle
Where,
-s option specifies the user default shell (i.e. Korn shell) ,
-d option specifies the home directory for oracle user (i.e. /opt/app/oracle ) ,
-g option specifies the primary group (i.e. oinstall)
-G option specifies the secondary group (i.e. dba)
Make oracle user as the owner of app folder.
chown –R oracle:oinstall app
Change the password for oracle user.
passwd oracle
Configuring SSH
Create RSA and DSA keys on each node.
Log in as the oracle user and go to the ORACLE_BASE directory(For me oracle_base directory is /u0/app/oracle).
mkdir .ssh
Generating RSA and DSA keys.
/usr/bin/ssh-keygen -t rsa
/usr/bin/ssh-keygen -t dsa
Add keys to an authorized key file, this file should exist in .ssh directory. If it doesn’t exist, create it. Change your direction to .ssh directory and run the following.
ssh charly1 cat /u0/app/oracle/.ssh/id_rsa.pub >> authorized_keys
ssh charly1 cat /u0/app/oracle/.ssh/id_dsa.pub >> authorized_keys
Enabling ssh user equivalency.
/usr/bin/ssh-agent $SHELL
/usr/bin/ssh-add
To prevent Oracle clusterware installation errors caused by stty commands, add the following text in oracle user’s profile (you should change your directory to oracle home directory and open “.profile” for editing).
if [ -t 0 ]; then
stty intr ^C
fi
Network Requirements
We should create second IP interface.
Open or create the file /etc/hostname.e100g1 and enter the following text:
Host1-priv
Add the following entries into /etc/host file:
20.0.0.100           Host1       loghost
192.168.2.117   Host1-priv
20.0.0.105          Host1-vip
Where 192.168.2.117 is a private IP address and 20.0.0.105 is a virtual IP address of the server.
Connect as a root user and create /etc /hosts.equiv file. Then open this file for editing and enter the following text:
Host1 oracle
Configuring Kernel Parameters
To add the system parameters open /etc/system file and add the following entries:
set shmsys:shminfo_shmmax = 4294967295
set shmsys:shminfo_shmmin = 1
set shmsys:shminfo_shmmni = 100
set shmsys:shminfo_shmseg = 10
set semsys:seminfo_semmni = 100
set semsys:seminfo_semmns = 1024
set semsys:seminfo_semmsl = 256
set md:mirrored_root_flag=1
set noexec_user_stack=1
Identifying Required Software Directories
Creating an Oracle Base Directory
mkdir -p /u0/app/oracle
chown -R oracle:oinstall /u0/app/oracle
chmod -R 775 /u0/app/oracle
Creating the Oracle Clusterware Home Directory
mkdir -p /u0/app/oracle/product/10.2.0/crs
chown -R root:oinstall /u0/app/oracle/product/10.2.0/crs
chmod -R 775 /u0/app/oracle/product/10.2.0/crs
2. Installing Oracle Clusterware
First of all, you should download Oracle Clusterware from the oracle site.
Verifying Oracle Clusterware Requirements with CVU
Extract downloaded file and run runcluvfy.sh file, which should be located in clusterware/cluvfy folder.
./runcluvfy.sh comp nodecon -n Host1 –verbose
Installing Oracle Clusterware with OUI
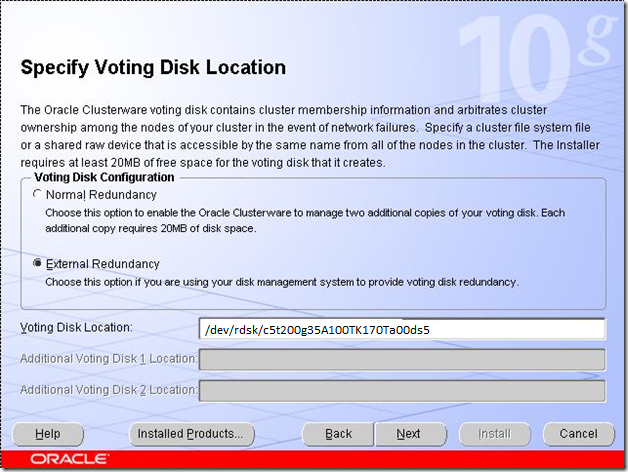
Initialize the devices that you want to use for the Oracle Cluster Registry (OCR) and Voting Disk(VD)
1.Voting file– uses by the cluster synchronization service deamons for monitoring information across the cluster. It’s size around 20MB(use format utility and reserve 200MB on 5th slice)
2. Oracle cluster registry(OCR file) it maintain information about the high-availability components such as cluster node list, CRS application profiles(Virtual interconnect protocol address, services). It’s size around 200MB(use format utility and reserve on 7th slice)
For voting disk
dd if=/dev/zero of=/dev/rdsk/c5t200g35A100TK170Ta00ds5 bs=125829120 count=1 chown oracle:dba /dev/rdsk/c5t200g35A100TK170Ta00ds5
chmod 660 /dev/rdsk/c5t200g35A100TK170Ta00ds5
For OCR
dd if=/dev/zero of=/dev/rdsk/c5t200g35A100TK170Ta00ds7 bs=125829120 count=1 chown root:dba /dev/rdsk/c5t200g35A100TK170Ta00ds7
chmod 660 /dev/rdsk/c5t200g35A100TK170Ta00ds7
Connect as the oracle user and run runInstaller.sh, located in CRS installation.
./runInstaller
Run these scripts and then click OK.
Now we should run ./vipca and configure Host1-vip virtual ip address(20.0.0.105).
Go to the installation window, click ok and retry install failed component.
Installing Oracle database files
Run root.sh script and click OK, then click Exit button.
Configure oracle listener by netca.
Configuring ASM
Run the following command, for to make oracle user owner for the following disk slice
chown oracle:oinstall /dev/rdsk/c5156D778A145a11d0s6
Creating database using DBCA
Click Next>> and check/uncheck Configure the Database with Enterprise Manager.


