How to Change the Domain Name of an Oracle RAC Cluster

Changing the domain name of an existing Oracle RAC cluster requires more than changing the hostname at the operating-system level. The old domain may be referenced in DNS, operating-system configuration, Oracle Net files, VIP configuration, and SCAN resources.

This article describes the steps for changing the domain name of a two-node Oracle RAC cluster.

Example

Assume the existing nodes are:

rac1.olddomain.com
rac2.olddomain.com

and they need to be changed to:

rac1.newdomain.com
rac2.newdomain.com

The SCAN name changes from rac-scan.olddomain.com to rac-scan.newdomain.com.


1. Stop the databases

Before making the domain-name changes, stop all database instances running (if any) on the cluster.

For example:

srvctl stop database -d <DB_UNIQUE_NAME>

Verify:

srvctl status database -d <DB_UNIQUE_NAME>

2. Update DNS

Update the DNS records to reflect the new domain name.

Review the records for:

rac1.newdomain.com
rac2.newdomain.com
rac1-vip.newdomain.com
rac2-vip.newdomain.com
rac-scan.newdomain.com

Make sure the IP addresses themselves remain mapped correctly.

For SCAN, verify that the new SCAN name resolves to all configured SCAN IP addresses.

For example:

nslookup rac-scan.newdomain.com

or:

dig rac-scan.newdomain.com

3. Update the operating-system configuration

Review the operating-system files that may contain the old domain.

Depending on the Linux distribution and configuration, this may include:

/etc/hosts
/etc/resolv.conf
/etc/sysconfig/network
/etc/sysctl.conf

For example, /etc/resolv.conf may contain:

search olddomain.com

which should be changed to:

search newdomain.com

Similarly, /etc/sysconfig/network may contain:

DOMAINNAME=olddomain.com

and /etc/sysctl.conf may contain:

kernel.domainname=olddomain.com

4. Review Oracle Net configuration

Check the Oracle Grid Infrastructure and Database Oracle homes for references to the old domain.

Review files such as:

<GI_HOME>/network/admin/tnsnames.ora
<DB_HOME>/network/admin/tnsnames.ora
<GI_HOME>/network/admin/listener.ora
<DB_HOME>/network/admin/sqlnet.ora

Search for the old domain:

grep -Ri "olddomain.com" <GI_HOME>/network/admin
grep -Ri "olddomain.com" <DB_HOME>/network/admin

Check for IFILE

tnsnames.ora may not contain the actual entry directly. It can reference another Oracle Net configuration file using IFILE.

For example:

IFILE=/path/to/additional_tnsnames.ora

Check for it with:

grep -i '^[[:space:]]*IFILE' <GI_HOME>/network/admin/tnsnames.ora
grep -i '^[[:space:]]*IFILE' <DB_HOME>/network/admin/tnsnames.ora

If an IFILE is configured, review the referenced file for the old domain as well.


5. Change the operating-system hostname

Check the current hostname:

hostname
hostname -f
hostname -s
hostnamectl

For example:

hostname -f
rac1.olddomain.com
hostname -s
rac1

Change the hostname to the new FQDN:

hostnamectl set-hostname rac1.newdomain.com

Repeat the operation on the second node:

hostnamectl set-hostname rac2.newdomain.com

Verify:

hostname
hostname -f
hostname -s

The expected result should be similar to:

hostname -f
rac1.newdomain.com
hostname -s
rac1

The FQDN changes, while the RAC node short name remains the same.


6. Check the VIP configuration before modifying it

Oracle’s procedure includes changing the VIP when the VIP resource itself contains the old domain name.

However, this step may not be necessary in every RAC configuration.

Check the existing VIP configuration first:

<GI_HOME>/bin/srvctl config vip -node rac1
<GI_HOME>/bin/srvctl config vip -node rac2

For example, if the output is:

VIP exists: network number 1, hosting node rac1
VIP Name: rac1-vip
VIP IPv4 Address: 192.168.1.101

Then Clusterware stores only the short VIP name. In this case, there is no old domain name stored in the VIP resource, and the VIP modification step can be skipped.

However, if the configuration shows:

VIP Name: rac1-vip.olddomain.com

stop the VIP and modify it to use the new domain:

# As GI owner
<GI_HOME>/bin/srvctl stop vip -node rac1 -force
# As root
<GI_HOME>/bin/srvctl modify vip \
-node rac1 \
-address rac1-vip.newdomain.com/255.255.255.0/<public_interface> \
-netnum 1

Then start and verify the VIP:

# As GI owner
<GI_HOME>/bin/srvctl start vip -node rac1
<GI_HOME>/bin/srvctl config vip -node rac1
<GI_HOME>/bin/srvctl status vip -node rac1

Repeat the same steps for the second node:

# As GI owner
<GI_HOME>/bin/srvctl stop vip -node rac2 -force
# As root
<GI_HOME>/bin/srvctl modify vip \
-node rac2 \
-address rac2-vip.newdomain.com/255.255.255.0/<public_interface> \
-netnum 1
# As GI owner
<GI_HOME>/bin/srvctl start vip -node rac2
<GI_HOME>/bin/srvctl config vip -node rac2
<GI_HOME>/bin/srvctl status vip -node rac2

The important point is: do not modify the VIP blindly. First check whether the Clusterware VIP resource actually contains the old domain name.


7. Check the current SCAN configuration

Check SCAN:

<GI_HOME>/bin/srvctl config scan

For example:

SCAN name: rac-scan.olddomain.com, Network: 1

Unlike the VIP configuration, SCAN commonly contains the full domain name.


8. Stop the SCAN listeners and SCAN

As the Grid Infrastructure owner:

<GI_HOME>/bin/srvctl stop scan_listener
<GI_HOME>/bin/srvctl stop scan

Verify that the resources are stopped if necessary:

<GI_HOME>/bin/srvctl status scan
<GI_HOME>/bin/srvctl status scan_listener

9. Change the SCAN name

After the DNS records for the new SCAN name are configured, modify SCAN.

Run the modification from root user:

<GI_HOME>/bin/srvctl modify scan -n rac-scan.newdomain.com

Verify the new configuration:

<GI_HOME>/bin/srvctl config scan

Expected:

SCAN name: rac-scan.newdomain.com, Network: 1

10. Update the SCAN listeners

Update the SCAN listener configuration:

<GI_HOME>/bin/srvctl modify scan_listener -u

Start the SCAN listeners:

<GI_HOME>/bin/srvctl start scan_listener

Then verify:

<GI_HOME>/bin/srvctl status scan
<GI_HOME>/bin/srvctl status scan_listener

All SCAN VIPs and SCAN listeners should be online.


11. Stop Oracle Clusterware

Once the required changes have been completed, stop Clusterware on all nodes:

# As root
<GI_HOME>/bin/crsctl stop cluster -all

Verify that Clusterware shuts down cleanly.


12. Restart the RAC nodes

Restart all RAC nodes using the normal operating-system procedure:

reboot

After the nodes return, verify the hostname:

hostname
hostname -f

Expected:

rac1.newdomain.com

Repeat the validation on every RAC node.


13. Validate node name resolution

Check the node names:

getent hosts rac1
getent hosts rac2

Expected:

192.168.1.1 rac1.newdomain.com
192.168.1.2 rac2.newdomain.com

14. Validate VIP resolution

Check the VIP names:

getent hosts rac1-vip
getent hosts rac2-vip

Expected:

192.168.1.101 rac1-vip.newdomain.com
192.168.1.102 rac2-vip.newdomain.com

Even when Clusterware stores the VIP as only rac1-vip, the operating system should resolve that short name correctly.


15. Validate SCAN resolution

First retrieve the exact SCAN configured in Clusterware:

srvctl config scan

Then validate that exact name:

getent hosts rac-scan.newdomain.com

or:

dig rac-scan.newdomain.com

For a three-SCAN-VIP configuration, all three expected IP addresses should resolve.

Example:

192.168.1.201 rac-scan.newdomain.com
192.168.1.202 rac-scan.newdomain.com
192.168.1.203 rac-scan.newdomain.com

16. Validate RAC node membership

Run:

olsnodes

The RAC node names should normally remain the same short names:

rac1
rac2

This was also the result after the domain change in the tested cluster.


17. Validate Clusterware resources

Run:

crsctl status resource -t

Verify that the important RAC resources are online, including:

ora.LISTENER.lsnr
ora.asm
ora.rac1.vip
ora.rac2.vip
ora.scan1.vip
ora.scan2.vip
ora.scan3.vip
ora.LISTENER_SCAN1.lsnr
ora.LISTENER_SCAN2.lsnr
ora.LISTENER_SCAN3.lsnr

After the tested domain change and restart, the node VIPs, three SCAN VIPs, SCAN listeners, ASM, and other Clusterware resources returned to ONLINE state.


18. Validate nodeapps and SCAN

Run:

srvctl config nodeapps -a
srvctl config scan

Confirm:

  • the node VIPs have the expected names and IP addresses
  • the SCAN uses the new domain
  • all expected SCAN VIP addresses are present

For example:

VIP Name: rac1-vip
VIP IPv4 Address: 192.168.1.101
VIP Name: rac2-vip
VIP IPv4 Address: 192.168.1.102

and:

SCAN name: rac-scan.newdomain.com

19. Run Cluster Verification Utility

Finally, run the appropriate Cluster Verification Utility checks.

For example:

cluvfy stage -post crsinst -n rac1,rac2

or the appropriate cluvfy command for your Grid Infrastructure version and environment.

Validate:

  • hostname resolution
  • node connectivity
  • public network
  • private interconnect
  • VIPs
  • SCAN
  • SCAN listeners
  • Clusterware
  • ASM
  • database connectivity

Also search the system and Oracle configuration for any remaining references to the old domain:

grep -Ri "olddomain.com" /etc 2>/dev/null
grep -Ri "olddomain.com" <GI_HOME>/network/admin 2>/dev/null
grep -Ri "olddomain.com" <DB_HOME>/network/admin 2>/dev/null

Review the results carefully rather than automatically replacing every occurrence.

Recovering failed GI 19c to 26ai upgrade

During the Oracle Grid Infrastructure upgrade from 19c to 26ai, the upgrade failed on rac1 while running:

/u01/app/23.0.0/grid/rootupgrade.sh

The failure occurred at:

2026/08/14 02:43:14 CLSRSC-595: Executing upgrade step 14 of 16: 'UpgradeCluster'.

After this point, rac1 entered a reboot loop. CRS autostart was disabled to stop the continuous reboots.

Later, starting Clusterware manually failed:

[root@rac1 trace]# crsctl start crs -wait
CRS-6705: Oracle Clusterware Release Version ('19.0.0.0.0') does not match Software Version ('23.0.0.0.0'). Oracle Clusterware cannot be started.
CRS-4000: Command Start failed, or completed with errors.

The cluster was left in a partially upgraded state: the cluster active version was still 19c, while rac1 had already been partially switched to the 26ai software.

1. Verify the cluster upgrade state

On the healthy node, rac2:

/u01/app/19.3.0/grid/bin/crsctl query crs activeversion -f

Output:

Oracle Clusterware active version on the cluster is [19.0.0.0.0].
The cluster upgrade state is [ROLLING UPGRADE].
The cluster active patch level is [1191252804].

This confirmed that the cluster active version had not yet been advanced to 26ai.

2. Restore rac1 configuration in OCR

From rac2, where the 19c Clusterware stack was still running:

/u01/app/19.3.0/grid/bin/clscfg -nodedowngrade-h rac1

Output:

clscfg: -nodedowngrade mode specified
clscfg: EXISTING configuration version 19 detected.
Successfully restored the node specific configuration from backup for host:[rac1]

This restores the pre-upgrade cluster metadata associated with rac1 in OCR as part of terminating the incomplete upgrade.

3. Downgrade the local Clusterware configuration on rac1

On rac1 as root, run the downgrade from the 26ai Grid home:

cd /u01/app/23.0.0/grid/crs/install./rootcrs.sh -downgrade -online

Output:

2026/08/14 04:38:58 CLSRSC-591: successfully downgraded Oracle Clusterware stack on this node
2026/08/14 04:38:59 CLSRSC-592: Run 'crsctl start crs' from home /u01/app/19.3.0/grid on each node to complete downgrade.

This reverts the local Clusterware configuration on rac1 to the previous GI release.

4. Start CRS from the 19c Grid home

On rac1:

/u01/app/19.3.0/grid/bin/crsctl start crs -wait

Clusterware now started successfully:

CRS-2676: Start of 'ora.cssd' on 'rac1' succeeded
CRS-2676: Start of 'ora.asm' on 'rac1' succeeded
CRS-2676: Start of 'ora.storage' on 'rac1' succeeded
CRS-2676: Start of 'ora.crsd' on 'rac1' succeeded...
CRS-4123: Oracle High Availability Services has been started.

5. Verify both nodes are back on 19c

/u01/app/19.3.0/grid/bin/crsctl check cluster -all
/u01/app/19.3.0/grid/bin/crsctl query crs softwareversion rac1
/u01/app/19.3.0/grid/bin/crsctl query crs softwareversion rac2

Both nodes returned:

19.0.0.0.0

However:

/u01/app/19.3.0/grid/bin/crsctl query crs activeversion -f

still showed:

Oracle Clusterware active version on the cluster is [19.0.0.0.0].
The cluster upgrade state is [ROLLING UPGRADE].

The rollback was therefore not yet complete.

6. Stop ASM rolling migration

As grid, connect to ASM:

sqlplus / as sysasm

Run:

ALTER SYSTEM STOP ROLLING MIGRATION;

7. Start the formal failed-upgrade downgrade

From the 26ai Grid home on rac1, as grid:

/u01/app/23.0.0/grid/gridSetup.sh -silent -downgrade -nodes rac1 -oldHome /u01/app/19.3.0/grid

In this case, gridSetup.sh generated the following root action:

/u01/app/23.0.0/grid/crs/install/rootcrs.sh -downgrade -auto

8. Stop CRS on the other node before the last-node operation

The first attempt at rootcrs.sh -downgrade -auto failed because rac2 was still running:

CRS-4402: The CSS daemon was started in exclusive mode but found an active CSS daemon on node rac2, number 2, and is terminating
CLSRSC-549: The root script cannot downgrade this node rac1 with last node operations because the Grid Infrastructure stack is up on at least one other cluster node.

Because rac1 was the node being processed with last-node downgrade operations, the GI stack on the other node had to be stopped temporarily.

On rac2 as root:

/u01/app/19.3.0/grid/bin/crsctl stop crs

9. Complete the last-node downgrade on rac1

On rac1 as root:

/u01/app/23.0.0/grid/crs/install/rootcrs.sh -downgrade -auto

This time the command can perform the required last-node operations because no other CSS daemon is active in the cluster.

10. Start the 19c Clusterware stack

After the downgrade succeeds, start rac1 explicitly from the 19c Grid home:

/u01/app/19.3.0/grid/bin/crsctl start crs -wait

Then restart the 19c stack on rac2, which was stopped for the last-node downgrade:

/u01/app/19.3.0/grid/bin/crsctl start crs -wait

11. Update Oracle Inventory on a failed node

Run the commands generated by gridSetup.sh as the grid owner.

Mark the failed 26ai Grid home as no longer being the CRS home:

$ /u01/app/23.0.0/grid/oui/bin/runInstaller -nowait -waitforcompletion -ignoreSysPrereqs -updateNodeList -silent CRS=false ORACLE_HOME=/u01/app/23.0.0/grid "CLUSTER_NODES=rac1" -doNotUpdateNodeList

Then register the 19c Grid home as the CRS home again:

$ /u01/app/23.0.0/grid/oui/bin/runInstaller -nowait -waitforcompletion -ignoreSysPrereqs -updateNodeList -silent CRS=true ORACLE_HOME=/u01/app/19.3.0/grid "CLUSTER_NODES=rac1" -doNotUpdateNodeList

These are not manually invented cleanup commands; they are the exact inventory commands produced by gridSetup.sh -downgrade for this failed upgrade.

12. Verify that the rollback is fully complete

Check both nodes:

/u01/app/19.3.0/grid/bin/crsctl check cluster -all

Verify their software versions:

/u01/app/19.3.0/grid/bin/crsctl query crs softwareversion rac1
/u01/app/19.3.0/grid/bin/crsctl query crs softwareversion rac2

Both should report:

19.0.0.0.0

Finally:

/u01/app/19.3.0/grid/bin/crsctl query crs activeversion -f

The rollback is complete when the cluster reports:

Oracle Clusterware active version on the cluster is [19.0.0.0.0].The cluster upgrade state is [NORMAL].

Only after reaching NORMAL should another GI upgrade attempt be started.

Forceful startup of CRS, when minority VMs are down

If a minority of database nodes are down because of cloud maintenance, those nodes may not be startable. If CRS is also down on the remaining working nodes, manual intervention is required.

Before proceeding, confirm that the cluster still has majority quorum.

Majority formula = TRUNC((number of database nodes + number of quorum nodes) / 2) + 1

The cluster can only be started when the majority of voting members are available. If the majority of database nodes or quorum nodes are down, the steps below will not work.

Use the following procedure on each database node where CRS fails to start.


Procedure 1: Restart CRS cleanly

1. Temporarily disable CRS autostart

crsctl disable crs

2. Stop any running CRS processes

crsctl stop crs -f

It is normal to see errors such as CRS-4639 or CRS-4000 when running this command. You can continue with the next steps.

3. Kill any remaining ohasd.bin reboot processes

ps -ef | grep "ohasd.bin reboot" | grep -v grep | awk '{print $2}' | xargs kill -9 > /dev/null 2>&1

4. [Only if using FlashGrid cluster] Stop flashgrid_wait service

flashgrid-node stop-waiting

Expected output may look similar to this:

pkill -USR1 -f flashgrid_wait ... OK

5. Restart the ohasd services

systemctl restart ohasd
systemctl restart oracle-ohasd

6. Monitor CRS startup

First, check whether the Clusterware daemons are running:

crsctl status res -t -init

If the Clusterware daemons started successfully, check the cluster resources:

crsctl status res -t

If CRS does not start automatically, start it manually:

crsctl start crs -wait

If startup hangs on ora.storage, check the ASM alert log (alert_+ASM?.log).

Look for errors such as: ORA-15042, ORA-15040

If these errors are present, cancel the CRS startup, skip step 7, and continue with Procedure 2 below.

7. Re-enable CRS autostart

crsctl enable crs

Procedure 2: If CRS still does not start

Use this procedure if CRS did not start successfully and some CRS resources remain failed.

Repeat the following steps on each database node where CRS still fails to start.

1. Stop any running CRS processes

crsctl stop crs -f

2. Kill any remaining ohasd.bin reboot processes

ps -ef | grep "ohasd.bin reboot" | grep -v grep | awk '{print $2}' | xargs kill -9 > /dev/null 2>&1

3. Restart the ohasd services

systemctl restart ohasd
systemctl restart oracle-ohasd

4. Start only HAS

crsctl start has

5. Start ASM in nomount mode

Connect as the Grid Infrastructure owner, for example grid:

su - grid
sqlplus / as sysasm

Then start ASM in nomount mode:

startup nomount;

6. Try to mount all ASM diskgroups

alter diskgroup all mount;

7. If mounting all diskgroups fails, mount them one by one using force

For example:

alter diskgroup GRID mount force;
alter diskgroup DATA mount force;

Sometimes ASM delays background operations after an unclean shutdown. In that case, you may see a message similar to this in alert_+ASM?.log:

WARNING: Background operations delayed until 08/08/23 21:22:21 because ASM was not stopped cleanly and there could be disconnected client(s)

Do not cancel the running command. Wait until the time shown in the message. The diskgroup should mount after that delay.

8. Re-enable CRS autostart

crsctl enable crs

9. Check cluster status

crsctl status res -t

Make Chrome trust your self-signed Root CA on macOS

Problem

Harbor: Self-signed certificates are suitable for quick localhost tests, but they are not recommended for production or shared environments.

Chrome shows “Not Secure” for my test Golden Gate 23ai setup, where I decided to use a self-signed certificate:

Chrome does not trust the issuer (my self-signed Root CA), which is normal.

Solution

We need to trust Root CA on macOS. For the command line, please see below.
I will start by explaining the GUI version for better visibility. However, I also have a simple command available, please check below.

  • Open Keychain Access -> System keychain -> File -> Import Items… -> pick ca-cert.pem.

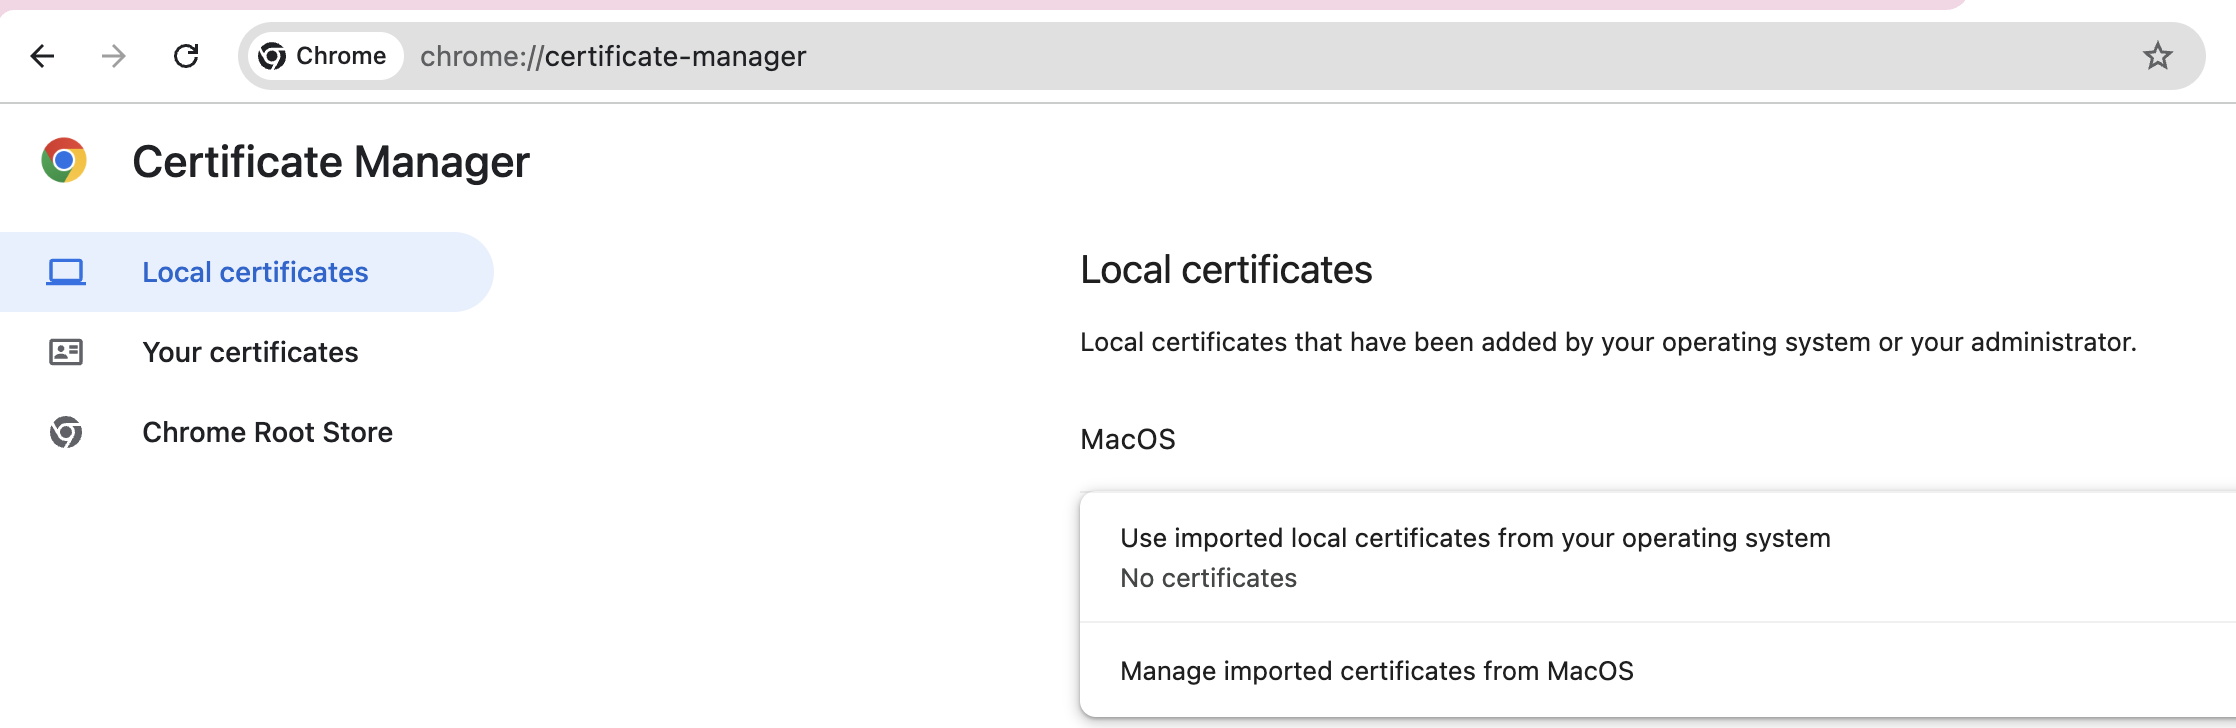
If you cannot find Keychain Access, then type chrome://certificate-manager/ in URL and click Manage imported certificates from MacOS

On the pop-up window, choose Open Keychain Access:

Since you are in the right section, now you can check the steps that I provided before.

  • Double-click the CA -> Trust -> When using this certificate: Always Trust.
  • Quit & reopen Chrome.

CLI equivalent:

$ sudo security add-trusted-cert -d -r trustRoot \
  -k /Library/Keychains/System.keychain ca-cert.pem

Running the above command will install ca-cert.pem in the correct location. You still need to restart Chrome.

After restarting the Chrome, here is the result:

Note: Make sure your server certificate includes a Subject Alternative Name (SAN) for the exact hostname you’re visiting (e.g., mkgghub). CN alone isn’t enough for modern browsers.

Linux/macOS: Retrieve RPMs from .sh file without running the script

Problem

Sometimes vendors ship their software as a single self-extracting .sh installer that contains multiple .rpm or other files inside.

Running the .sh directly might trigger installation logic you don’t want, so the challenge is: How can we safely unpack the RPMs without executing the script?

Solution

Most vendor installers provide built-in extraction flags that allow you to unpack it safely.

First, check whether your script supports extraction options:

  • Run it with --help.
  • Or open the file in a text editor (vi, vim, less) and search for the section that lists available options.
  • Look for keywords like --target, --noexec, or --keep.

    In my case, the script showed this usage block:

    $0 [options] [--] [additional arguments to embedded script]
    
    Options:
      --confirm             Ask before running embedded script
      --quiet               Do not print anything except error messages
      --noexec              Do not run embedded script
      --keep                Do not erase target directory after running
      --noprogress          Do not show the progress during decompression
      --nox11               Do not spawn an xterm
      --nochown             Do not give the extracted files to the current user
      --target dir          Extract directly to a target directory
                            (absolute or relative path)
      --tar arg1 [arg2 ...] Access the contents of the archive through tar
      --                    Pass following arguments to the embedded script


    The key flags here are:

    • --target -> specifies the output directory for extracted files
    • --noexec -> prevents the embedded installer logic from executing

    Here’s how I safely extracted the files from my .sh installer. You might need to create an extract directory before:

    $ sh flashgrid_cluster_node_update-25.5.89.70767.sh --target extract/ --noexec
    Creating directory extract/
    Verifying archive integrity... All good.
    Uncompressing update 100%
    

    Checking the number of files extracted, shows 46:

    $ ll extract/ | wc -l
    46
    

    Linux: Change the crash dump location

    When kdump is enabled, the crash dumps are typically written to /var/crash. However, this directory may not always be suitable – especially if it lacks sufficient space. Thankfully, the dump location is configurable.

    Follow the steps below to redirect the crash dump to another path.

    1. Edit the kdump configuration file /etc/kdump.conf

    Find the line that begins with path (or add it if it doesn’t exist), and set it to your desired directory. For example:

    path /var2/crash

    This tells kdump to save crash dumps to /var2/crash instead of the default /var/crash.

    2. Ensure the directory exists and has enough space

    Create the new directory if it doesn’t already exist:

    # mkdir /var2/crash

    Make sure it has appropriate permissions and enough disk space to store crash dumps, which can be large depending on system memory.

    3. Restart the kdump service

    After making changes, restart the kdump service to apply the new configuration:

    # systemctl restart kdump

    You can check the status to confirm it’s active:

    # systemctl status kdump

    ● kdump.service - Crash recovery kernel arming
    Loaded: loaded (/usr/lib/systemd/system/kdump.service; enabled; vendor preset: enabled)
    Active: active (exited) since Thu 2025-07-10 19:42:12 UTC; 10min ago
    Main PID: 1162 (code=exited, status=0/SUCCESS)
    Tasks: 0 (limit: 196884)
    Memory: 0B
    CGroup: /system.slice/kdump.service

    Jul 10 19:42:08 rac1.mycompany.mydomain systemd[1]: Starting Crash recovery kernel arming...
    Jul 10 19:42:12 rac1.mycompany.mydomain kdumpctl[1428]: kdump: kexec: loaded kdump kernel
    Jul 10 19:42:12 rac1.mycompany.mydomain kdumpctl[1428]: kdump: Starting kdump: [OK]
    Jul 10 19:42:12 rac1.mycompany.mydomain systemd[1]: Started Crash recovery kernel arming.

    ⚠️ Important Notes

    • The crash dump directory must be accessible even during a crash, so avoid temporary filesystems (like /tmp) or network paths unless properly configured.
    • For production systems, it’s best to use a dedicated partition or storage volume with enough capacity to hold full memory dumps.

    ORA-26988: Cannot grant Oracle GoldenGate privileges. The procedure GRANT_ADMIN_PRIVILEGE is disabled.

    Problem:

    While trying to grant the privilege to Golden Gate user in 23ai database, I received the following error:

    SQL> EXEC DBMS_GOLDENGATE_AUTH.GRANT_ADMIN_PRIVILEGE('GGADMIN');
    BEGIN DBMS_GOLDENGATE_AUTH.GRANT_ADMIN_PRIVILEGE('GGADMIN'); END;

    *
    ERROR at line 1:
    ORA-26988: Cannot grant Oracle GoldenGate privileges. The procedure GRANT_ADMIN_PRIVILEGE is disabled.
    ORA-06512: at "SYS.DBMS_LOGREP_UTIL", line 601
    ORA-06512: at "SYS.DBMS_LOGREP_UTIL", line 636
    ORA-06512: at "SYS.DBMS_GOLDENGATE_AUTH", line 38
    ORA-06512: at line 1
    Help: https://docs.oracle.com/error-help/db/ora-26988/

    Explanation:

    With Oracle Database release 23ai, procedures are replaced by roles.

    Solution:

    Grant the following Oracle GoldenGate roles: OGG_CAPTURE for Extract, OGG_APPLY for Replicat, and OGG_APPLY_PROCREP for procedural replication with Replicat.

    grant OGG_APPLY to GGADMIN;
    grant OGG_APPLY_PROCREP to GGADMIN;
    grant OGG_CAPTURE to GGADMIN;

    ORA-27106: system pages not available to allocate memory

    Oracle error ORA-27106: system pages not available to allocate memory can appear when starting up a database instance, particularly when HugePages are misconfigured or unavailable. This post walks through a real-world scenario where the error occurs, explains the underlying cause, and provides step-by-step resolution.

    Problem

    Attempting to start up the Oracle database instance results in the following error:

    oracle@mk23ai-b:~$ sqlplus / as sysdba

    SQL*Plus: Release 23.0.0.0.0 - for Oracle Cloud and Engineered Systems on Thu Jul 3 00:15:46 2025
    Version 23.7.0.25.01

    Copyright (c) 1982, 2024, Oracle. All rights reserved.

    Connected to an idle instance.

    SQL> startup
    ORA-27106: system pages not available to allocate memory
    Additional information: 6506
    Additional information: 2
    Additional information: 3

    Cause

    This error is most often seen on Linux platforms when HugePages are either:

    • Not configured,
    • Insufficiently allocated,
    • and the database is explicitly configured to use only HugePages with: use_large_pages='ONLY'

    Troubleshooting

    1) Identify the SPFILE path of the database

    $ srvctl config database -db orclasm

    Output:

    Database unique name: orclasm
    Database name: orclasm
    Oracle home: /u01/app/oracle/product/23ai/dbhome_1
    Oracle user: oracle
    Spfile: +DATA/ORCLASM/PARAMETERFILE/spfile.274.1201294643
    Password file:
    Domain:
    Start options: open
    Stop options: immediate
    Database role: PRIMARY
    Management policy: AUTOMATIC
    Disk Groups: DATA
    Services:
    OSDBA group:
    OSOPER group:
    Database instance: orclasm

    2) Create a PFILE from the SPFILE

    You can create a pfile from an spfile without starting the instance, which is particularly useful when the instance cannot be started.

    $ export ORACLE_SID=orclasm
    $ sqlplus / as sysdba

    SQL> create pfile='/tmp/temppfile.ora' from spfile='+DATA/ORCLASM/PARAMETERFILE/spfile.274.1201294643';

    File created.

    SQL> exit

    Now, inspect the HugePages configuration setting:

    $ grep -i use_large_pages /tmp/temppfile.ora
    *.use_large_pages='ONLY'

    3) Check HugePages availability on the system

    $ grep Huge /proc/meminfo

    Example output (problem scenario):

    HugePages_Total:       0
    HugePages_Free: 0
    HugePages_Rsvd: 0
    Hugepagesize: 2048 kB

    HugePages are not configured on the system in this case. If it is configured for you, then the HugePages_Free value is insufficient.

    Solution

    1) Estimate required HugePages

    You can estimate the needed HugePages based on total SGA:

    𝑓: HugePages = (SGA size in MB) / Hugepagesize

    For example, if SGA is 24 GB (24576 MB) and Hugepagesize = 2 MB, then required
    HugePages = 24576 / 2 = 12288

    2) Configure HugePages at OS level

    Edit /etc/sysctl.conf:

    vm.nr_hugepages = 12288

    Then apply:

    # sysctl -p
    

    3) Start the database in nomount to verify it is startable

    $ sqlplus / as sysdba
    SQL>
    startup nomount

    4) Reboot and verify

    Restart the system to ensure that everything is functioning properly after the reboot and double check the config:

    $ grep Huge /proc/meminfo

    Expected output:

    HugePages_Total:    12288
    HugePages_Free: 12288
    Hugepagesize: 2048 kB

    ⚠️ Temporary Workaround (not recommended for production)

    If you need to get the database up urgently and cannot configure HugePages immediately, change the parameter to:

    use_large_pages='TRUE'

    This allows fallback to regular memory pages. However, for best performance and to avoid fragmentation, it’s strongly recommended to configure HugePages correctly and use use_large_pages='ONLY' in production.

    Linux: Disable Kdump

    To disable Kdump, follow these steps:

    1. Disable the kdump service:

    # systemctl disable --now kdump.service

    2. Check that the kdump service is inactive:

    # systemctl status kdump.service

    3. Remove kexec-tools package

    # rpm -e kexec-tools 

    4. (Optional) Remove the crashkernel command-line parameter from the current kernel by running the following command:

    # grubby --remove-args="crashkernel" --update-kernel=/boot/vmlinuz-$(uname -r)

    Or set the desired value using grubby --update-kernel=/boot/vmlinuz-$(uname -r) --args="crashkernel=....” (Instead of dots, indicate your value).

    ℹ️ One possible error that may occur when removing the kexec-tools package is that it might indicate that the package is not installed, even though it actually is. In this case, you can try rebuilding the RPM database and then rerunning the erase command.

    # rpm --rebuilddb
    # rpm -e kexec-tools

    Linux: sed cannot rename /etc/default/sedysYQ9l Operation not permitted

    Problem:

    I was trying to enable Kdump and wanted to set the memory for crashkernel, so I tried this command that is provided by the RHEL official site:

    [root@rac1 ~]# sudo grubby --update-kernel=ALL --args="crashkernel=1G"

    And I’ve received the following error:

    sed: cannot rename /etc/default/sedysYQ9l: Operation not permitted

    Please note that every time you rerun the command, the letters after /etc/default change, so you probably have a different path.

    Workaround:

    At this time, I am providing only a workaround since I could not find a solution. You have several options available.

    • Enabling it for the current kernel, which can be done with one command:
    # grubby --update-kernel=/boot/vmlinuz-$(uname -r) --args="crashkernel=1G"
    • Or enable for a specific kernel (run multiple times for other kernels if necessary)
    # grubby --update-kernel=/boot/vmlinuz-4.18.0-553.22.1.el8_10.x86_64 --args="crashkernel=1G"