Open Suse desktop turns black problem [SOLVED]

I don’t know how, but I have had enabled desktop effects on my Open Suse, which caused computer screen to turn black when computer was not in use during some minutes.I couldn’t see my mouse pointer, it did not have any reaction on pressing keys. Just CTRL+ALT+F1(turning to console mode) worked.

I have found a good solution and I want to share it with you.

Assume that you see a black screen now.

Go to the console mode:

CTRL+ALT+F1

Go to the following location:

cd .kde4/share/config

Edit the following file:

vi kwinrc

Find the following entry:

[Compositing]

Enabled=true

Change value true to false, the output should look like this:

[Compositing]

Enabled=false

Note: If you do not know how to edit file from command line do the following: press “i” key, which makes file writable in a console, now you can move to your desired line by arrow keys and change the value, after that press “Esc” key and type the following: “:wq” which means save the changes and quite.

Switch back to graphical mode:

CTRL+ALT+F7

Restart X-Graphics Server:

CTRL+ALT+BACKSPACE (twice, fast)

Now you should see the login screen.


How to change MAC address in Open Suse

Connect as a root user:

> su
Password:

Go to the following location:

> cd /etc/init.d

and edit the following file by some editor, I prefer to use vi editor.

> vi boot.local

Press “i” key, which means enabling insert mode, and then add the following entries:

/sbin/ifconfig eth0 down
/sbin/ifconfig eth0 hw ether 7F:G2:A4:30:R1:H7
/sbin/ifconfig eth0 up

7F:G2:A4:30:R1:H7 is the MAC address, enter yours.

after that click ESC key and type:

:wq

which means write and quite.

Now reboot the system :

>reboot

That it, I hope this post will help someone 🙂


Installing Google Chrome in Open Suse

I couldn’t install Google Chrome browser by single-click. I found it a little bit difficult to install that browser on Open Suse, that is why I am writing this post.

I hope my post will be useful for most of the people . Smile

First of all LSB (Linux Standard Base Core) package should be installed.

The goal of the LSB is to develop and promote a set of open standards that will increase compatibility among Linux distributions and enable software applications to run on any compliant system even in binary form. In addition, the LSB will help coordinate efforts to recruit software vendors to port and write products for Linux Operating System.

Connect as a root user:

mariam@linux-jg40:~/Downloads> su
Password:

Install that package

linux-jg40:/home/mariam/Downloads# yast2 -i lsb

Download Google Chrome installation package for Open Suse from here.

Choose appropriate radio button: 32bit or 64bit.
Accept the license terms.

After that install Google Chrome.

linux-jg40:/home/mariam/Downloads# yast2 -i google-chrome-stable_current_i386.rpm

Note:

i386 indicates that this package is for 32bit OS
x86_64 —-is for 64bit

If after that Chrome is installed but doesn’t start up then run the following:

linux-jg40:/home/mariam/Downloads# zypper in libpng12-0

You can show the shortcut on the desktop by the following way:

Right click on the Desktop Folder-> choose Create New-> Link to Application.

Go to the Application tab and fill the following textboxes.

Note: In Command field there is written /opt/google/chrome/google-chrome.

Properties for Program.desktop

Click OK.

To change icon for the shortcut : Go to the General tab and click squared box, choose Other icons and clickbrowse, choose icon and click OK.

Happy browsing!


Another confusion in IE

It is well-known fact that there are a lot of staff that are implemented illogically in IE. I found another one, cost of which was three successive days of rewriting + debugging and a month of background warring + thinking for me…

I have implemented dynamic loading of .js content in my web application. It had problem in IE for a long time. Once it came time to fix it. I rewrite all the staff that was related to it. Originally it was in a single file. I rewrite it in three files with three different classes (App, Manager, Loader) to make it as simple and as clear as possible with a lot of comments. Loader class is responsible for file downloading and this was the most suspected place. After exploring during three successive days I found the problem. Originally the key method was written like this: (I use ExtJs):

       /* Loads .js file from specified URL */
	Loader.prototype.loadScript = function(src, callBack){
	    var script;
	    !this.head && (this.head = document.getElementsByTagName("head")[0]);
	    script = document.createElement('script');
	    script.type = 'text/javascript';
	    if(Ext.isIE){
	        //listener for IE
	        script.setAttribute('onreadystatechange', function() {
	            if (script.readyState == 'complete'){
	                callBack();
		    }
		});
            }else{
	        //listener for other browsers than IE.
	        script.onload = callBack;
	    }
	    script.setAttribute('src', src);
	    this.head.appendChild(script);
	};

Problem was in bolded line. There are two cases:

  • When the file is not in the cache then onreadystatechange is fired two times: firstly, script.readyState == ‘loading’ and secondly, script.readyState == ‘loaded’. script.readyState never equals to “complete”!!!.
  • When the file is in the cache then onreadystatechange is fired only once and script.readyState == ‘complete’.
  • So, I rewrite if condition like this: (script.readyState == ‘complete’ || script.readyState == ‘loaded’). It is very easy solution but it was quite time-consuming to get to it for me.

    The first thing is to discover that script.onload doesn’t work in IE and you have to use script.onreadystatechange instead and the socond thing is to debug and pray for discovering how onreadystatechange works 😀

Function-based index

There are several types of indices: B-tree, Bitmap, Function-based, IOT.

I will discuss what function-based index is and in what cases is it used.

Let’s start by creating a demo example.

–Create a test table

create table tesTable(
col1 number,
col2 VARCHAR2(50)
);

–Insert some values

insert into testable
values(1,‘Giorgi’);

commit;

insert into testable
values(2,‘Mariami’);

commit;

–Gather table statistics

begin
dbms_stats.gather_table_stats(null,‘TESTABLE’);
end;

–Check if the statistics is OK

select column_name,num_distinct,hidden_column
from dba_tab_cols
where table_name=‘TESTABLE’;

–Output

COLUMN_NAME NUM_DISTINCT HIDDEN_COLUMN
COL1 2 NO
COL2 2 NO


Let’s see the explain plan for the following sql statement:

explain plan for select *
from testable
where UPPER(col2)=‘MARIAMI’;

select * from table(dbms_xplan.display);

——————————————————————————
| Id  | Operation   | Name     | Rows  | Bytes | Cost (%CPU)| Time     |
——————————————————————————
|   0 | SELECT STATEMENT  |          |     1 |    40 |     2   (0)| 00:00:01 |
|*  1 |  TABLE ACCESS FULL| TESTABLE |     1 |    40 |     2   (0)| 00:00:01 |
——————————————————————————

If we have a big amount of data in this table, for example 1000000 rows what will happen?

Oracle will convert each row value into UPPER case and then compare it to our string. And this will happen 1000000  times Surprised smile

To make faster our query, there exists function-based index.

–Create function-based index

create index testable_func_indx on testable(upper(col2));

–Gather table statistics

begin
dbms_stats.gather_table_stats
(null,‘TESTABLE’);
end;

–Check if the statistics is OK

select column_name,num_distinct,hidden_column
from dba_tab_cols
where table_name=‘TESTABLE’;

–Output

COLUMN_NAME NUM_DISTINCT HIDDEN_COLUMN
COL1 2 NO
COL2 2 NO
SYS_NC00003$ 2 YES


As you can see there appeared hidden column by system generated name. Oracle behind the scenes creates a hidden virtual column on the parent table in order to capture the data characteristics of the function so that the CBO can make an accurate determination of the selectivity associated with using the function.

–See explain plan

explain plan for select *
from testable
where upper(col2)=‘MARIAMI’;

select * from table(dbms_xplan.display);

————————————————————————————————–
| Id  | Operation                   | Name               | Rows  | Bytes | Cost (%CPU)| Time     |
————————————————————————————————–
|   0 | SELECT STATEMENT            |                    |     1 |    40 |     1   (0)| 00:00:01 |
|   1 |  TABLE ACCESS BY INDEX ROWID| TESTABLE   |     1 |    40 |     1   (0)| 00:00:01 |
|*  2 |   INDEX RANGE SCAN | TESTABLE_FUNC_INDX |     1 |       |     1   (0)| 00:00:01 |
————————————————————————————————–

You see there is INDEX RANGE SCAN. It will be faster then FULL TABLE SCAN if there is a big amount of data.

If we want to use user-defined function instead of Oracle built-in function, such as UPPER, we should do the following:

create or replace function my_fun(x varchar2) RETURN VARCHAR2
deterministic
is
begin
return upper
(x);
end;

You must indicate that the function is deterministic,which means that for same input values the output will be the same. So you must not use random function or something like that .

explain plan for select *
from testable
where upper(col2)=‘MARIAMI’;

select * from table(dbms_xplan.display);

————————————————————————————————–
| Id  | Operation                   | Name               | Rows  | Bytes | Cost (%CPU)| Time     |
————————————————————————————————–
|   0 | SELECT STATEMENT            |                    |     1 |    40 |     1   (0)| 00:00:01 |
|   1 |  TABLE ACCESS BY INDEX ROWID| TESTABLE   |     1 |    40 |     1   (0)| 00:00:01 |
|*  2 |   INDEX RANGE SCAN | TESTABLE_FUNC_INDX |     1 |       |     1   (0)| 00:00:01 |
————————————————————————————————–

Install SQL Server 2005 Express Edition & Enabling Remote Client Connection

Run the installation. You can download it from here.

Microsoft SQL Server 2005 Setup End User License Agreement


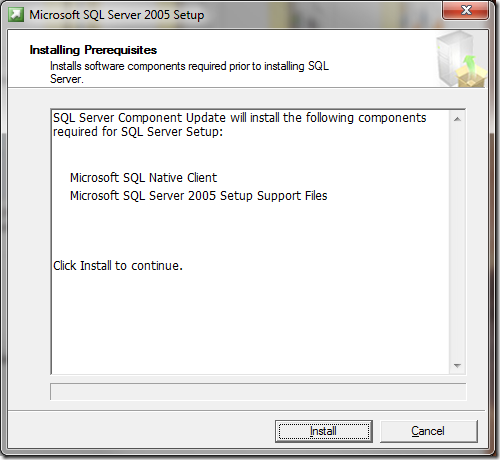
Microsoft SQL Server 2005 Setup Installing Prerequisites

Microsoft SQL Server 2005 Setup Installing Prerequisites 2

Microsoft SQL Server 2005 Setup Welcome Server Installation Wizard

Microsoft SQL Server 2005 Setup System Configuration Check

Microsoft SQL Server 2005 Setup Microsoft SQL Server Installation

Microsoft SQL Server 2005 Setup Registration Information

Microsoft SQL Server 2005 Setup Feature Selection

Microsoft SQL Server 2005 Setup Feature Selection 2

Microsoft SQL Server 2005 Setup Instance Name

Microsoft SQL Server 2005 Setup Existing Components

Click Next>

Microsoft SQL Server 2005 Setup Service Account

Microsoft SQL Server 2005 Setup Authentication Mode

Microsoft SQL Server 2005 Setup Collation Settings

Microsoft SQL Server 2005 Setup Configuration Options

It is optional, if you want to send error reports to Microsoft then check them. I will not disturb Microsoft and leave these boxes unchecked SmileSmile

Microsoft SQL Server 2005 Setup Error and Usage Report Settings

Microsoft SQL Server 2005 Setup Ready to Install

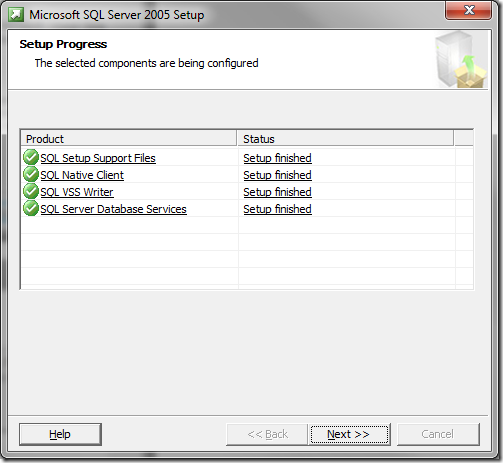
Microsoft SQL Server 2005 Setup Progress

Microsoft SQL Server 2005 Setup Completing MS SQL Server Setup


Enabling Remote Client Connection

Click Start->All Programs->Microsoft SQL Server 2005->Configuration Tools->SQL Server Surface Area Configuration…Click Surface Area Configuration for Services and Connections

Microsoft SQL Server 2005 Surface Area Configuration


Microsoft SQL Server 2005 Connection Settings Change Alert

Click OK, and reload Database Engine service:

Microsoft SQL Server 2005 Surface Area Configuration_Service_Stop

Microsoft SQL Server 2005 Surface Area Configuration_Service_Start

Click OK.

Insert multiple rows with a single INSERT statement

If you want to insert multiple rows in one table with a single INSERT statement do the following:

INSERT ALL INTO testTable(col1,col2,col3) VALUES(1,2,3)
           INTO testTable(col1,col2,col3) VALUES(4,5,6)
           INTO testTable(col1,col2,col3) VALUES(7,8,9)
           INTO testTable(col1,col2,col3) VALUES(10,11,12)
SELECT * FROM DUAL;
COMMIT;

If you want to insert multiple rows in multiple tables with a single insert statement do the following:

INSERT ALL INTO testTable_1(col1,col2,col3) VALUES(1,2,3)
           INTO testTable_2(col1,col2,col3) VALUES(4,5,6)
           INTO testTable_3(col1,col2,col3) VALUES(7,8,9)
           INTO testTable_4(col1,col2,col3) VALUES(10,11,12)
SELECT * FROM DUAL;
COMMIT;

You also are able to use when to insert specific values into tables, so adding some condition:

INSERT FIRST
   WHEN a < 50 THEN
       INTO testTable_1 VALUES(a,b,c)
   WHEN a > 50 AND a < 500 THEN
       INTO testTable_2 VALUES(a,b,c)   
   WHEN a > 500 AND a < 1000 THEN
       INTO testTable_3 VALUES(a,b,c)
   WHEN a > 1000  THEN
       INTO testTable_4 VALUES(a, b, c)
SELECT col1 AS a, col2 AS b, col3 AS c
FROM testTable_5
COMMIT;

FIRST means that if one of the condition is satisfied Oracle will stop checking other conditions. For example, if after selecting first row from the table  testTable_5 the condition
a > 50 AND a < 500 is satisfied, Oracle will insert just into testTable_2 and go again to the SELECT statement for selecting another row, till the end of table.

INSERT statement has another option ALL which will check each WHEN clause doesn’t matter if any condition is already satisfied or not.