Azure: Get email when VM instance state changes

To set up email notification in Azure environment when VM changes the state, you should do the following:

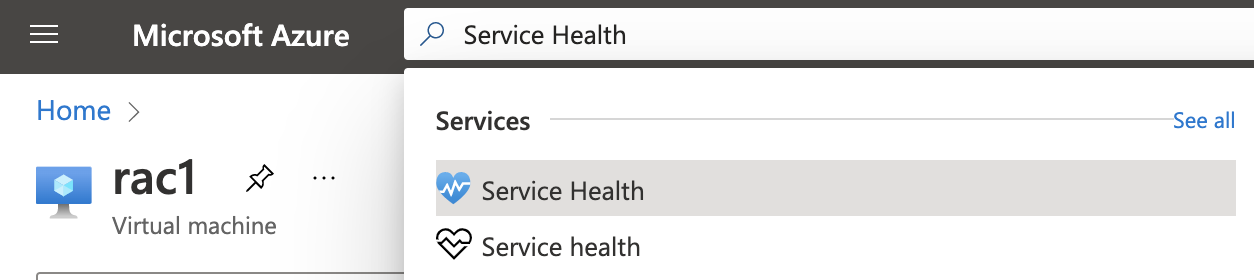
1. In the Azure portal, select Service Health

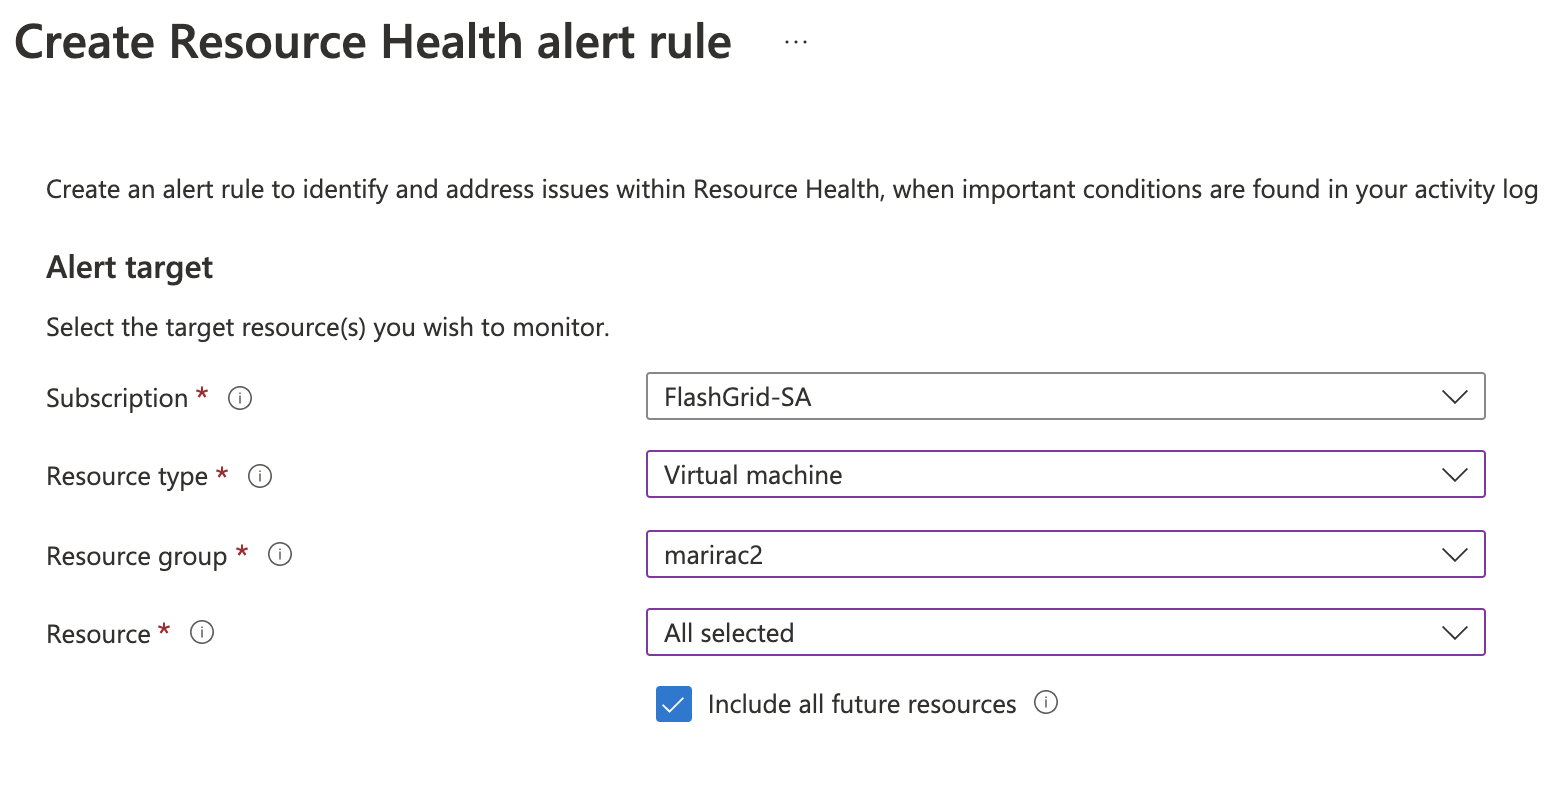
2. From the left side panel choose Resource health -> click Create Resource Health alert rule

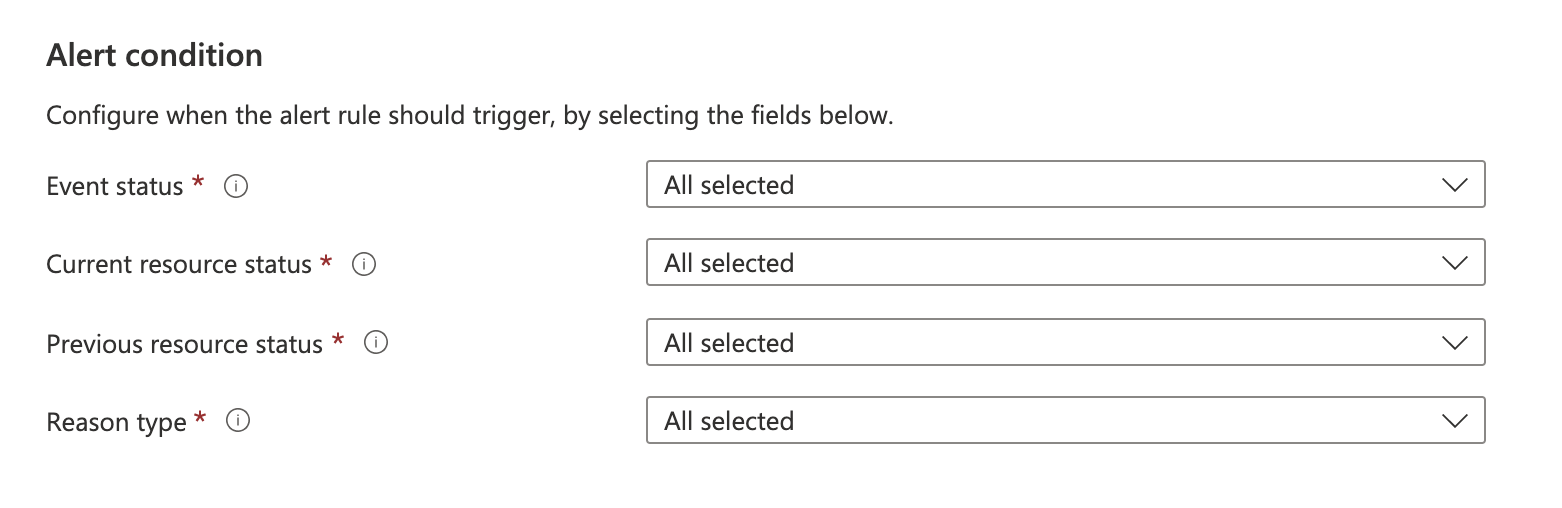
Fill in the necessary fields:

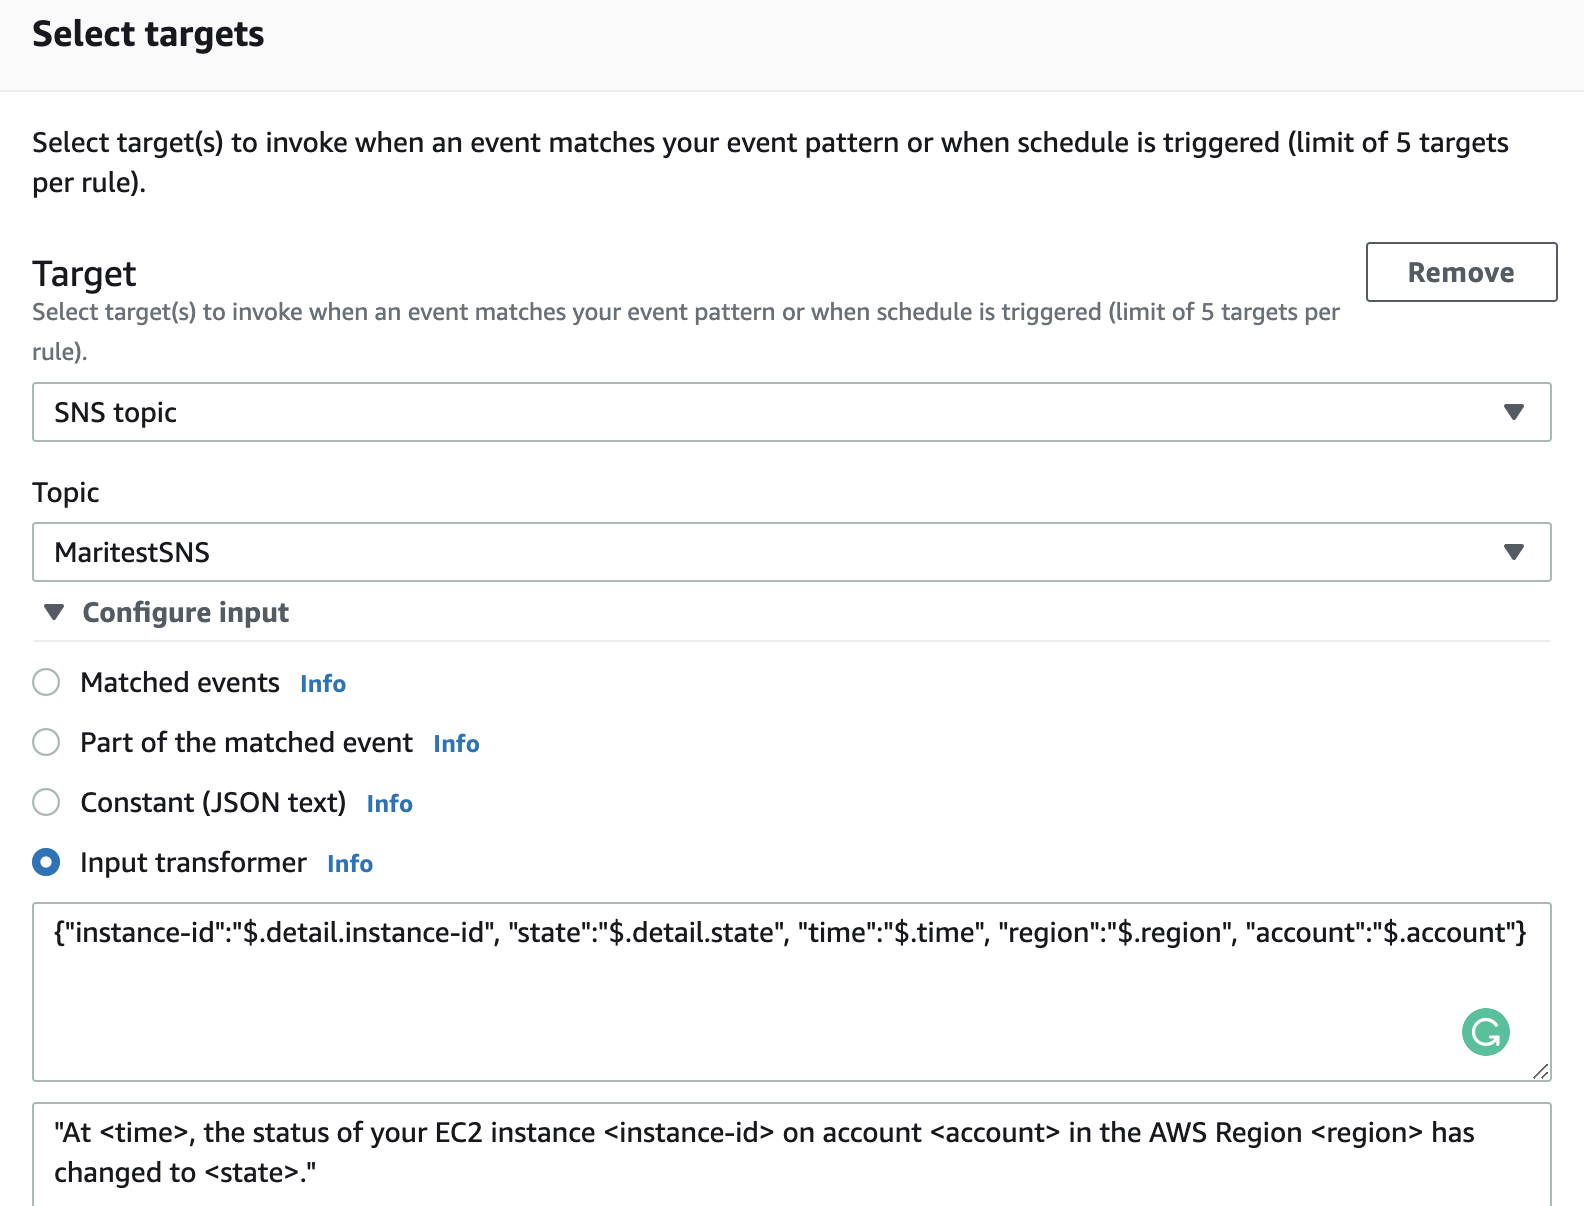
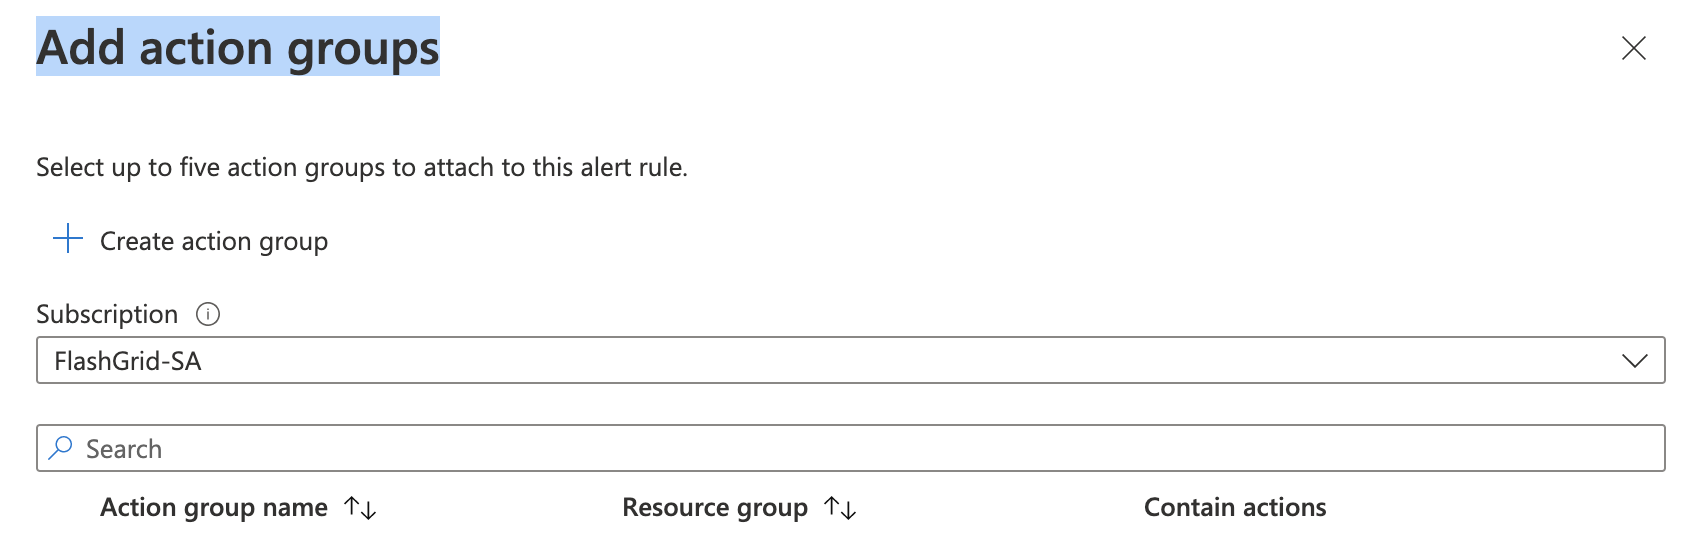
In the Actions section, you have to indicate action groups. As long as we have not created any before, let’s click Add action groups -> Create action group

And fill in the following fields:

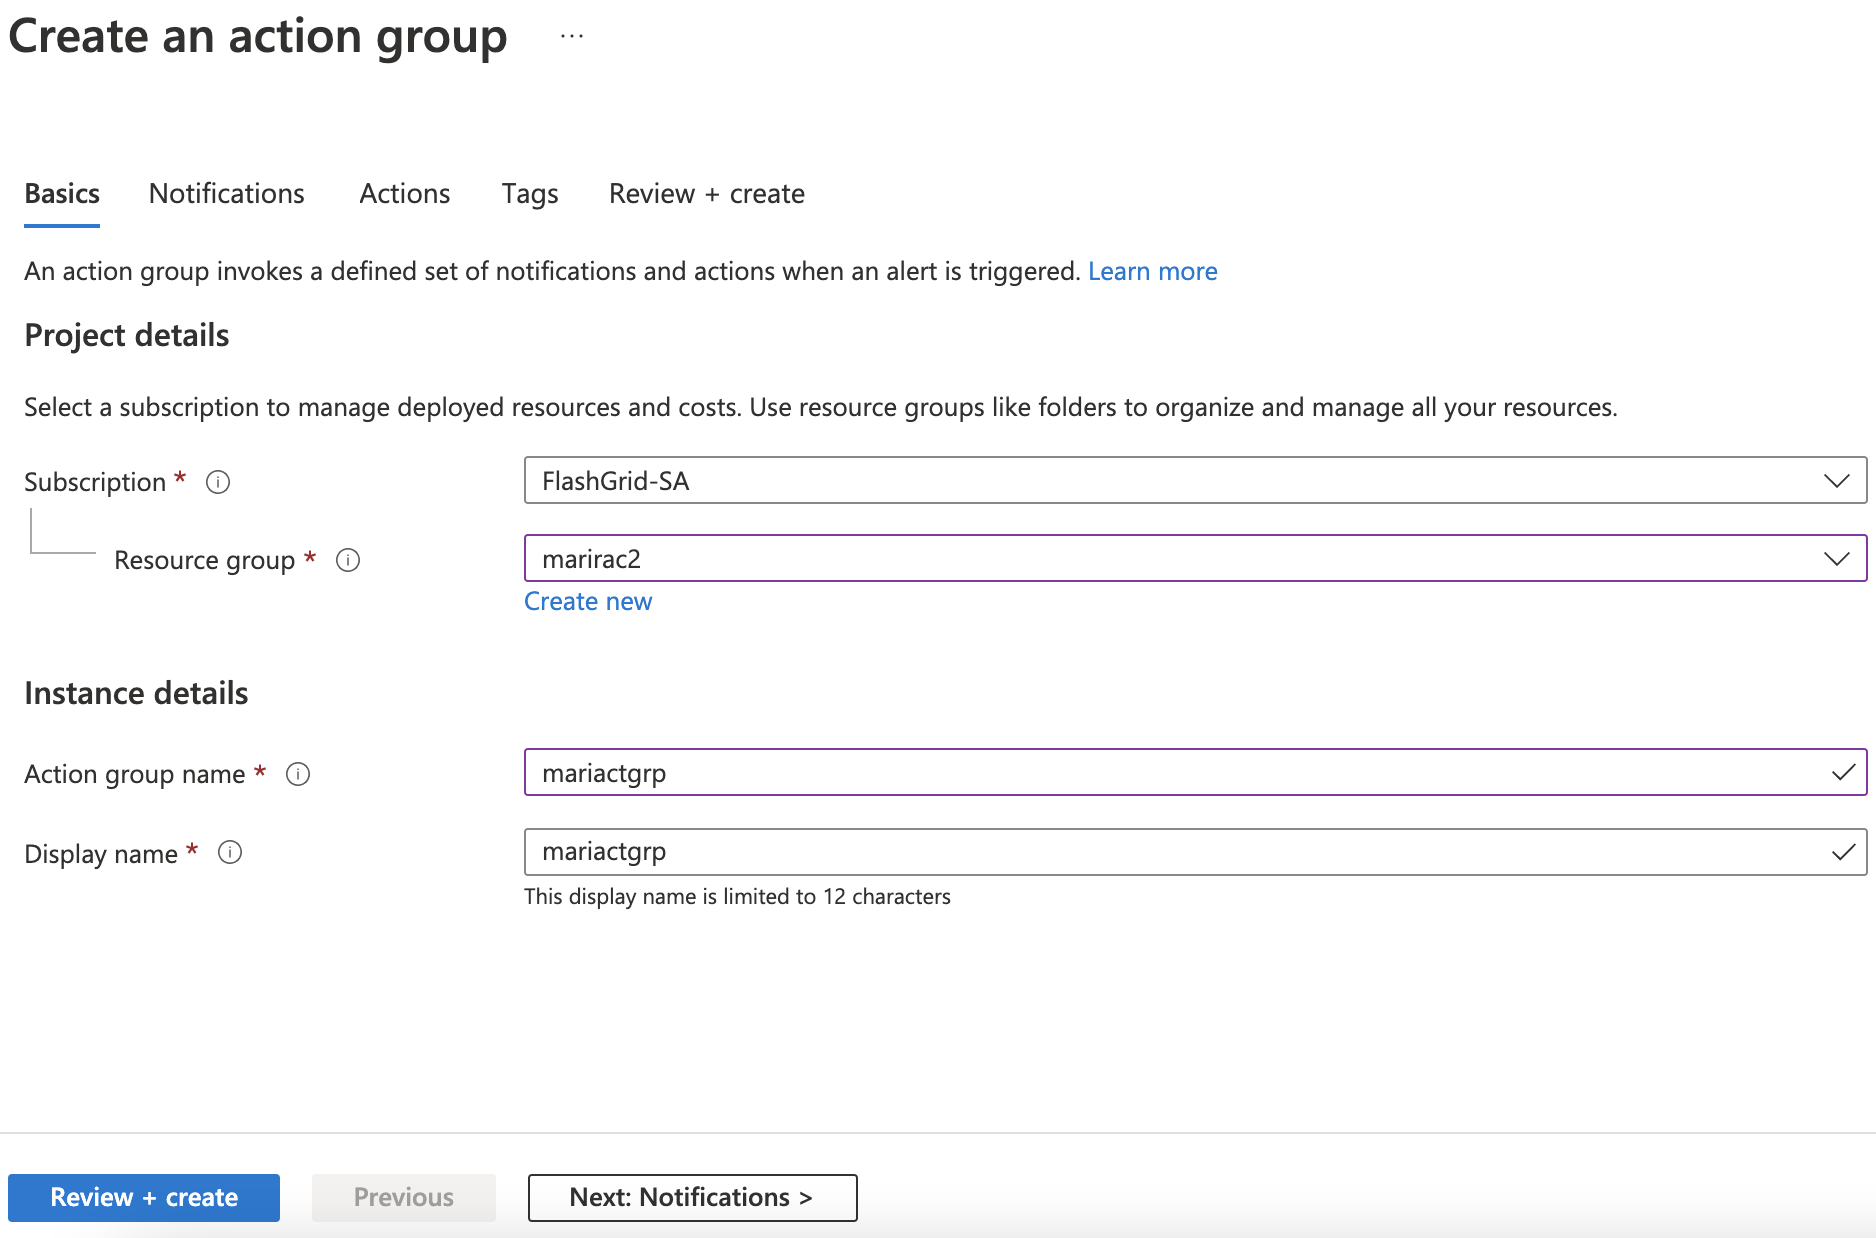
Click Review + create -> Create.

After creating the group you will see that the new group was chosen automatically. Fill in fields under Alert rule details:

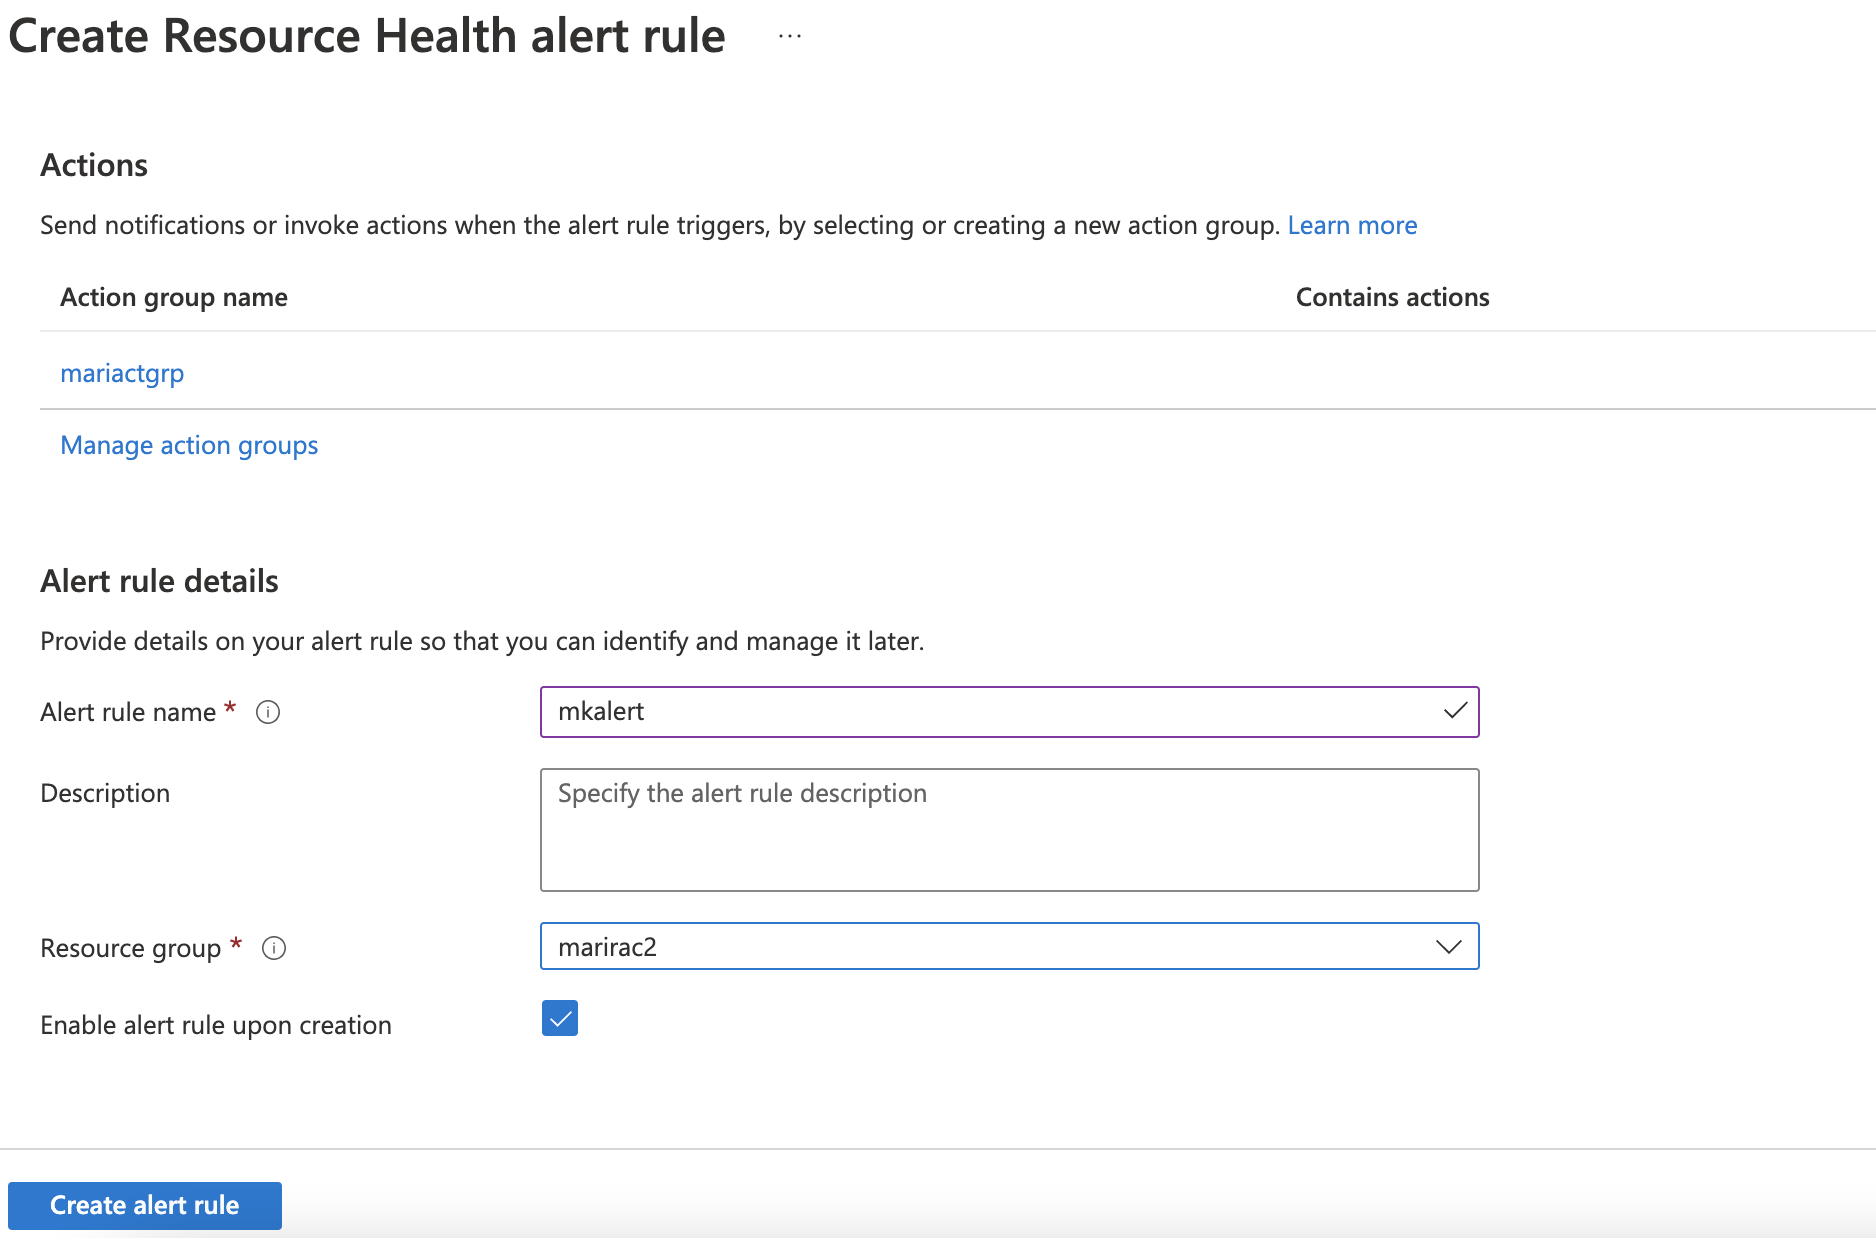
Click Create alert rule.

3. Go to the Resource Group (in my case marirac2) where you have created Action Group.

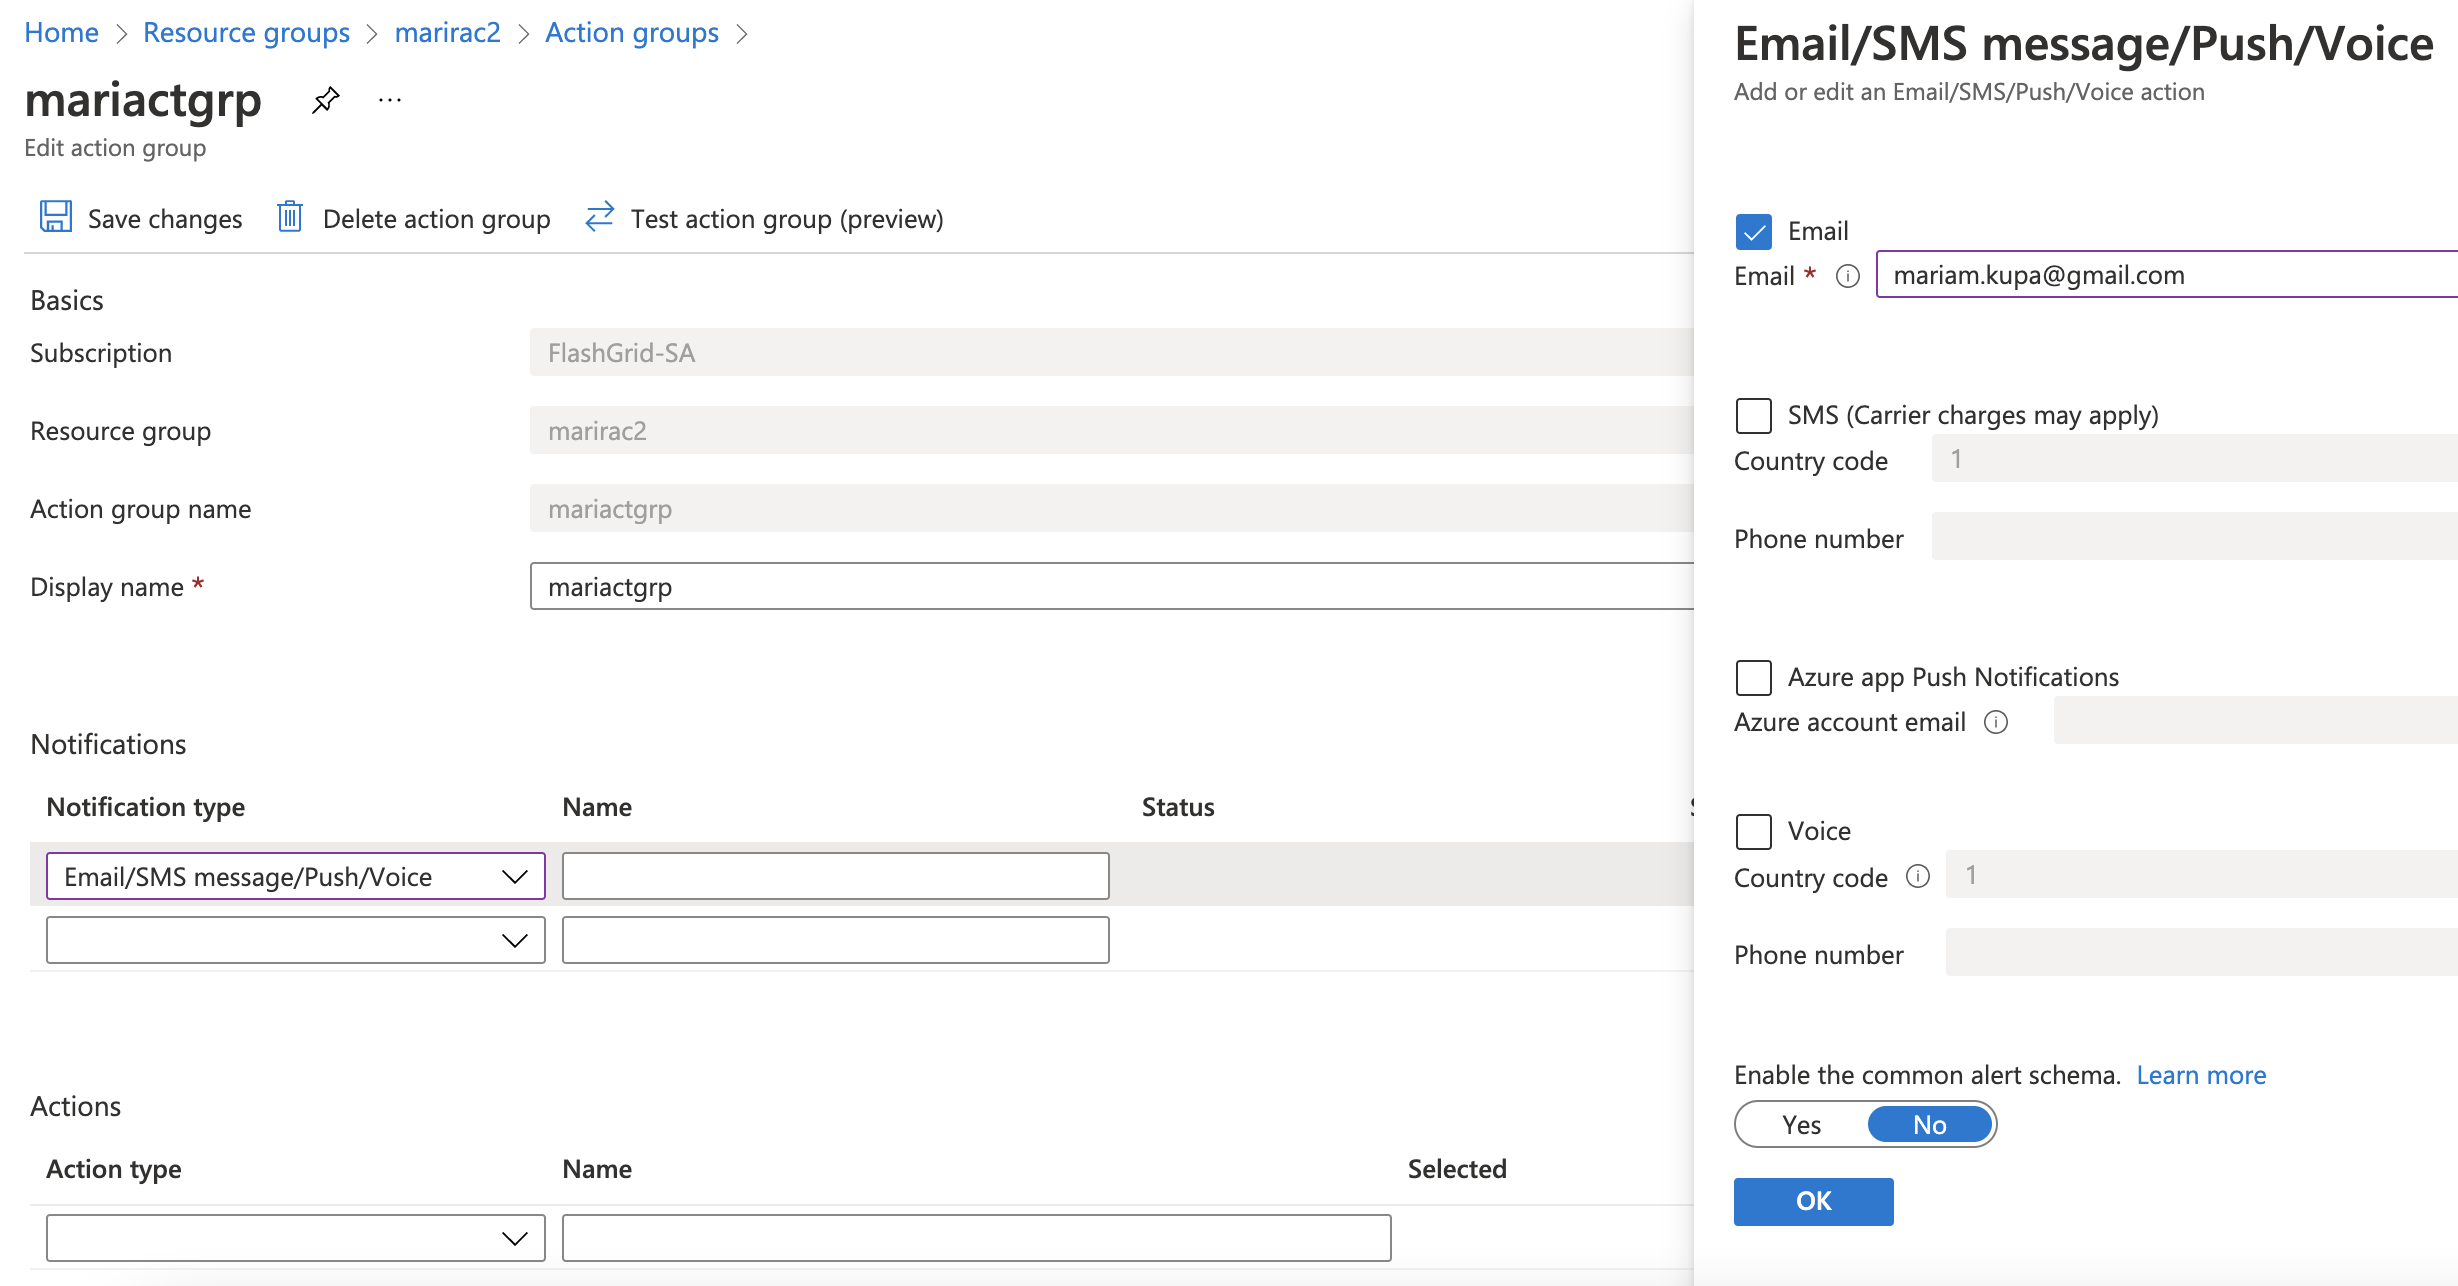
Resource groups -> marirac2 -> from the left-side panel choose Alerts -> Action groups -> choose action group name in my case mariactgrp -> on the Notifications section choose Email/SMS message/Push/Voice -> on the right-side panel click Email checkbox -> enter email address who will be responsible for receiving and handling these alerts -> click OK -> enter desirable name under Notifications section -> click Save changes.

4. Test alert by stopping and starting the VM (assuming it is a test environment)

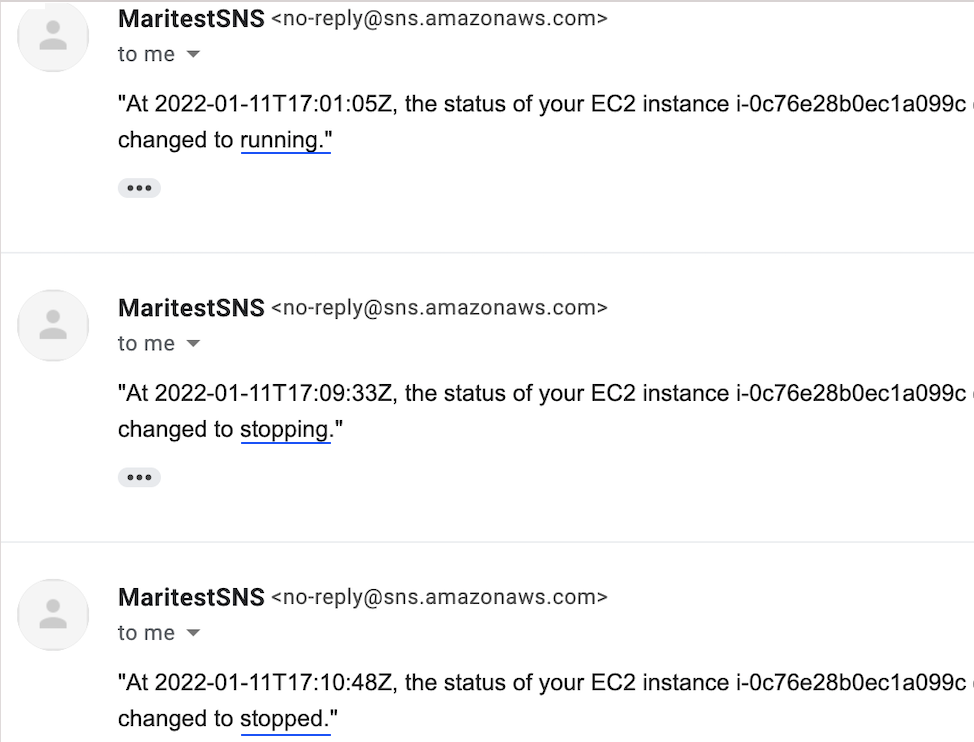
After changing the state of the VM you will receive the following notification.

Please note notification should have been sent as soon as VM changes the state but email can come 2 – 3 min later.

AWS: Get email when EC2 instance state changes

To setup email notification when your EC2 instances change state, you should configure the following:

  • Amazon SNS topic – where you define recepients
  • Create an EventBridge event – where you define rule on instances that will trigger the notification

1. Create an Amazon Simple Notification Service (Amazon SNS) topic:

Go to Amazon SNS -> Create topic ->

Screen 1

-> Click Create topic

Go to Subscriptions -> Create subscription

Screen 2

A subscription confirmation email is sent to the address you have entered. Choose Confirm subscription in the email (Screen 3):

Screen 3

2. Create an EventBridge event

Open the EventBridge console -> Create rule

Screen 4

 To monitor all instances, in the Event pattern enter the following (Screen 4)

{
"source": ["aws.ec2"],
"detail-type": ["EC2 Instance State-change Notification"]
}

If you are planing to monitor particular instances then you need to indicate their instance IDs using the following way:

{
"source": ["aws.ec2"],
"detail-type": ["EC2 Instance State-change Notification"],
"detail": {
"instance-id": ["i-0897b9d936bda3bda", "i-0c76e28b0ec1a099c"]
}
}

Please note, this pattern can also be generated by choosing “Pre-defined pattern by service” radio button and choosing appropriate services. But for simplicity the above pattern can be entered.

In the Select targets section, choose previously created SNS topic.


Screen 5

In the Input transformer (Screen 5) paste the following strings accordingly:

Input Path

{"instance-id":"$.detail.instance-id", "state":"$.detail.state", "time":"$.time", "region":"$.region", "account":"$.account"}

Input Template

"At <time>, the status of your EC2 instance <instance-id> on account <account> in the AWS Region <region> has changed to <state>."

Click Create.

3. Test the configuration

Start/stop target instanes and check your email:

The home is not clean. This home cannot be used since there was a failed OPatch execution in this home. Use a different home to proceed

Problem:

While installing Oracle software using applyRU:

$ /u01/app/oracle/product/19.3.0/dbhome_1/runInstaller -silent -applyRU /u01/swtmp/32895426/32904851/ -responseFile /opt/rsp/db_19.3_EE_swonlyinstall.rsp -ignorePrereqFailure -waitforcompletion

Got an error:

ERROR: The home is not clean. This home cannot be used since there was a failed OPatch execution in this home. Use a different home to proceed.

Solution:

If a previous attempt to install Oracle software using applyRU or applyOneOffs option failed, the home becomes unusable. Before retrying the process, you need to clean up the home first:

$ rm -rf /u01/app/oracle/product/19.3.0/dbhome_1/*

$ unzip -o /u01/swtmp/LINUX.X64_193000_db_home.zip -d /u01/app/oracle/product/19.3.0/dbhome_1

As a best practice I always have a new Opatch, so need to unzip it again:

$ unzip -o /u01/swtmp/p6880880_190000_Linux-x86-64.zip -d /u01/app/oracle/product/19.3.0/dbhome_1

Rerun the command:

$ /u01/app/oracle/product/19.3.0/dbhome_1/runInstaller -silent -applyRU /u01/swtmp/32895426/32904851/ -responseFile /opt/rsp/db_19.3_EE_swonlyinstall.rsp -ignorePrereqFailure -waitforcompletion
Preparing the home to patch...
Applying the patch /u01/swtmp/32895426/32904851/...

After GI upgrade flashgrid-cluster shows wrong diskgroup status

Problem:

I have upgraded Oracle GI from 12c to 19c. ASM is up and diskgroups are mounted, but flashgrid-cluster still shows that diskgroups are not mounted on any node:

[root@rac1 ~]# flashgrid-cluster
FlashGrid 21.8.67.66809 #707efdc10a212421dbd3737ef8e693ae14c15964
License: Active, Marketplace
Licensee: Flashgrid Inc.
Support plan: 24x7
~~~~~~~~~~~~~~~~~~~~~~~~~~~~~~~~~~~~~~~~~~~~~~~~~~~~~~~~~~~~~~~~~~~~~~~~~~~~~
FlashGrid running: OK
Clocks check: OK
Configuration check: OK
Network check: OK

Querying nodes: rac1, rac2, racq ...

Cluster Name: mariGIMR
Cluster status: Warning
-------------------------------------------------------------
Node  Status   ASM_Node  Storage_Node  Quorum_Node  Failgroup
-------------------------------------------------------------
rac1  Warning  Yes       Yes           No           RAC1
rac2  Warning  Yes       Yes           No           RAC2
racq  Warning  No        No            Yes          RACQ
-------------------------------------------------------------
-----------------------------------------------------------------------------
GroupName  Status  Mounted  Type  TotalMiB  FreeMiB  OfflineDisks  LostDisks  Resync  ReadLocal  Vote
-----------------------------------------------------------------------------
GRID     Warning  No  N/A   N/A   N/A    N/A    N/A  N/A     N/A        N/A
-----------------------------------------------------------------------------

Solution:

After upgrade, you should restart flashgrid_asm service on all nodes, it does not require downtime:

[root@rac1 ~]# systemctl restart flashgrid_asm
[root@rac2 ~]# systemctl restart flashgrid_asm

Check the status again:

...
-----------------------------------------------------------------------------
GroupName  Status  Mounted   Type    TotalMiB  FreeMiB  OfflineDisks  LostDisks  Resync  ReadLocal  Vote
-----------------------------------------------------------------------------
GRID    Good    AllNodes  NORMAL  204800    154336   0   0  No Enabled    3/3
-----------------------------------------------------------------------------