Fix WAN Miniport problem windows 8

Windoooooowwws , it makes me crazy some times 🙂

Sometimes(it’s my third time) I have problems with windows vpn, getting error 720.

It has a “simple”(when you know(:) solution but every time I come across this problem I forget how I solved it before and decided to write solution here.

In Device Manager under “Network adapters” , there is yellow exclamation mark over “WAN Miniport (IP)” and “WAN Miniport(Network Monitor)

Let’s uninstall it.

Uninstalling these miniports are not allowed. So first of all you should change it with different driver.

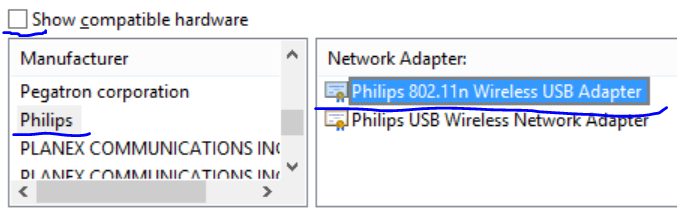
Locate your mouse on these driver and right click -> Update Driver Software->Browse my computer for driver software->Let me pick from a list of …-> uncheck “Show compatible hardware” and then choose for example Philips ->

ChangeDriver


When instead of WAN Miniport (IP) there appears the above driver , you can uninstall it.

Do the same steps for Network Monitor driver.

Now we do not have these drivers with exclamation marks.. because we do not have them at all 🙂

Now we are going to install these drivers with devcon.exe utility.

Download devcon 64bit version from http://static.miklos.ca/devcon.zip

Run CMD with administrator privileges, go to the directory where devcon.exe file exist and run:

devcon.exe install c:\windows\inf\netrasa.inf MS_NDISWANIP

Good Luck, it should now be working.

Upgrade Oracle Database from 11g to 12c

  1. Download Oracle 12c software fromhttp://www.oracle.com/technetwork/database/enterprise-edition/downloads/database12c-linux-download-1959253.html

    unzip files:

    unzip linuxamd64_12102_database_1of2.zip
    unzip linuxamd64_12102_database_2of2.zip
  2. Make another home for 12c.
    mkdir -p /u01/app/oracle/product/12.1.0/dblb
  3. Change permissions for /u01 directory.  If 11g home is also located in /u01 you have already done the steps bellow. Just check that permissions are the following:
    chown -R oracle:oinstall /u01
    chmod -R 775 /u01
  4. Change the following parameters in response file, other parameters just leave blank.
    Response file is located in installation directory… extract_drectory/database/response/db_install.rsp

     oracle.install.option=INSTALL_DB_SWONLY
     ORACLE_HOSTNAME=DBServerHostname
     UNIX_GROUP_NAME=oinstall
     INVENTORY_LOCATION=/u01/app/oraInventory
     SELECTED_LANGUAGES=en
     ORACLE_HOME=/u01/app/oracle/product/12.1.0/dblb
     ORACLE_BASE=/u01/app/oracle
     oracle.install.db.InstallEdition=EE
     oracle.install.db.DBA_GROUP=dba
     oracle.install.db.OPER_GROUP=dba
     oracle.install.db.BACKUPDBA_GROUP=dba
     oracle.install.db.DGDBA_GROUP=dba
     oracle.install.db.KMDBA_GROUP=dba
     SECURITY_UPDATES_VIA_MYORACLESUPPORT=false
     DECLINE_SECURITY_UPDATES=true
  5. Go to the 12c installation folder  and run runInstaller, to install 12c home:
     ./runInstaller -silent -responseFile /install/database/response/db_install.rsp  -waitforcompletion -showProgress

    When it asks , connect to the server via root user and run

    /u01/app/oracle/product/12.1.0/dblb/root.sh
  6. At this time your database should be turned on from 11g home. Connect to the database via SYS user and run the following scripts: emremove.sql will remove EM repository. olspreupgrade.sql will run preupgrade scripts

    You should also purge the recyclebin. For reducing upgrade time.

    Note: these scripts should be run to the open database , that is turned on by 11g

    export ORACLE_HOME=/u01/app/oracle/product/11.2.0/dblb
     sqlplus / as sysdba
     @/u01/app/oracle/product/12.1.0/dblb/rdbms/admin/emremove.sql
     @/u01/app/oracle/product/12.1.0/dblb/rdbms/admin/olspreupgrade.sql
     purge recyclebin;
  7. Run DBUA from 12c home to upgrade existing database
    export ORACLE_HOME=/u01/app/oracle/product/11.2.0/dblb
    /u01/app/oracle/product/12.1.0/dblb/bin/dbua -silent \
    -sid ORCL \
    -oracleHome /u01/app/oracle/product/11.2.0/dblb \
    -diagnosticDest /u01/app/oracle \
    -recompile_invalid_objects true \
    -degree_of_parallelism 40 \
    -upgradeTimezone \
    -emConfiguration NONE \
    -keepHiddenParams \
    -gatheringStatistics \
    -upgrade_parallelism 40
  8. To check that everything was upgraded successfully, after successful message from the previous command, check the following:
    cat /etc/oratab
    ORCL:/u01/app/oracle/product/12.1.0/dblb:N
    cat /u01/app/oraInventory/ContentsXML/inventory.xml
     <VERSION_INFO>
     <SAVED_WITH>12.1.0.2.0</SAVED_WITH>
     <MINIMUM_VER>2.1.0.6.0</MINIMUM_VER>
     </VERSION_INFO>

    Update the following parameters in your  .bash_profile:

     export ORACLE_HOME=/u01/app/oracle/product/12.1.0/dblb
     export LD_LIBRARY_PATH=/u01/app/oracle/product/12.1.0/dblb/lib
  9. Network file configuration. Stop listener that was previously started from 11g. Move listener.ora and tnsnames.ora files to 12c home and rename them in old location. Start the listener from 12c home.
    /u01/app/oracle/product/11.2.0/dblb/bin/lsnrctl stop
    cp /u01/app/oracle/product/11.2.0/dblb/network/admin/listener.ora /u01/app/oracle/product/12.1.0/dblb/network/admin
    cp /u01/app/oracle/product/11.2.0/dblb/network/admin/tnsnames.ora /u01/app/oracle/product/12.1.0/dblb/network/admin
    mv /u01/app/oracle/product/11.2.0/dblb/network/admin/tnsnames.ora /u01/app/oracle/product/11.2.0/dblb/network/admin/tnsnames.ora.old
    mv /u01/app/oracle/product/11.2.0/dblb/network/admin/listener.ora /u01/app/oracle/product/11.2.0/dblb/network/admin/listener.ora.old
    /u01/app/oracle/product/12.1.0/dblb/bin/lsnrctl start
  10. Connect to the database using 12c home and check again the version in v$instance view:
    export ORACLE_HOME=/u01/app/oracle/product/12.1.0/dblb
    sqlplus / as sysdba
    select instance_name,version,status
    from v$instance;
  11. If you want to deinstall 11g home run the following :
    /u01/app/oracle/product/11.2.0/dblb/deinstall/deinstall