We have two separate Real Application Clusters, one 12c and another 19c. We decided to migrate data from 12c to 19c by simply detaching all ASM disks from the source and attaching to the destination.
Steps:
1. Connect to the 12c GI via grid user and dismount FRA diskgroup on all nodes:
[grid@rac1 ~]$ sqlplus  / as sysasm
Connected to:
Oracle Database 12c Enterprise Edition Release 12.2.0.1.0 - 64bit Production
SQL> alter diskgroup FRA dismount;
Diskgroup altered.
[grid@rac2 ~]$ sqlplus  / as sysasm
Connected to:
Oracle Database 12c Enterprise Edition Release 12.2.0.1.0 - 64bit Production
SQL> alter diskgroup FRA dismount;
Diskgroup altered.
You can also use srvctl to stop the diskgroup with one command.
2. Detach disks belonging to the specific diskgroup from 12c cluster and attach to 19c cluster.
3. After ASM disks are visible on 19c cluster, connect as sysasm via grid user and mount the diskgroup:
# Check that there is no FRA resource
registered with CRS:
[root@rac1 ~]# crsctl status res -t |grep FRA
# Mount the diskgroup on all nodes
[grid@rac1 ~]$ sqlplus / as sysasm
Connected to:
Oracle Database 19c Enterprise Edition Release 19.0.0.0.0 - Production
Version 19.3.0.0.0
SQL> alter diskgroup FRA mount;
Diskgroup altered.
[grid@rac2 ~]$ sqlplus / as sysasm
Connected to:
Oracle Database 19c Enterprise Edition Release 19.0.0.0.0 - Production
Version 19.3.0.0.0
SQL> alter diskgroup FRA mount;
Diskgroup altered.
# FRA diskgroup resource will
automatically be registered with CRS:
[root@rac1 ~]# crsctl status res -t |grep FRA
ora.FRA.dg(ora.asmgroup)
Note that all these patches are part of RU 16-04-2019.
2. Stop all database instances on that node:
# srvctl stop instance -db orclA -i orclA1
3. Download Release Update 16-04-2019 (p29301687_122010_Linux-x86-64.zip), unzip and go to the unzipped patch location:
To rollback all these patches it is easier to have unzipped Release Update 16-04-2019 patch (all existing patches are part of it) on the server.
If you cannot download zipped RU then you need to indicate all patch ids in the list during opatchauto rollback -id 29314424,29314339,29301676,28566910,26839277
As long as I have unzipped RU on rac1, I will do by the following way:
[root@rac1 ~]# cd /u01/app/sw/29301687

[root@rac1 29301687]# ll
 total 132
 drwxr-x--- 4 grid oinstall     48 Mar 25 01:09 26839277
 drwxr-x--- 4 grid oinstall     48 Mar 25 01:08 28566910
 drwxr-x--- 5 grid oinstall     62 Mar 25 01:03 29301676
 drwxr-x--- 4 grid oinstall     67 Mar 25 01:08 29314339
 drwxr-x--- 5 grid oinstall     62 Mar 25 01:06 29314424
 drwxr-x--- 2 grid oinstall   4096 Mar 25 01:03 automation
 -rw-rw-r-- 1 grid oinstall   5828 Mar 25 01:29 bundle.xml
 -rw-r--r-- 1 grid oinstall 120219 Apr 10 18:07 README.html
 -rw-r----- 1 grid oinstall      0 Mar 25 01:03 README.txt
CRS was down on both nodes, during startup cluster encountered the following error when it was trying to mount diskgroup containing voting files and OCR:
WARNING: Disk Group VOTE containing configured OCR is not mounted
WARNING: Disk Group VOTE containing voting files is not mounted
ORA-15040: diskgroup is incomplete
ORA-15042: ASM disk "0" is missing from group number "1"
The diskgroup, where OCR and voting files were located was not able to mount because one disk was missing. As a result CRS is down:
# crsctl status res -t
 CRS-4535: Cannot communicate with Cluster Ready Services
 CRS-4000: Command Status failed, or completed with errors.
We know that NORMAL redundancy diskgroup can tolerate one mirror problem at a time.
Solution:
1. Start HAS and check status of the local resoureces
2. Connect to the ASM instance and mount diskgroup using force option.
ASM instance will be in nomount state, because diskgroup having voting files and OCR cannot be mounted.
Force option is mandatory, otherwise you will get the same ORA-15040 error.
# su - grid

$ sqlplus / as sysasm

SQL*Plus: Release 12.2.0.1.0 Production on Tue May 28 16:14:14 2019
Copyright (c) 1982, 2016, Oracle.  All rights reserved.

Connected to:
 Oracle Database 12c Enterprise Edition Release 12.2.0.1.0 - 64bit Production

SQL> alter diskgroup VOTE mount force;
Diskgroup altered.
This operation sometimes takes ~6min to complete because of the following notification in alert_ASM?.log
"WARNING: Background operations delayed until 05/28/19 16:19:47 because ASM was not stopped cleanly and there could be disconnected client(s)"
The error message is self explanatory.
3. The diskgroup online operation on the 2nd step should trigger clusterware autostart, if not start it using the following command:
MGMTDB is a repository database that saves Cluster Health Monitor (CHM) data. In Oracle 11g this information was stored in Berkley database ( .bdb files) but starting from Oracle database 12c it is configured as an Oracle single instance database.
In Oracle 12.1.0.1 – GIMR is optional. Whereas in Oracle 12.1.0.2 – it’s mandatory and it’s not supported to be turned off with the exception of Exadata. I’ve searched a lot to find out why it is not supported to be turned off, but I still do not have that answer. I only know that TFA collects some information from MGMTDB and if we turn it off, it means TFA will not be able to retrieve that information. In 19c GIMR is optional again.
The reason why I want to turn it off is that there are several bugs related to MGMTDB. We have noticed that several customers had performance-related issues because of MGMTDB. The repository database was able to use almost 100% of CPU resources. In addition to this, one customer noticed that MGMTDB increased up to 60GB and exhausted GRID diskgroup where OCR and voting files were located (this size is not normal for 3-node cluster).
More information about Grid Infrastructure Management Repository (GIMR) can be found at 1568402.1
Steps
Please consider that for 12.1.0.2 deleting it is not supported by Oracle, which is not clear why, but it is better to ask Oracle support before doing this.
Instead of deleting a repository, it is better to apply all bug fixes that are related to it. And try to use its intelligence to proactively tune your database. But if you still want to delete it, or at least know how to delete it – then let’s do that, it is not harmful.
1. Update the dependency
CHA has a dependency on mgmtdb:
[root@rac1 ~]# crsctl stat res ora.chad -p | grep mgmt
START_DEPENDENCIES=hard(global:ora.mgmtdb) pullup(global:ora.mgmtdb)
STOP_DEPENDENCIES=hard(global:intermediate:ora.mgmtdb)
If you try to delete mgmtdb without updating the dependency you will get:
Clear the dependency by setting the following attributes:
[grid@rac1 ~]$ srvctl status cha
Oracle Cluster Health Analysis Service is enabled
Oracle Cluster Health Analysis Service is running on nodes: rac1, rac2
2. Delete MGMTDB using dbca
Identify the node where mgmtdb is running:
[grid@rac1 ~]$ srvctl status mgmtdb
Database is enabled
Instance -MGMTDB is running on node rac1
Connect rac1 and run:
[grid@rac1 ~]$ dbca -silent -deleteDatabase -sourceDB -MGMTDB
[WARNING] [DBT-19202] The Database Configuration Assistant will delete the Oracle instances and datafiles for your database. All information in the database will be destroyed.
Prepare for db operation
32% complete
Connecting to database
35% complete
39% complete
42% complete
45% complete
48% complete
52% complete
65% complete
Updating network configuration files
68% complete
Deleting instance and datafiles
84% complete
100% complete
Database deletion completed.
Make sure that MGMTDB was deleted
[grid@rac1 ~]$ srvctl status mgmtdb
PRCD-1120 : The resource for database _mgmtdb could not be found.
PRCR-1001 : Resource ora.mgmtdb does not exist
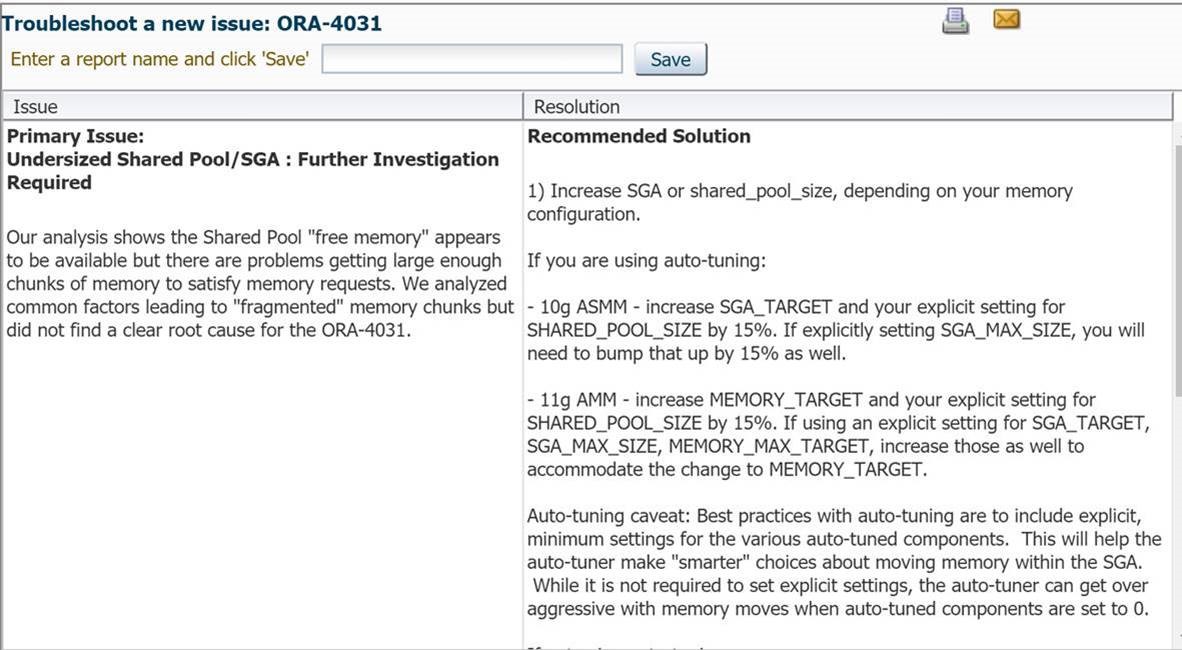
I want to share information about the document Doc ID 559339.1. The mentioned document contains links to very useful Diagnostics Tools for Database (as well as for Fusion Middleware and E-Business Suite)
Recently I used ORA-4031-Troubleshooting Tool, uploaded database TFA log and got very informative recommendation. My shared pool was fragmented and did not have large enough chunk of memory to satisfy memory requests. Based on this information we decided to increase shared_pool size.
2019-03-23T21:59:50.237+0000 INFO | Read SharedContext from store for length 1372 of file '/GG_HOME/deploy/var/lib/conf/ServiceManager-config.dat'. (main)
2019-03-23T21:59:50.242+0000 INFO | Read SharedContext from store for length 245 of file '/GG_HOME/deploy/var/lib/conf/global.dat'. (main)
2019-03-23T21:59:50.245+0000 INFO | Read SharedContext from store for length 19 of file '/GG_HOME/deploy/var/lib/conf/ServiceManager-resources.dat'. (main)
2019-03-23T21:59:50.247+0000 ERROR| XAG Integration mode global setting of true does not match command line setting of false. (main)
2019-03-23T21:59:50.249+0000 ERROR| XAG Configuration failed (main)
Solution:
Pass `--xagEnabled` option when starting ServiceManager:
When you have untrusted source and trusted target. Or in simple words, your untrusted source should not have IP address and manager port details of the trusted target system in the configuration. And the trusted target is allowed to know VIP or Host IP of the untrusted source.
How does it work?
1) Start command must be issued on the Trusted Target for the Alias Extract, that is intercepted by Manager. 2) Start command is forwarded to the Manager on the Untrusted Source. 3) Manager on the Untrusted Source starts Passive Extract. 4) Passive Extract retrieves data from source database. 5) After security validation, Manager on the Untrusted Source knows where to send Trails (initiator server IP). And sends captured data. 6) Trail files are read by Replicat. 7) Data from the Trails are applied to the database at the Trusted Target.
GGSCI (primrac1.example.com)> edit params mgr
PORT 7809
ACCESSRULE, PROG *, IPADDR *, PRI 1, ALLOW
AUTORESTART ER *, RETRIES 5, WAITMINUTES 1, RESETMINUTES 60
AUTOSTART ER *
On the target:
GGSCI (stbyrac1.example.com)> edit params mgr
PORT 7809
ACCESSRULE, PROG *, IPADDR *, PRI 1, ALLOW
AUTORESTART ER *, RETRIES 5, WAITMINUTES 1, RESETMINUTES 60
AUTOSTART ER *
ACCESSRULE is used to control connection access to the Manager process and the processes under its control. By default there is only deny rule.
For testing purposes I created a rule that grants access to all programs and all IP addresses. In production environment you have to filter incomming IPs. For more information about ACCESSRULE, please click here.
Modify Globals
To allow a remote Director server connection, add the following parameter in ./GLOBALS:
START and STOP commands must be run on Alias Extract. Any GGSCI command executed against the Alias Extract is forwarded to the untrusted source for execution against the Passive Extract.
If you try to STOP or START Passive Extract, you will get the following error:
GGSCI (primrac1.example.com as ggcw@orclgg)> start PASSEXTR
ERROR: START is not allowed against a passive group.
GGSCI (primrac1.example.com as ggcw@orclgg)> stop PASSEXTR
ERROR: STOP is not allowed against a passive group.
Run start on only Alias Extract:
GGSCI (stbyrac1.example.com as ggcw@orclgg)> start AlExtr
Sending START request to MANAGER@PRIMRAC1.EXAMPLE.COM:7809 …
Sending START request to MANAGER@stbyrac1.example.com:7809 …
Check Status
GGSCI (stbyrac1.example.com as ggcw@orclgg)> info all
Program     Status      Group       Lag at Chkpt  Time Since Chkpt
MANAGER     RUNNING
EXTRACT     RUNNING     ALEXTR
GGSCI (primrac1.example.com as ggcw@orclgg)> info all
Program     Status      Group       Lag at Chkpt  Time Since Chkpt
MANAGER     RUNNING
EXTRACT     RUNNING     PASSEXTR    00:00:00      00:18:14
For any possible problems you can check ggserr.log file under GG home.
This parameter can be entered under DESCRIPTION_LIST, DESCRIPTION or ADDRESS_LIST. After setting LOAD_BALANCE to a positive value, the list of addresses is processed in a random sequence.
Values: on, yes, true, off, no, false.
Default: ON for DESCRIPTION_LIST. Please note that for DESCRIPTION and ADDRESS_LIST it is OFF by default.
Don’t be confused with the keyword balance. Oracle client does not know which database node is least loaded, this parameter only chooses addresses randomly there is no real balancing here.
The real balancing is a server-side task, when you connect to the SCAN listener it finds a least loaded node and redirects the connection to that node. LOAD_BALANCE=ON will help you to distribute the load between SCAN listeners but not evenly.
In the following test scenario, we will see how behaves client connection when using LOAD_BALANCE parameter.
In the above connection string, I have used two other parameters. If you are not faimiliar with them, please see a brief explanation bellow:
TRANSPORT_CONNECT_TIMEOUT:
“The TRANSPORT_CONNECT_TIMEOUT parameter specifies the time, in seconds, for a client to establish a TCP connection to the database server. The default value is 60 seconds.” For more information, click here
RETRY_COUNT:
“To specify the number of times an ADDRESS list is traversed before the connection attempt is terminated.” For more information, click here
Enable client tracing by specifying the following parameters in client sqlnet.ora file:
TRACE_LEVEL_CLIENT = USER
TRACE_FILE_CLIENT = MY_SQLNET.TRC
TRACE_DIRECTORY_CLIENT = /SQLTRACE_FOLDER
TRACE_TIMESTAMP_CLIENT = on
TRACE_UNIQUE_CLIENT = ON
DIAG_ADR_ENABLED = OFF
Try the connection using the above TNS alias and analyze generated trace file.
[10-MAR-2019 15:38:27:271] nttbnd2addr: using host IP address: 13.13.13.13
[10-MAR-2019 15:38:30:274] nttbnd2addr: using host IP address: 14.14.14.14
[10-MAR-2019 15:38:33:276] nttbnd2addr: using host IP address: 11.11.11.11
[10-MAR-2019 15:38:36:279] nttbnd2addr: using host IP address: 15.15.15.15   <- instead of 12 it chose 15
[10-MAR-2019 15:38:39:282] nttbnd2addr: using host IP address: 12.12.12.12
[10-MAR-2019 15:38:42:286] nttbnd2addr: using host IP address: 10.10.10.10
[10-MAR-2019 15:38:45:289] nttbnd2addr: using host IP address: 15.15.15.15
[10-MAR-2019 15:38:48:292] nttbnd2addr: using host IP address: 14.14.14.14
[10-MAR-2019 15:38:51:294] nttbnd2addr: using host IP address: 13.13.13.13
[10-MAR-2019 15:38:54:297] nttbnd2addr: using host IP address: 12.12.12.12
[10-MAR-2019 15:38:57:298] nttbnd2addr: using host IP address: 10.10.10.10
[10-MAR-2019 15:39:00:299] nttbnd2addr: using host IP address: 11.11.11.11
[10-MAR-2019 15:39:03:302] nttbnd2addr: using host IP address: 11.11.11.11  <- Here it used the same address again
[10-MAR-2019 15:39:06:303] nttbnd2addr: using host IP address: 14.14.14.14
[10-MAR-2019 15:39:09:306] nttbnd2addr: using host IP address: 15.15.15.15
[10-MAR-2019 15:39:12:309] nttbnd2addr: using host IP address: 12.12.12.12
[10-MAR-2019 15:39:15:312] nttbnd2addr: using host IP address: 10.10.10.10
[10-MAR-2019 15:39:18:314] nttbnd2addr: using host IP address: 13.13.13.13
[10-MAR-2019 15:39:21:315] nttbnd2addr: using host IP address: 15.15.15.15
[10-MAR-2019 15:39:24:318] nttbnd2addr: using host IP address: 13.13.13.13
From the above output we can conclude that addresses
were chosen randomly.
Let’s comment LOAD_BALANCE parameter in connection string or explicitly specify LOAD_BALANCE=OFF. Increase RETRY_COUNT until 5 to see a better picture.
[10-MAR-2019 15:53:08:108] nttbnd2addr: using host IP address: 10.10.10.10
[10-MAR-2019 15:53:11:109] nttbnd2addr: using host IP address: 11.11.11.11
[10-MAR-2019 15:53:14:110] nttbnd2addr: using host IP address: 12.12.12.12
[10-MAR-2019 15:53:17:111] nttbnd2addr: using host IP address: 13.13.13.13
[10-MAR-2019 15:53:20:112] nttbnd2addr: using host IP address: 14.14.14.14
[10-MAR-2019 15:53:23:114] nttbnd2addr: using host IP address: 15.15.15.15

[10-MAR-2019 15:53:26:117] nttbnd2addr: using host IP address: 10.10.10.10
[10-MAR-2019 15:53:29:120] nttbnd2addr: using host IP address: 11.11.11.11
[10-MAR-2019 15:53:32:123] nttbnd2addr: using host IP address: 12.12.12.12
[10-MAR-2019 15:53:35:124] nttbnd2addr: using host IP address: 13.13.13.13
[10-MAR-2019 15:53:38:127] nttbnd2addr: using host IP address: 14.14.14.14
[10-MAR-2019 15:53:41:131] nttbnd2addr: using host IP address: 15.15.15.15

[10-MAR-2019 15:53:44:132] nttbnd2addr: using host IP address: 10.10.10.10
[10-MAR-2019 15:53:47:135] nttbnd2addr: using host IP address: 11.11.11.11
[10-MAR-2019 15:53:50:139] nttbnd2addr: using host IP address: 12.12.12.12
[10-MAR-2019 15:53:53:142] nttbnd2addr: using host IP address: 13.13.13.13
[10-MAR-2019 15:53:56:144] nttbnd2addr: using host IP address: 14.14.14.14
[10-MAR-2019 15:53:59:147] nttbnd2addr: using host IP address: 15.15.15.15

[10-MAR-2019 15:54:02:150] nttbnd2addr: using host IP address: 10.10.10.10
[10-MAR-2019 15:54:05:153] nttbnd2addr: using host IP address: 11.11.11.11
[10-MAR-2019 15:54:08:156] nttbnd2addr: using host IP address: 12.12.12.12
[10-MAR-2019 15:54:11:159] nttbnd2addr: using host IP address: 13.13.13.13
[10-MAR-2019 15:54:14:160] nttbnd2addr: using host IP address: 14.14.14.14
[10-MAR-2019 15:54:17:161] nttbnd2addr: using host IP address: 15.15.15.15

[10-MAR-2019 15:54:20:164] nttbnd2addr: using host IP address: 10.10.10.10
[10-MAR-2019 15:54:23:165] nttbnd2addr: using host IP address: 11.11.11.11
[10-MAR-2019 15:54:26:167] nttbnd2addr: using host IP address: 12.12.12.12
[10-MAR-2019 15:54:29:170] nttbnd2addr: using host IP address: 13.13.13.13
[10-MAR-2019 15:54:32:171] nttbnd2addr: using host IP address: 14.14.14.14
[10-MAR-2019 15:54:35:174] nttbnd2addr: using host IP address: 15.15.15.15

[10-MAR-2019 15:54:38:175] nttbnd2addr: using host IP address: 10.10.10.10
[10-MAR-2019 15:54:41:178] nttbnd2addr: using host IP address: 11.11.11.11
[10-MAR-2019 15:54:44:182] nttbnd2addr: using host IP address: 12.12.12.12
[10-MAR-2019 15:54:47:184] nttbnd2addr: using host IP address: 13.13.13.13
[10-MAR-2019 15:54:50:187] nttbnd2addr: using host IP address: 14.14.14.14
[10-MAR-2019 15:54:53:190] nttbnd2addr: using host IP address: 15.15.15.15
If you turn off LOAD_BALANCE then addresses are chosen using round-robin until one succeeds or until (RETRY_COUNT * #_of_addresses).
ORA-12578: TNS:wallet open failed encountered while starting the database using SRVCTL. Auto-login wallet doesn’t open during database startup when started using SRVCTL .
$ srvctl start database -db orcl PRCD-1332 : failed to start database orcl PRCR-1079 : Failed to start resource ora.orcl.db CRS-5017: The resource action “ora.orcl.db start” encountered the following error: ORA-01078: failure in processing system parameters ORA-01565: error in identifying file ‘+DATA/ORCL/PARAMETERFILE/spfile.291.1001107969’ ORA-17503: ksfdopn:10 Failed to open file +DATA/ORCL/PARAMETERFILE/spfile.291.1001107969 ORA-12578: TNS:wallet open failed
There are two solutions:
Solution1:
Start the database in mount mode using sqlplus:
SQL> startup mount;
Open the wallet:
SQL> alter system set encryption wallet open identified by “wallet_password”;
Open the database:
SQL> alter database open;
Solution2:
Check the value of TNS_ADMIN value by executing:
$ srvctl getenv database -d orcl -t “TNS_ADMIN” orcl: PRKF-1128 : Environment variable TNS_ADMIN is not defined.
“If you’re confused as to why Oracle skipped 6 releases, it may be simpler to regard Oracle Database 18c as Oracle Database 12c Release 2 12.2.0.2, where Oracle simply changed the naming to reflect the year in which the product is released.
Oracle Database 18c is the first version of the product to follow a yearly release pattern. “