Note: The post may seem related to Linux only. However, the issue of high rxdrop/s affects anything, especially Oracle database performance, if it occurs on the database server.
In this post, I will explain the parameters that affect the behavior of receive packet drops per second (rxdrop/s). The post is more about workarounds and tuning values rather than identifying exactly what has changed and why the fragmentation level has increased. We will discuss several key /etc/sysctl.conf parameters that can help make fragmentation more manageable, these are:
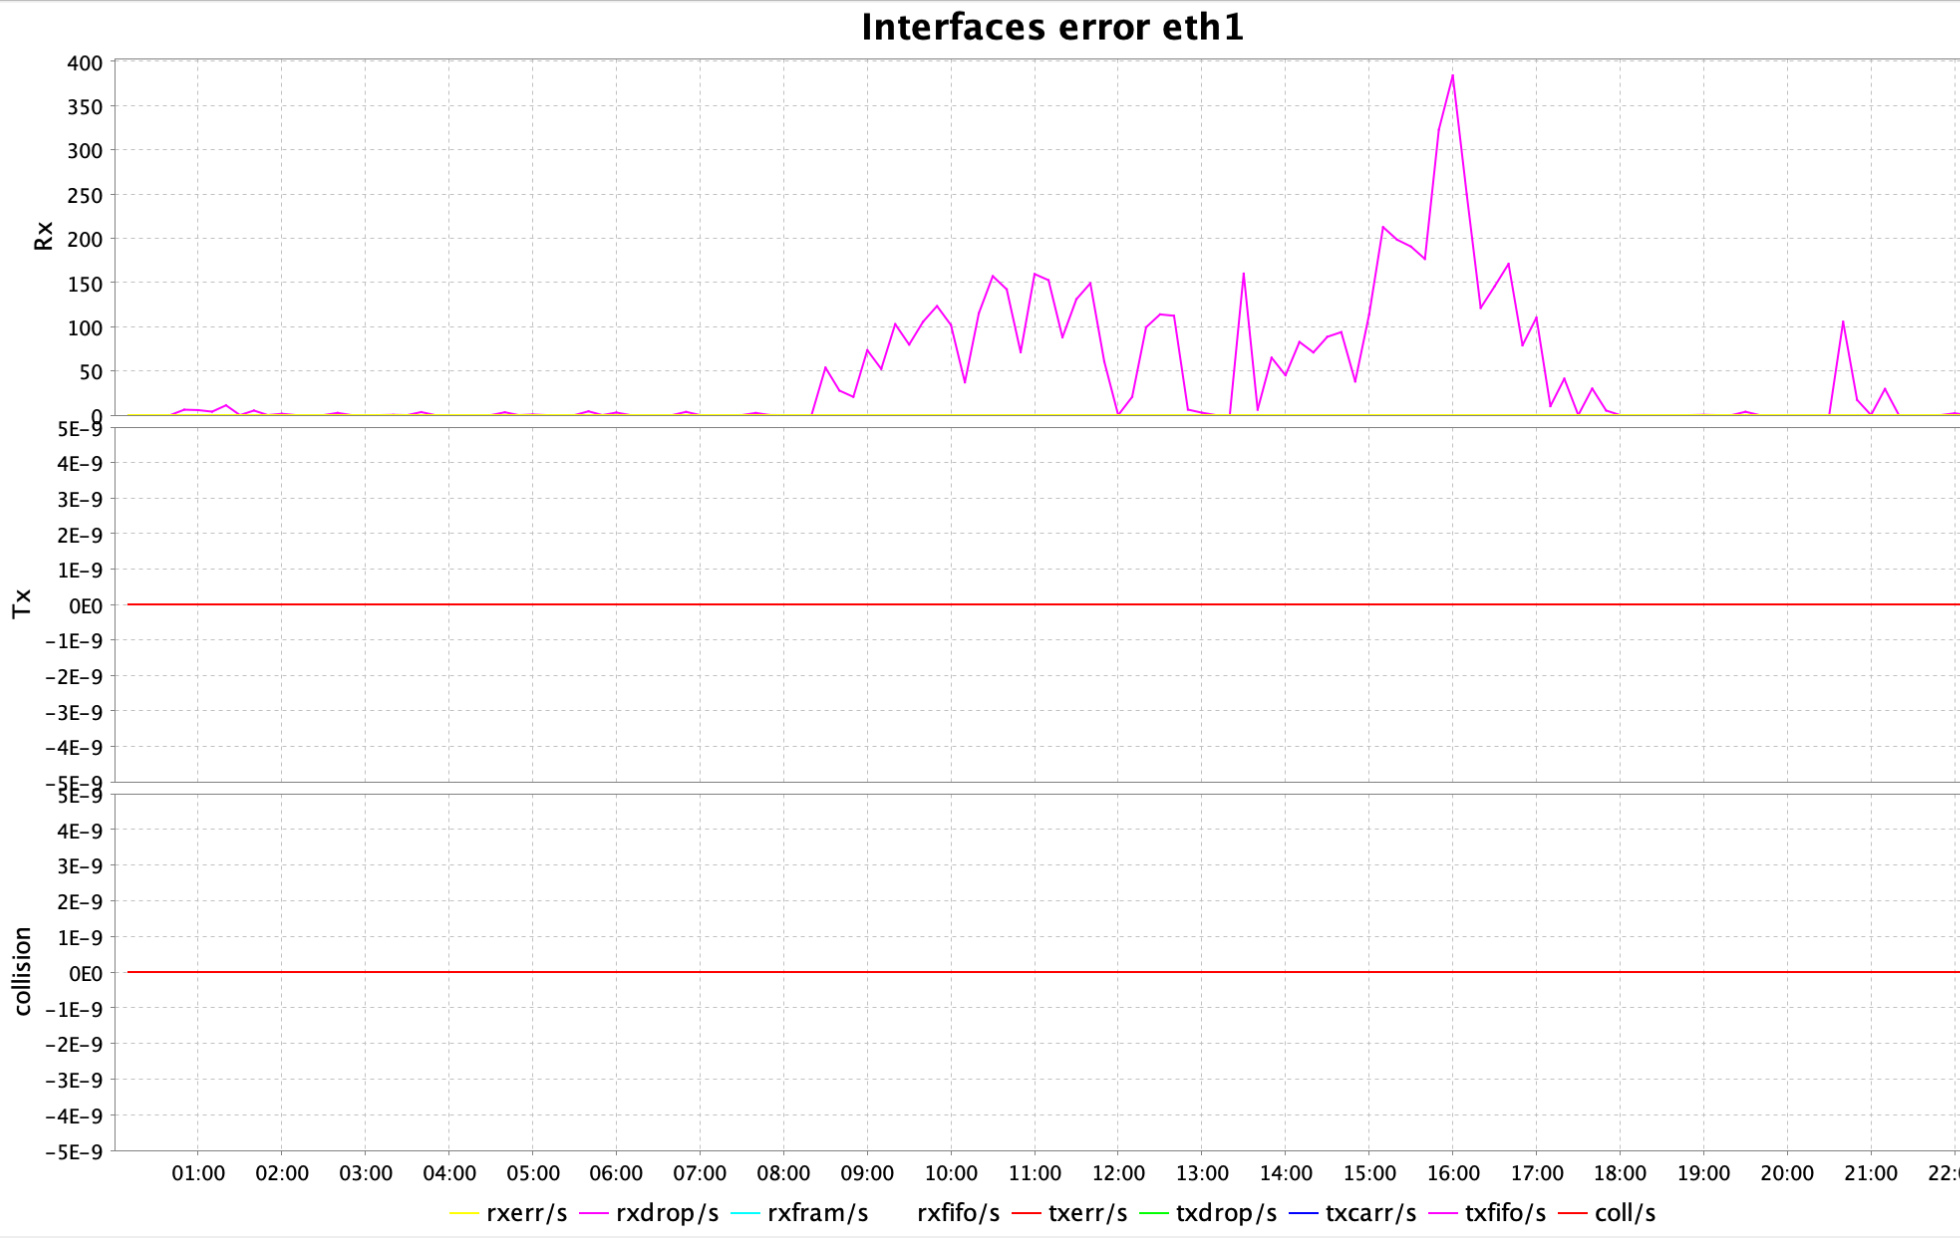
The ksar graph (a tool that interprets output from sar) was displaying peaks for interface errors on eth1 interface, particularly rxdrop/s:
Workaround:
The following kernel parameters in Linux control how the system handles IP packet fragments in the IPv4 stack.
The maximum memory threshold (in bytes) that the kernel can use to store IPv4 fragmented packets:
net.ipv4.ipfrag_high_thresh = 67108864
When the total memory used for IP fragments exceeds 64 MB (67108864), the kernel will start dropping fragments until memory usage falls below the low threshold (ipfrag_low_thresh next parameter).
The minimum memory threshold to stop dropping fragments:
net.ipv4.ipfrag_low_thresh = 66060288
Once memory drops below ~63 MB (66060288), fragment discarding stops.
The time (in seconds) the kernel will keep an incomplete, fragmented packet in memory before discarding it:
net.ipv4.ipfrag_time = 10
The default is often 30 seconds. Here it’s reduced to 10 seconds.
This helps prevent memory from being held too long by incomplete or malicious fragment streams, which are common in DoS attacks.
After changing these parameters in /etc/sysctl.conf you need to run sysctl -p to apply the modified kernel parameters and make them effective at runtime.
Determining the schedule for a new database release can be challenging. Online, you may encounter misleading information suggesting that the database has already launched when it is still not generally available (GA). To ensure you have accurate details, refer to the following metalink article.
Release Schedule of Current Database Releases (Doc ID 742060.1)
Also, verify the document’s update date found on the right side under Document Details -> Last Major Update -> Last Update.
While running command in GGSCI, I received the following messages:
GGSCI (rac1.mycompany.mydomain as ggcw@orcl2) 4>  ADD TRANDATA HR.*
...
2024-04-06 00:13:51  WARNING OGG-00706  Failed to add supplemental log group on table HR.TEST due to ORA-06550: line 1, column 46:
PL/SQL: ORA-00904: "DBMS_XSTREAM_GG_ADM"."SYNCHRONIZATION": invalid identifier
ORA-06550: line 1, column 39:
PL/SQL: SQL Statement ignored
ORA-06550: line 1, column 109:
PLS-00201: identifier 'DBMS_XSTREAM_GG_ADM' must be declared
ORA-06550: line 1, column 109:
PL/SQL: Statement ignored
ORA-06550: line 1, column 156:
PLS-00201: identifier 'DBMS_CAPTURE_ADM' must be declared
ORA-06550: line 1, column 156:
PL/SQL: Statement ignored
ORA-06550: line 1, column 263:
PLS-00201: identifier 'DBMS_XSTREAM_GG_ADM' must be declared
ORA-06550: line 1, column 263:
PL/SQL: Statement ignored
 SQL DECLARE saved_sync varchar2(4); BEGIN select dbms_xstream_gg_adm.synchronization into saved_sync from dual; dbms_xstream_gg_adm.synchronization := 'NONE'; DBMS_CAPTURE_ADM.PREPARE_TABLE_INSTANTIATION(table_name => '"HR"."TEST"', supplemental_logging => 'none'); dbms_xstream_gg_adm.synchronization := saved_sync; END;.
Solution:
Connect to the database via sqlplus and grant the below privileges to GG user (ggcw in my case):
exec dbms_goldengate_auth.grant_admin_privilege('ggcw');
grant select any dictionary to ggcw;
grant insert any table to ggcw;
grant update any table to ggcw;
grant delete any table to ggcw;
Rerun the statement:
GGSCI (rac1.mycompany.mydomain as ggcw@orcl2) 4> ADD TRANDATA HR.*
On the Oracle site or on the Internet, there is no useful information that can help so far. The only place you should search for the reason is in dbca logs generated under /u01/app/oracle/cfgtoollogs/dbca
/usr/bin/scp binary was removed from the system. Which has caused the Oracle Patching process to fail.
scp binary is provided by openssh-clients rpm, which was present on the system, but scp binary was missing.
Troubleshooting/Testing:
The workaround is to copy scp binary from a similar healthy server (keep the same version). However, transferring a file to a location where it doesn’t exist can be a bit challenging. Let’s try:
[fg@rac1 ~]$ scp /usr/bin/scp racq:/tmp/scp
bash: scp: command not found
lost connection
We got lost connection, because scp is not on racq node.
Solution:
Need to use ssh and cat commands. For most systems root user login is not enabled, so you need to place the file under /tmp and then relocate to the correct location.
In my example, I have already set up fg user equivalency, so in my case, the format will be the following:
But because of filename contains + sign, my command fails:
[root@rac2 trace]# vim +ASM2_ora_26576.trc

Error detected while processing command line:
E492: Not an editor command: ASM2_ora_26576.trc
Press ENTER or type command to continue
Solution:
Indicate — (two dashes)
[root@rac2 trace]# vim -- +ASM2_ora_26576.trc
From man page of vim — means the following:
-- Denotes the end of the options. Arguments after this will be handled as a file name. This can be used to edit a filename that starts with a '-'.
Please note another copy of controlfile is already on ASM, +FRA diskgroup. We are moving the first one.
SQL> show parameter control_files

NAME				     TYPE	 VALUE
------------------------------------ ----------- ------------------------------
control_files			     string	 /u01/app/oracle/oradata/PRSH01
						 /control01.ctl, +FRA/PRSH01/co
						 ntrol02.ctl
2. Place database into nomount mode using RMAN and copy controlfile to new location:
$ rman target /

RMAN> startup nomount;
RMAN> restore controlfile to '+DATA' from '/u01/app/oracle/oradata/PRSH01/control01.ctl';
SQL> alter system set control_files='+data/PRSH01/CONTROLFILE/current.261.1122675497','+FRA/PRSH01/control02.ctl' scope=spfile;
5. Restart database
SQL> shutdown immediate;
SQL> startup
6. Double check new location
SQL> show parameter control_files

NAME				     TYPE	 VALUE
------------------------------------ ----------- ------------------------------
control_files			     string	 +DATA/PRSH01/CONTROLFILE/curre
						 nt.261.1122675497, +FRA/PRSH01
						 /control02.ctl
1. Connect to the database using RMAN and move database into mount mode:
$ rman target /
RMAN> shutdown immediate
RMAN> startup mount
2. Get information about target datafiles and tempfiles:
RMAN> report schema;

using target database control file instead of recovery catalog
Report of database schema for database with db_unique_name PRSH01

List of Permanent Datafiles
===========================
File Size(MB) Tablespace           RB segs Datafile Name
---- -------- -------------------- ------- ------------------------
1    1020     SYSTEM               YES     /u01/app/oracle/oradata/PRSH01/system01.dbf
3    490      SYSAUX               NO      /u01/app/oracle/oradata/PRSH01/sysaux01.dbf
4    850      UNDOTBS1             YES     /u01/app/oracle/oradata/PRSH01/undotbs01.dbf
7    5        USERS                NO      /u01/app/oracle/oradata/PRSH01/users01.dbf

List of Temporary Files
=======================
File Size(MB) Tablespace           Maxsize(MB) Tempfile Name
---- -------- -------------------- ----------- --------------------
1    114      TEMP                 32767       /u01/app/oracle/oradata/PRSH01/temp01.dbf
3. Copy datafiles from filesystem to ASM diskgroup, in our case to +DATA:
RMAN> copy datafile 1 to '+DATA';
RMAN> copy datafile 3 to '+DATA';
RMAN> copy datafile 4 to '+DATA';
RMAN> copy datafile 7 to '+DATA';
RMAN> switch datafile 1 to copy;
RMAN> switch datafile 3 to copy;
RMAN> switch datafile 4 to copy;
RMAN> switch datafile 7 to copy;
4. Place tempfile on +DATA:
RMAN> run{
2> set newname for tempfile 1 to '+DATA';
3> switch tempfile 1;
4> }

executing command: SET NEWNAME
renamed tempfile 1 to +DATA in control file
5. Double check that all files have a new name
RMAN> report schema;

Report of database schema for database with db_unique_name PRSH01

List of Permanent Datafiles
===========================
File Size(MB) Tablespace           RB segs Datafile Name
---- -------- -------------------- ------- ------------------------
1    1020     SYSTEM               ***     +DATA/PRSH01/DATAFILE/system.256.1122674191
3    570      SYSAUX               ***     +DATA/PRSH01/DATAFILE/sysaux.257.1122674225
4    910      UNDOTBS1             ***     +DATA/PRSH01/DATAFILE/undotbs1.258.1122674235
7    5        USERS                ***     +DATA/PRSH01/DATAFILE/users.259.1122674253

List of Temporary Files
=======================
File Size(MB) Tablespace           Maxsize(MB) Tempfile Name
---- -------- -------------------- ----------- --------------------
1    114      TEMP                 32767       +DATA
6. Open database:
RMAN> alter database open;
7. Check new file names. Note tempfile name will also be generated:
RMAN> report schema;

Report of database schema for database with db_unique_name PRSH01

List of Permanent Datafiles
===========================
File Size(MB) Tablespace           RB segs Datafile Name
---- -------- -------------------- ------- ------------------------
1    1020     SYSTEM               YES     +DATA/PRSH01/DATAFILE/system.256.1122674191
3    570      SYSAUX               NO      +DATA/PRSH01/DATAFILE/sysaux.257.1122674225
4    910      UNDOTBS1             YES     +DATA/PRSH01/DATAFILE/undotbs1.258.1122674235
7    5        USERS                NO      +DATA/PRSH01/DATAFILE/users.259.1122674253

List of Temporary Files
=======================
File Size(MB) Tablespace           Maxsize(MB) Tempfile Name
---- -------- -------------------- ----------- --------------------
1    114      TEMP                 32767       +DATA/PRSH01/TEMPFILE/temp.260.1122674673
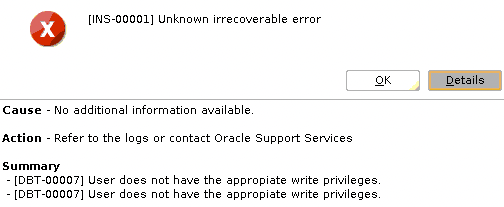
While trying to run dbca from Oracle user I received the following error:
Cause - No additional information available.
Action - Refer to the logs or contact Oracle Support Services

Summary
- [DBT-00007] User does not have the appropiate write privileges.
- [DBT-00007] User does not have the appropiate write privileges.
Screenshot:
Solution:
Make sure the directory has the correct owner and permissions, otherwise set: