RALUS is a remote agent installation , simply Linux client of Backup exec that can be retrieved from Backup Exec installation DVD in LinuxUnixMac folder.
Some details:
Client Server IP: 10.0.1.100
Client Hostname: orcl_node
Domain: sa.ge
Media Server IP: 192.168.1.100
Create some installation directory and locate RALUS installation file to this folder.
1. Installation
# mkdir /0
# cd /0
# tar -xvf RALUS_RMALS_RAMS-4164.5.tar
# ./installralus
Step 1:
Enter the system names separated by spaces on which to install RALUS: (oracle-node1.tbilisi.gov.ge)10.0.1.100
Checking system communication:
Checking OS version on 10.0.1.100 ………….. Linux 2.6.18-194.el5
Checking system support for 10.0.1.100 … Linux 2.6.18-194.el5 supported by RALUS
Initial system check completed successfully.
Press Enter.
Step 2:
Press Enter.
Step 3:
If the output is:
Checking file system space ……………. required space is available
Then press Enter
Step 4:
To display the Remote Agent as a selection in a media server’s backup selection tree, and to be able to specify a local network for use between the Remote Agent and a media server, enter the names or IP addresses of the media servers that you want the Remote Agent on ‘10.0.1.100’ to communicate with.
An IP Address: XXX.XXX.XXX.XXX
A Host Name: COMPUTERNAME
Enter a directory host:192.168.1.100
Do you want to add another name or address for this agent? [y, n] (n)
Step 5:
If the information is correct press Enter
Step 6:
In this step beoper group will be created if it doesn’t exist and root user will be added to this group.
Press Enter
Press Enter
Press Enter (choosing y option by default)
Press Enter(choosing n option by default)
Press Enter (choosing y option by default)
Press Enter
Step 7 :
Checking VRTSralus package ………………………… not installed
Press Enter
Step 8:
Installing VRTSralus 13.0.4164 on 10.0.1.100 …… done 1 of 1 steps
Press Enter
Step 9 :
Creating configuration files on 10.0.1.100 ………………… Done
Press Enter
RALUS installation is complete, now it’s time to configure it.
2. Configuration on Client
Step 1:
Run AgentConfig:
# /opt/VRTSralus/bin/AgentConfig
Symantec Backup Exec Remote Agent Utility
Choose one of the following options:
1. Configure database access
2. Configure Oracle instance information
3. Quit
Please enter your selection: 1
Configuring machine information
Choose one of the following options:
1. Add system credentials for Oracle operations
2. Edit system credentials used for Oracle operations
3. Remove system credentials used for Oracle operations
4. View system credentials used for Oracle operations
5. Quit
Please enter your selection: 1
Enter a user name that has local system credentials: oracle
Enter the password:
Re-enter password:
Validating credentials…….
Do you want to use a custom port to connect to the media server during Oracle operations? (Y/N): N
Commit Oracle operation settings to the configuration file? (Y/N): Y
SUCCESS: Successfully added the entry to the configuration file.
Configuring machine information
Choose one of the following options:
1. Add system credentials for Oracle operations
2. Edit system credentials used for Oracle operations
3. Remove system credentials used for Oracle operations
4. View system credentials used for Oracle operations
5. Quit
Please enter your selection: 5
Symantec Backup Exec Remote Agent Utility
Choose one of the following options:
1. Configure database access
2. Configure Oracle instance information
3. Quit
Please enter your selection: 2
If this computer is a RAC node, you must perform additional steps for configuration before you continue. Refer to the readme for these additional steps.
Configuring the Oracle Agent
Choose one of the following options:
1. Add a new Oracle instance to protect
2. Edit an existing Oracle instance
3. Delete an existing Oracle instance
4. View Oracle instance entries that have been added in the Remote Agent Utility
5. Quit
Please enter your selection: 1
Select an Oracle instance to configure
Entry 1. orcl
Enter the number 0 to go back
Enter your selection: 1
Enter the Oracle database SYSDBA user name: SYS
Enter the Oracle database SYSDBA password:
Re-enter password:
Validating credentials…….
Enter the media server name or IP address: The length of the entered data is greater than the maximum permitted length.
Enter the media server name or IP address: 192.168.1.100
Do you use a recovery catalog? (Y/N):N
Do you want to use a customized job template? (Y/N): N
Commit Oracle operation settings to the configuration file? (Y/N): Y
Created symbolic link for /opt/VRTSralus/bin/libobk.so at /u01/app/oracle/product/11.2.0/db_1/lib/libobk.so
SUCCESS: Successfully added the entry to the configuration file.
Configuring the Oracle Agent
Choose one of the following options:
1. Add a new Oracle instance to protect
2. Edit an existing Oracle instance
3. Delete an existing Oracle instance
4. View Oracle instance entries that have been added in the Remote Agent Utility
5. Quit
Please enter your selection: 5
Symantec Backup Exec Remote Agent Utility
Choose one of the following options:
1. Configure database access
2. Configure Oracle instance information
3. Quit
Please enter your selection: 3
Start agent:
# /etc/init.d/VRTSralus.init start
Starting Symantec Backup Exec Remote Agent ……
Starting Symantec Backup Exec Remote Agent: [ OK ]
3. Configuration on Media Server
To make media server see your client do the following steps:
Step 1:
Run Start->-All Programs>Symantec Backup Exec->Backup Exec 2010
Step 2:
Tools->Options->Oracle –>click Modify List button->click New button and fill the following fields, by the following way:
Oracle or DB2 Server: 10.0.1.100
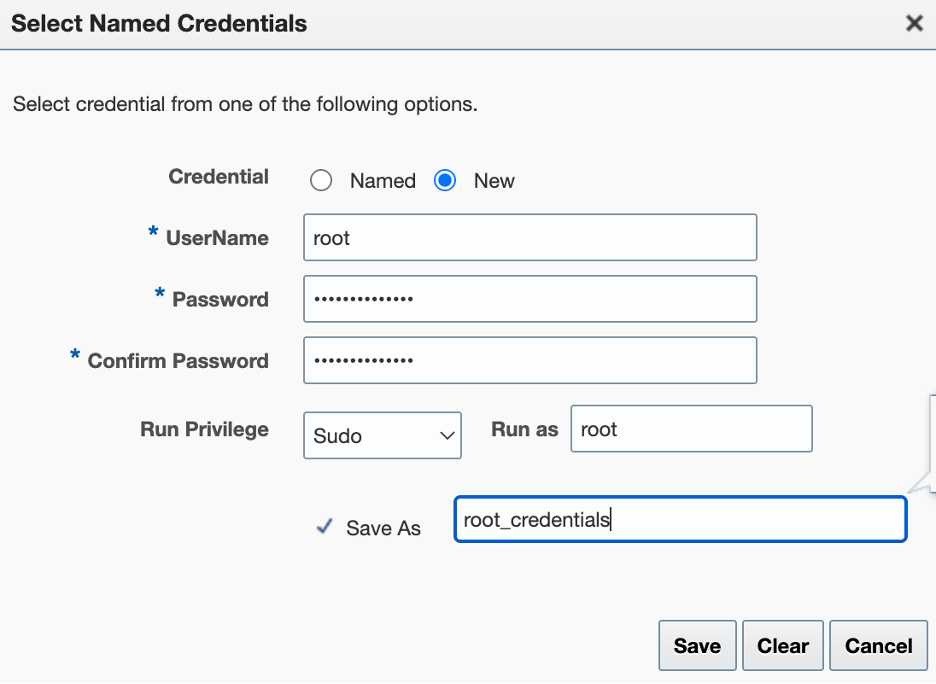
Logon Account ->>>>click New button –>click New button and fill the following fields, by the following way:
User name: oracle
Password: enter oracle password for client server
Confirm Password: enter the password again
Account Name: oracle
click OK.
You will also need to configure SYS user account.
And choose oracle in Logon Account field.
click OK.
Do the same steps for 2 more times, just change Oracle or DB2 Server filed to orcl_node(instead of 10.0.1.100) for the first time and orcl_node.sa.ge for the second time
Step 3:
On media server , in hosts file add client entry.
That is all.