Securing the Oracle Listener

Oracle listener is a server process, which listens incoming connections on the specified port(default is 1521) and redirects them to the database server. It is not limited to database connections, but it also can be used to access executable programs on the database server. As you can guess executing external procedures sometimes is not secure, because listener can be used by hackers to execute malicious programs.

There are several security options:

1.Setting the password for listener

It can be accomplished by the several ways:

1.1. Add the following entry to the listener.ora file.

PASSWORD_LISTENER=YourPassword

–Reload the listener

lsnrctl>reload

Note that password, in this case, is a plain text.

1.2. Using CHANGE_PASSWORD command

lsnrctl> change_password
Old password:
New password:
Reenter new password:
....

Note that Old password option asks you to enter the old password for listener, but if it doesn’t exist(means that listener currently not have the password) press the Enter key(do not enter anything).

You should save the configuration of the listener. Before saving, set its password, because listener is governed by the password right now and for to save the configuration you should enter the password for the listener.

lsnrctl> set password
Password:
lsnrctl> save_config

–To check, open listener.ora file and you will see the entry like this:

#----ADDED BY TNSLSNR 06-FEB-2011 23:40:18---
PASSWORDS_LISTENER = ADD733DA61CD19A5
#--------------------------------------------

Note that the password is in an encrypted format.

2. Controlling the Access

Valid Node Cheching it the functionality by which access can be controlled for some specific hosts.

This functionality is implemented by manually adding some entries to sqlnet.ora file.

Valid entries are:

TCP.VALIDNODE_CHECKING – YES/NO, its value should be YES to enable valid node checking.

TCP.INVITED_NODES – values are ip addresses or hostnames, from where requests can be accepted.

TCP.EXCLUDED_NODES – values are ip addresses or hostnames, from where requests should not be accepted.

Note that just one option TCP.INVITED_NODES or TCP.EXCLUDED_NODES may be specified, not both of them. Because they are mutually exclusive. Also wild card values can not be used, each individual ip/hostname should be specified.

For example:

We need to configure oracle net configuration like that just request from 192.168.11.2 and Reichel can be accepted. To do this, we should add the following entries to sqlnet.ora file:

tcp.validnode_checking=yes
tcp.invited_nodes=(192.168.11.2, Reichel)

–Restart the listener

lsnrctl> stop
lsnrctl> start

3. Using the Listener Logging

Enabling this feature gives you an ability to track down all listener activities. For example, it may contain brute force password attack symptoms. Error TNS-01169 in the log file indicates that someone was trying to enter the password for the listener but failed.

To turn on the logging, the following parameters should be used:

LOG_DIRECTORY – location where log files should be created.

LOG_FILE – name of the log file.

LOG_STATUS – ON/OFF , to enable logging set its value to ON.

lsnrctl> set log_directory C:\oracle\product\10.2.0\oralsnrlogs
lsnrctl> set log_file listener_ora.log
lsnrctl> set log_status on

You should save the configuration. Restarting listener is not necessary.

4. Removing External Procedure Services

This service is defined in listener.ora file.

–listener.ora file.

SID_LIST_LISTENER =
(SID_LIST =
(SID_DESC =
(SID_NAME = ORCL)
(ORACLE_HOME = C:\oracle\product\10.2.0\db_1)
(PROGRAM = ORCL)
)
(SID_DESC =
(SID_NAME = PLSExtProc)
(ORACLE_HOME = C:\oracle\product\10.2.0\db_1)
(PROGRAM = extproc)
)
)
LISTENER =
(DESCRIPTION_LIST =
(DESCRIPTION =
(ADDRESS = (PROTOCOL = TCP)(HOST = Mariami-PC)(PORT = 1521))
(ADDRESS = (PROTOCOL = IPC)(KEY = EXTPROC0))
)
)

Underlined rows need to be removed. After removing reload the listener.

5. Creating a Separate Listener for External Procedures

I think that this choice is better than explicitly removing external procedure entries from listener.ora file. You can run another lister, which listens just external procedures, under limited operating user or limit the libraries from which procedures can be executed.

5.1 Executing listener under limited OS user

When external procedure is called it runs the extproc agent process, which inherits privileges from OS user under which the listener process was started.

This user should not have any permission to access files owned by oracle user account.No permission to read data files. For this user, listener.ora file must be readonly.

5.2 Limiting libraries

As I said you can  limit libraries from where external procedures can be executed. You can do it by the following way:

–In listener.ora file

(ENVS="EXTPROC_DLLS=ONLY:/usr/libjava.so:/usr/lib/libz.so,PATH=$PATH")

ENVS -is used to define any environment variable.
EXTPROC_DLLS -list of libraries that can be accessed,list is separated by colon.
ONLY – only specified libraries list.

6. ADMIN_RESTRICTIONS Parameter

If the value of this parameter is ON in listener.ora file, than listener file can only be modified manually. It disallows all SET commands.

Above post is extracted and modified from Sybex.OCA.Oracle.10g.Administration.II.Study.Guide.1Z0-042
Oracle Database Resource Management (DRM)

Oracle Database Resource Manager is a pretty useful utility for DBAs. It simplifies distribution of resources(CPU time, idle time…) between users.

Three main elements are included in DRM:

1. Resource Consumer Groups
Resource Consumer Groups are groups to which user sessions can be assigned.
2. Resource Plans
It consists of Resource Plan Directives which decide how resources can be allocated for Resource Consumer Groups(same as user sessions).
3. Resource Plan Directives
As I said previously, it decides how resources should be distributed between users.

Resources are:
CPU usage, idle time, process execution time, number of sessions, etc.

After a brief summary about what DRM is, let’s use it in the example.

0. Privilege Needed for to use DRM

You must have ADMINISTER_RESOURCE_MANAGER system privilege to use it. This privilege is the default for DBA role.

You know how to grant privileges to users, by the following way:

grant privilege to user;

But this privilege(ADMINISTER_RESOURCE_MANAGER) can’t be granted by this way, you must use the following syntax:

begin
 dbms_resource_manager_privs.grant_system_privilege(
    grantee_name   => 'hr',
    privilege_name => 'administer_resource_manager',
    admin_option   => false);
end;

1. Creating Pending Area

First step is to create a Pending Area. This is like a room in which resource management objects are created and validated before their activation.

begin
 dbms_resource_manager.create_pending_area();
end;

2. Creating Resource Consumer Groups

For the first point you must define unique group name and the description.

begin
 dbms_resource_manager.create_consumer_group(
    consumer_group => 'group1',
    comment => 'This is the first resource consumer group');
end;

begin
 dbms_resource_manager.create_consumer_group(
    consumer_group => 'group2',
    comment => 'This is the second resource consumer group');
end;

–To see what resource consumer groups are in your database, query the following:

select *
from dba_rsrc_consumer_groups

The result may surprise you, because there will be some additional groups. By default there are four resource consumer groups:

DEFAULT_CONSUMER_GROUP – Users who are not assigned to some initial group, this will be default.

OTHER_GROUPS – Users who are assigned to groups, that are not part of the currently active plan, will become a member of this group. You can not assign users to this group manually.

SYS_GROUP – It is used by Oracle-provided SYSTEM_PLAN.

LOW_GROUP – It is used by Oracle-provided SYSTEM_PLAN.

3. Creating Resource Plans

begin
 dbms_resource_manager.create_plan(
    plan=> 'plan1',
    comment => 'This is the first resource plan');
end;

begin
 dbms_resource_manager.create_plan(
    plan=> 'plan2',
    comment => 'This is the second resource plan',

    cpu_mth=> 'ratio');
end;

Note:
cpu_mth is a CPU allocation method, the valid values are:

EMPASIS -Allocated amount is considered as a percentage(the default).

RATIO     -Allocated amount is considered as a ration of total CPU.

4. Creating Resource Plans Directives

–Creating Resource Plan Directives for plan1

begin
 dbms_resource_manager.create_plan_directive(
    plan=> 'plan1',
    group_or_subplan => 'sys_group',
    comment => 'Alocating CPU resource for sys_group',
    cpu_p1 =>90 );
end;

begin
 dbms_resource_manager.create_plan_directive(
    plan=> 'plan1',
    group_or_subplan => 'group1',
    comment => 'Alocating CPU resource for group1',
    cpu_p1 =>10 );
end;

begin
 dbms_resource_manager.create_plan_directive(
    plan=> 'plan1',
    group_or_subplan => 'other_groups',
    comment => 'Alocating CPU resource for other_groups',
    cpu_p2 =>100 );
end;

Note: 90%  of CPU resources is allocated on level 1 for sys_group, and 10% for group1.
100% of CPU resources is allocated on level 2 for other_group.

Groups at level 2 will share CPU resources not used by level 1 groups. And groups at level 3 will receive CPU time after level 1 and level 2.

–Creating Resource Plan Directives for plan2

begin
 dbms_resource_manager.create_plan_directive(
    plan=> 'plan2',
    group_or_subplan => 'sys_group',
    comment => 'Alocating CPU resource for sys_group',
    cpu_p1 =>4);
end;

begin
 dbms_resource_manager.create_plan_directive(
    plan=> 'plan2',
    group_or_subplan => 'group2',
    comment => 'Alocating CPU resource for group2',
    cpu_p1 =>4 );
end;

begin
 dbms_resource_manager.create_plan_directive(
    plan=> 'plan2',
    group_or_subplan => 'other_groups',
    comment => 'Alocating CPU resource for other_groups',
    cpu_p2 =>1 );
end;

Note: CPU allocation ratio for plan2 will be 4:4:1.

5. Validating the Pending Area

Validation ensures that:
1.Objects defined in a pending area exist,
2.All plan directives refer to either plans or resource groups(Plan directive can refer to plan(this plan is considered as a sub-plan) or consumer group).
3.Allocation percentage for a single leven can not exceed to 100%.
4. No deletion is allowed for top plans being used by an active instance.
5.An active plan schema can contain no more than 32 resource consumer groups.
6. Plan names cannot conflict with group names.
7.There must be a plan directive for OTHER_GROUPS.
8.No plan schema can contain loop.

If any of them are violated, error will occur and validating procedure fails.

begin
 dbms_resource_manager.validate_pending_area;
end;

6. Submitting the Pending Area

Submitting the pending area does the following steps: validates,submits and clears pending area. We validated it before submitting, because it is the preferable choice to check that everything is OK, before submit it(Move it to the data dictionary).
After submitting pending area, created plans are not activated! It just prepares plans for activation.

begin
 dbms_resource_manager.submit_pending_area;
end;

7. Activating the Resource Plans

There are two ways, to activate plan:

1. ALTER SYSTEM
2. RESOURCE_MANAGER_PLAN

The first method:

alter system set resource_manager_plan='plan1' [scope=both];

Note: [scope=both] is optional, you can choose it if you want to make changes permanent. The option both means memory and spfile(database must be started by spfile).

The second method:

In the init.ora file add the following:

RESOURCE_MANAGER_PLAN=plan1

8. Switching between Resource Plans

alter system set resource_manager_plan='plan2' [scope=both];

System altered. 

alter system set resource_manager_plan='plan1' [scope=both]; 

System alered.

Oracle Heterogeneous Services(hsODBC)

Heterogeneous Services provide the ability to communicate with non-Oracle databases and services.

I will discuss, how to communicate with SQL Server 2005 from Oracle.

1. First of all, you should have a trusted username in SQL Server 2005 to connect to the SQL database.

If you don’t have it, do the following:

1.1 Connect to the SQL Server 2005 database.
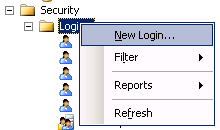
1.2 In the Object Explorer, expand the Security folder, then Logins and create new login.

New Login...(Sql Server 2005)

1.3 In General, type Login name, choose SQL Server authentication, type password for user, uncheck User must change password at next login, choose English in Default language.

Login_New(SQL Server 2005)

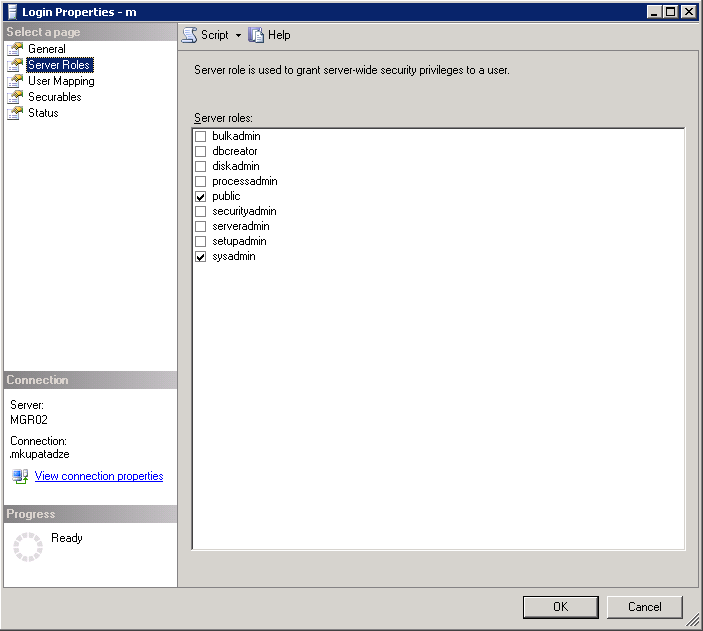
1.4 In the Server Roles, public and sysadmin roles should be checked.

Login Properties_Server Roles(SQL Server 2005)

1.5 In the User Mapping, check the database for which this user will be owner(Note that this database should be the database from where you want to query data).

Login_Properties_User_Mapping(SQL Server 2005)

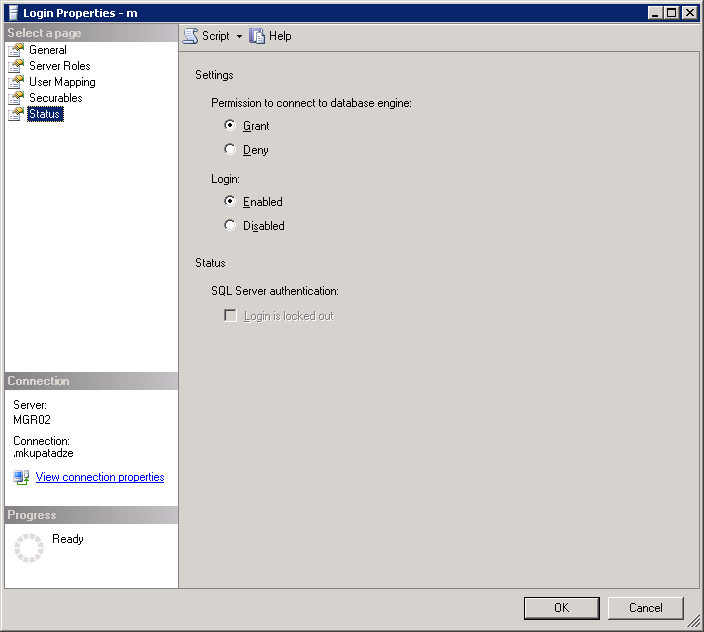
1.6 In Status.

Login_Properties_Status

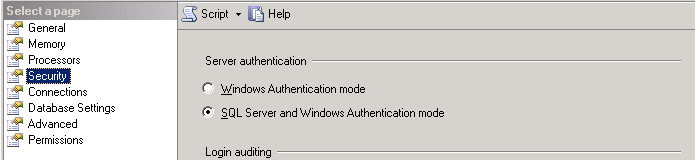
1.7 Right click on the server in the Object Explorer window, choose properties, in Security, choose SQL Server and Windows Authentication mode.

Server Properties_Sequrity(SQL Server 2005)

1.8 Reload the server.

2. Now, when you already have a trusted user in SQL Server 2005. Let’s install ODBC driver for sql server on the computer where Oracle is installed.

2.1 Start -> Control Panel -> Administrative Tools -> Data Sources (ODBC), go to System DSN tab, click Add button.

ODBC Data Source Administrator_System DSN

2.2 Choose SQL Server, click Finish.

Create New Data Source

2.3 In the Name field, type some name, we will use it later as a SID_NAME. In Server field, type the IP of the server, where SQL Server 2005 database is installed.

Create a New Data Source to SQL Server(Data Source)

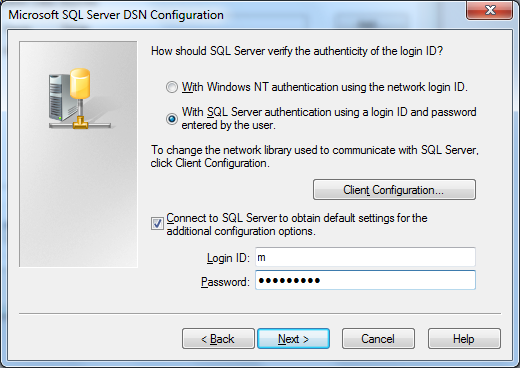
2.4 Choose second radio button, and type Login ID and Password for the user, which is a trusted user in SQL Server 2005(We have created it before, section 1).

Create a New Data Source to SQL Server

2.5 Check Change the default database to, and choose your database(Note this should be the database from where you want to query data).

Microsoft_SQL_Server_DNS_Configuration

2.6 Leave default settings.

Microsoft_SQL_Server_DNS_Configuration_2

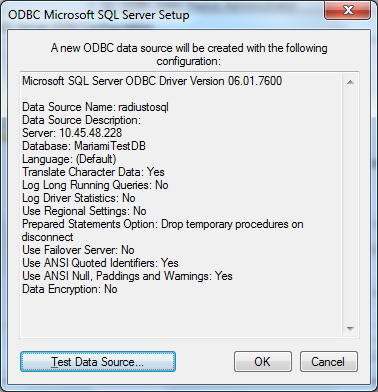
2.7  This window shows you the summary, click Test Data Source button.

ODBC Microsoft SQL Server Setup

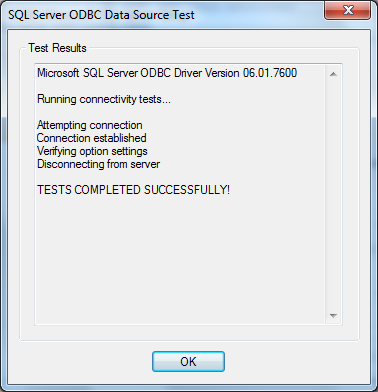
2.8 If you have indicated the correct settings, it should be successful.

SQL Server ODBC Data Source Test

3. Now, it’s time to configure in Oracle the following files: listener.ora, tnsnames.ora and %ORACLE_HOME%\hs\admin\inithsodbc.ora.

3.1 In listener.ora file add the following entries:

listenerradiustosql =
    (ADDRESS_LIST=
        (ADDRESS=(PROTOCOL=tcp)(HOST=localhost)(PORT=1522))
         (ADDRESS=(PROTOCOL=ipc)(KEY=PNPKEY))
)
SID_LIST_listenerradiustosql=
(SID_LIST=
   (SID_DESC=
     (SID_NAME=radiustosql)
     (ORACLE_HOME = C:\oracle\product\10.2.0\db_1)--Your oracle home
     (PROGRAM=hsodbc)
    )
)

Note: HOST must be localhost(127.0.0.1) not the computer IP, on where oracle is installed.
PORT is non-default port 1522, or choose the port which is free.
You should have two different listeners, one for Oracle itself and other one for radiustosql.

3.2 In tnsnames.ora file add the following entries:

radiustosql  =
  (DESCRIPTION=
    (ADDRESS=(PROTOCOL=tcp)(HOST=localhost)(PORT=1522))
    (CONNECT_DATA=(SID=radiustosql))
    (HS=OK)
  )

3.3  Rename %ORACLE_HOME%\hs\admin\inithsodbc.ora to %ORACLE_HOME%\hs\admin\initradiustosql.ora and change its content to the following:

# This is a sample agent init file that contains the HS parameters that are
# needed for an ODBC Agent.

#
# HS init parameters
#
HS_FDS_CONNECT_INFO = radiustosql
HS_FDS_TRACE_LEVEL = OFF

#
# Environment variables required for the non-Oracle system
#
#set <envvar>=<value>

3.4 Reload both Listeners: Oracle listener and newly created listenerradiustosql.

–To start default listener

>lsnrctl stop
>lsnrctl start

–To start non-default listener

>lsnrctl stop listenerradiustosql
>lsnrctl start listenerradiustosql

4. Connect to Oracle database and create database link.

4.1
–To create database link

create database link radiustosql
connect to m identified by itsPassword using 'radiustosql'

–To check if it works, run the following:

SELECT *
FROM dual@radiustosql

–Output

DUMMY
--------
X

What is orapwd?

Orapwd is the Oracle utility to create password file.  The syntax is the following:

orapwd file=file_name
password=password for SYS
[entries=number_of_users]
[force=Y/N]
[ignorecase=Y/N]
[nosysdba=Y/N]

Where,
file– is the password file name. If you do not indicate the full path, then file will be created in the current directory.
password-is the password for sys user.
entries– is the maximum number of users that can be granted sysdba or sysoper privileges.
force-if the value of this parameter is Y then the existing password file will be overwritten.
ignorecase– password will be case insensitive.

Note: parameters that are enclosed by ‘[‘ and ‘]’ are optional.

For example:

 orapwd file= pwdorcl password=sys entries=20

Explanation:

Password file, called pwdorcl.ora, will be created in the current directory. The password for sys user will be sys and maximum 20 users can be granted sysdba or sysoper privileges.

Note: Default location of the password file on Windows is %ORACLE_HOME%\database\ and name is pwd%ORACLE_SID%.ora ….. On Linux $ORACLE_HOME\dbs and name orapw$ORACLE_SID. If you do not consider this you will get error:  ORA-01017

In addition to password file creation:

The initialization parameter remote_login_passwordfile must be set to the appropriate value:

  • None: means that Oracle will behave like that the password file doesn’t exist. Which will cause that no privileged connections will be allowed over nonsecure connections.
  • Exclusive: means that the password file will be used with the only one database instance. Setting this value gives the ability to grant/revoke sysdba or sysoper privileges to/from users(Note that granting or revoking privs. causes the password file modifications). It also enables you to change password of SYS user with ALTER USER command. It is the default value.
  • Shared: It is used by multiple DBs, which are running on the same server, or with RAC. Setting this value prohibits you from changing the password file. If you try to change the password file generates the error. To make available to modify this file, first change this parameter to exclusive, modify file and change it back to the share value.

To see how many users are added to the password file run the following command:

select *
from v$pwfile_users

–My output is the following

USERNAME |SYSDBA |SYSOPER
SYS      |TRUE   |TRUE

Deleting password file

To remove the password file, first delete it and then set the initialization parameter remote_login_passwordfile to none. After that, the users that can authenticate by the operating system will be able to connect  to the database as sysdba/sysoper.

How to Create Database Link in Oracle

— Add the following entry in tnsnames.ora file:

SERVICENAME1=
     (DESCRIPTION =
       (ADDRESS_LIST =
         (ADDRESS = (PROTOCOL = TCP)(HOST = hostname1)(PORT = 1521))
       )
       (CONNECT_DATA = (SERVICE_NAME = SERVICENAME1))
      )

–Connect to the database where you want to create db link and run the following command:

CREATE DATABASE LINK link_name
CONNECT TO myusername IDENTIFIED BY mypassword
USING 'SERVICENAME1';

Note:
myusername
->is an username by which you can connect SERVICENAME1 database
mypassword->is myusername‘s password

–Check if it works:

SELECT sysdate
FROM dual@link_name

If it returns sysdate, means it works:)

Expdp/Impdp fails,version incompatibility issue(Installing OLAP)

Real World Scenario

Exchanging data between Oracle 11.1.0 and Oracle 11.2.0 using export/import data pump caused the following error.

PLS-00201: identifier 'DBMS_CUBE_EXP.SCHEMA_INFO_IMP_BEG' must be declared
PLS-00201: identifier 'DBMS_CUBE_EXP.SCHEMA_INFO_IMP_LOOP' must be declared
PLS-00201: identifier 'DBMS_CUBE_EXP.SCHEMA_INFO_IMP_END' must be declared

Sometimes this happens when you are exchanging data not just between these specific versions of Oracle but between other versions too, especially between higher and lower versions.

One solution for this is to use exp instead of expdp. It really works, but if you still want to use expdp then you should manually install OLAP on that oracle version, which doesn’t have it.

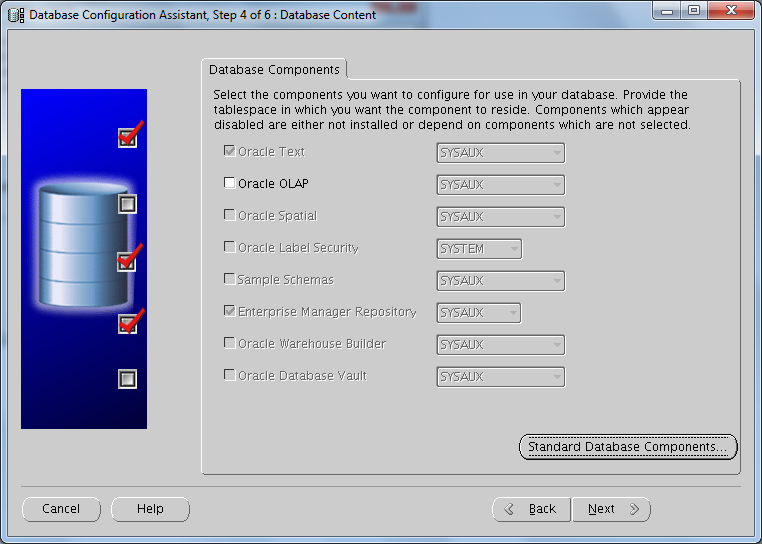
To determine if OLAP is installed or not just run DBCA(located in $ORACLE_HOME/bin). Choose “Configure Database Options”,press Next>> 3 times and if you see this, which means OLAP is not installed

Oracle OLAP is disabled

Do the following steps:

Step 1:

–Connect database as sysdba

export ORACLE_SID=db_sid
Sqlplus sys/sys_pass as sysdba

–Run the following query

SELECT value
FROM v$option
WHERE parameter = 'OLAP';

if the value is TRUE, OLAP is turned on. Go to Step 2.
If the value is FALSE, then shutdown DB and turn it on:

For Linux:

make -f $ORACLE_HOME/rdbms/lib/ins_rdbms.mk olap_on
make -f $ORACLE_HOME/rdbms/lib/ins_rdbms.mk ioracle

For Windows:

1. All oracle processes must be stopped. This includes the database (if any), listener, http (apache) server, intelligent agent, etc..
2. Change to the %ORACLE_HOME%\bin directory
3. Rename oraolapop10.dll.OFF to oraolapop10.dll
4. Restart the database

Step 2:

Verify that ‘JServer JAVA Virtual Machine’ is present and VALID in the database instance:

–Run the following query

SELECT comp_id, comp_name, status, substr(version,1,10) as version
FROM dba_registry
WHERE comp_id like 'JAVAVM';

–If the output is NOT like this:

Verify that 'JServer JAVA Virtual Machine' is present and VALID in the database instance


–Then run the following commands when connected as SYSDBA:

SQL>@?/javavm/install/initjvm.sql;
SQL>@?/xdk/admin/initxml.sql;
SQL>@?/xdk/admin/xmlja.sql;
SQL>@?/rdbms/admin/catjava.sql;

Note: ? is $ORACLE_HOME

Step 3:

Now we need to check or possibly  install the components for the XML Database

–Run the following query

select comp_name, version,status
from dba_registry
where comp_id in ('XDB','XML');

–If the output is NOT like this:

check components for the XML Database

Then you should run:

SQL> conn / as SYSDBA
SQL> @?/rdbms/admin/catqm.sql change_on_install XMLDB TEMP;

Step 4:

Check other  requirements:

–Run the following query

select comp_name, version,status
 from dba_registry
 where comp_name='Oracle Expression Filter'

–If the output is NOT like this:

Verify that Oracle Expression Filter is valid

Then run the following as SYS:

–This file is located in $ORACLE_HOME/rdbms/admin/

@catexf.sql

Step 5:

Finally to install  OLAP.

–Run the following script as sysdba

SQL>$ORACLE_HOME/olap/admin/olap.sql

Another Method to install OLAP is with DBCA

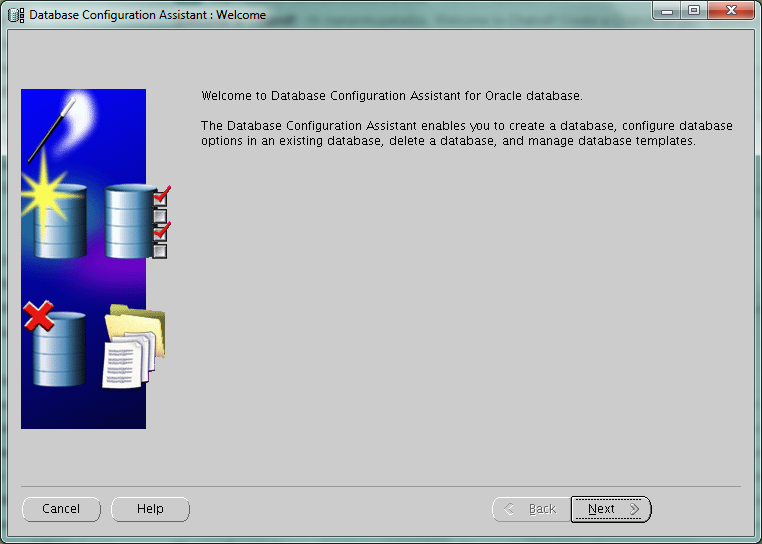
–Run DBCA and Click Next>>
Runing DBCA

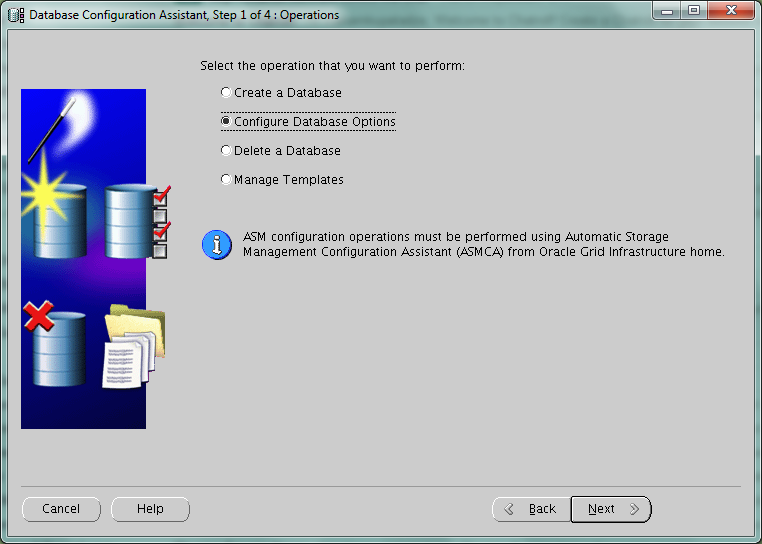
–Choose “Configure Database Options” and click Next>>
DBCA(Configure Database Options)

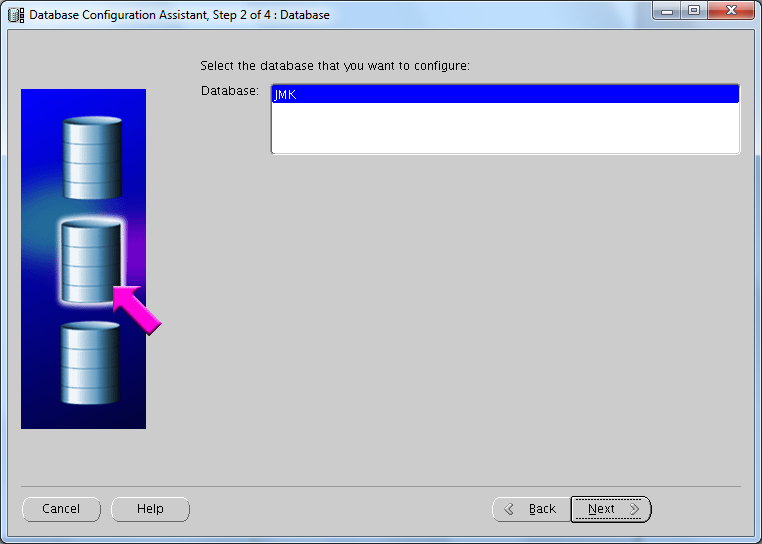
–Choose Database SID and click Next>>
DBCA(select database to configure)


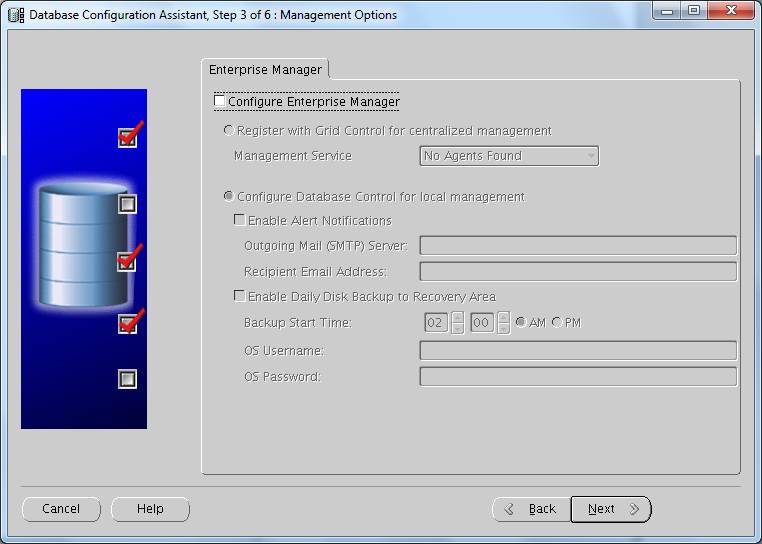
— Choose Enterprise Manager should be installed or not.Depends on your needs(I have unchecked it)

DBCA(Uncheck Configure Enterprise Manager)


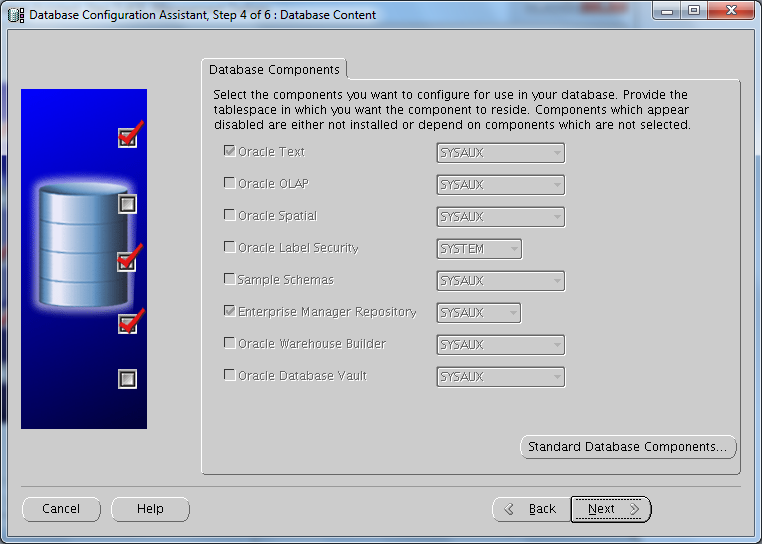
–If you see this(OLAP is disabled),
DBCA(Oracle OLAP is disabled)


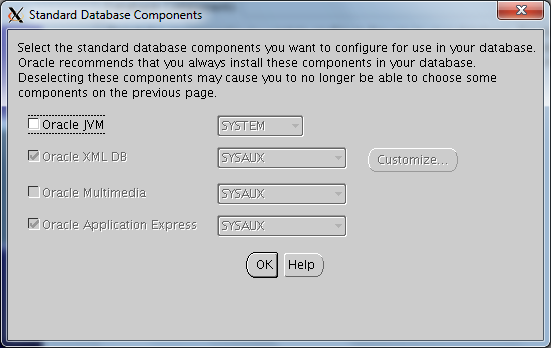
–Then press the button “Standard Database Components…”
Standard Database Components(Oracle JVM option)


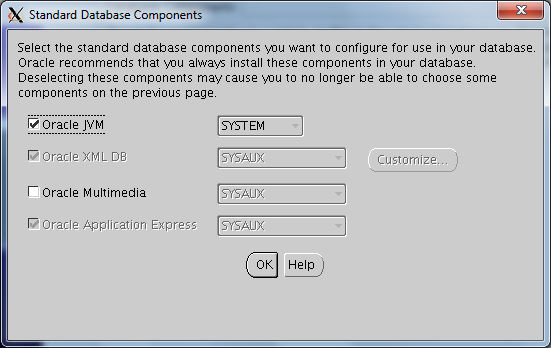
–Check “Oracle JVM” and click OK

Standard Database Components(Checked Oracle JVM option)

–Now you should see this
DBCA(Oracle OLAP is enabled)


–Check the option “Oracle OLAP” and click Next>>

SQL Access Advisor(Tuning a single sql)

SQL Access Advisor Overview

The SQL Access Advisor gives you the recommendations about performance tuning. For example it may recommend you to create materialized views, partitions, and/or indexes..You should just give it sql/sqls which are somehow problematic.For example sql which needs big amount of time to execute.

Now  I will discuss Quick Tune, because it is a simple way to tune sqls and also it is widely used . But its “disadvantage” may be counted that it tunes just one sql than multiple sqls(which can be performed by workloads).

Privileges Needed to Use the SQL Access Advisor

You need to have the ADVISOR privilege to manage or use the SQL Access Advisor.

If that user does not have SELECT privileges to a particular table, the SQL Access Advisor neglects  the statement referencing the table. To avoid missing recommendations, the current database user must have SELECT privileges on the tables.

Performing a Quick Tune

QUICK_TUNE procedure accepts as its input a task_name and a SQL statement text or id. It will then create a task and workload and execute that task.

BEGIN
DBMS_ADVISOR.QUICK_TUNE(DBMS_ADVISOR.SQLACCESS_ADVISOR,
                        'MY_QUICKTUNE_TASK',
                        'SELECT COUNT(*)
                         FROM CLIENTS');
END;

To see the result:

SELECT DBMS_ADVISOR.GET_TASK_SCRIPT('MY_QUICKTUNE_TASK')
FROM dual;

How to know that the database was started by spfile or pfile?

–Run the following command

SQL> show parameter spfile;

–Output

NAME  | TYPE |VALUE
——————|——————|—————————————————
spfile|string|

If the output is this(value is empty), means that oracle database was started by pfile.

NOTE :One reason oracle database was started by pfile is that it didn’t find spfile.Another is that you indicated pfile during the startup.

Oracle Errors(ORA-…)

Here is discussed just one variant how to solve the problem.

ORA-01033; ORA-01034; ORA-01035;  ORA-01203; ORA-02069; ORA-12518;

ORA-01034 and ORA-27101; ORA-19809 and ORA-19804; ORA-27101;
RMAN-06059 & ORA-19625 & ORA-27041

Error

ORA-27101: shared memory realm does not exist

Action

SQL> startup
SQL> shutdown immediate

(It helped me,I hope it will help you too )

Error

ORA-01033: ORACLE initialization or shutdown in progress

Cause

Database is in mount or nomount mode.

Action

–If it is in nomount mode:

SQL>alter database mount;
SQL>alter database open;

–if it is in mount mode:

SQL>alter database open;

Error

ORA-01035:  ORACLE only available to users with RESTRICTED SESSION privilege

Cause

Instance started in restricted mode.

Action

–Ask sysdba to disable restricted session

SQL>alter system disable restricted session;

–Or ask sysdba to give you RESTRICTED SESSION system privilege.

SQL>grant restricted session to yourUserName

Error

ORA-01034: ORACLE not available

Cause

The database and the instance are not started.

Action

SQL>startup;

Error

ORA-12518: TNS:listener could not hand off client connection tips

Action

–On windows

Start->Run->services.msc->OracleServiceMFD manually start it

Note: MFD is instance name

Error:

ORA-02069: global_names parameter must be set to TRUE for this operation

Cause:

You are trying to make DML operation on the remote database using local function.

This is the “Oracle Bug”, it should work but it doesn’t.

Example (for better understanding):

–Assume that we have two databases DB1 and DB2

–On DB1 we have function fun1

create function fun1 return number is
begin
return 1;
end;

–On DB1 we have a database link referring to DB2 called, for simplicity, DB2.

–Check that it works.

select *
from dual@DB2

–If the output is the following, then it works.

DUMMY
-----
X

–Let’s create test table in DB2(connect to DB2 database)

create table tesTable(
id         number,
testColumn number
);

–Let’s make some DML operation, which should cause this ORA-02069 error.

insert into testable@DB2(id,testColumn)
values(1, fun1);


“ORA-02069: global_names parameter must be set to TRUE for this operation”

Now, when you already know in what situation this error occurs let’s write the solution. It has two solutions:

Solution one:

1. Set the global_names parameter to true, it can be done on the system level or session level(consider that session level sometimes is not available)

-On DB1

alter session set global_names=true;

2. Create database link on the remote database, in our case on DB2, which will refer to the database DB1(make link name the same as the database global name, because setting global_names parameter to true requires it).

–On DB2

Create database link DB1 connect to <username> identified by <password>
using ‘DB1’;

Now it should work, but I should mention that creating database link may not be preferable, because it is not secure (You should guess why, because if you do this you will be able to connect to DB1 with some user through database link…if it doesn’t matter for you then use itJ).

Solution  two:

1.  Create temporary table on the local database.

2.  Insert row into the temporary table.

3.  Insert the temporary row from the temporary table to the remote database.

4.  Delete the temporary row.

Note that this solution is slower than the first one. But it also solves the problem and is much more secure.

Error

ORA-01203 wrong incarnation of this file – wrong creation SCN

Cause

The SCN in datafile is not the same as the SCN in the control file.
This is probably a copy of a file that was dropped.

Action

Restore the current  copy of the datafile.

Error

ORA-01034: ORACLE not available
ORA-27101: shared memory realm does not exist
SVR4 Error: 2: No such file or directory

Action

Check ORACLE_SID if it is correctly set.. For example, you may need to set this parameter with uppercase letters or lowercase letters…Try one of them


Error


RMAN-03009: failure of backup command on ORA_DISK_1 channel at …
ORA-19809: limit exceeded for recovery files
ORA-19804: cannot reclaim 52428800 bytes disk space from 104857600 limit

Cause

The flash recovery area is full.

Action

Run the following command to identify limit and used space:

   select name
          ,floor(space_limit / 1024 / 1024) "Limit(MB)"
          ,ceil(space_used  / 1024 / 1024) "Used(MB)"
   from	v$recovery_file_dest

You can change the limit:

 alter system set db_recovery_file_dest_size= scope=both;

You can continue.. backuping


Error


RMAN-06059: expected archived log not found, lost of archived log compromises recoverability
ORA-19625: error identifying file string
ORA-27041: unable to open file
OSD-04002: unable to open file
O/S-Error: (OS 3) The system cannot find the path specified.

Cause

RMAN attempted to backup an archive log file, but couldn’t find it.

Action

Restore missing file or run the following:

change archivelog all crosscheck;

RMAN makes a check and if any archivelog file is missing will be marked as unavailable.

Put Multiple Rows in a Single Row

In my working experience selecting multiple rows into one row was in “high-demand” query. So I decided to write here these queries as in Oracle also in SQL Server 2005:

First of all let’s create table and fill it with desired rows.

————————————————————Oracle—————————————————————–

–Create table

CREATE TABLE testTable(
deptno number,
ename varchar2(50)
);

–Fill table with data

insert into testTable
values(1,'Mari');

insert into testTable
values(1,'Gio');

insert into testTable
values(1,'Anna');

insert into testTable
values(2,'Sopo');

insert into testTable
values(2,'Vaso');

insert into testTable
values(2,'Temo');

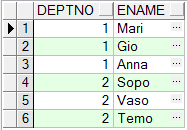
–Let see the data in testTable

select *
from testTable

–Output

Query from the table(Oracle)

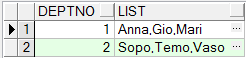
–But  our desired output is the following:

Multiple rows in a single row(Oracle)

–To achieve this,we should write the following query:

SELECT deptno
       ,LTRIM(SYS_CONNECT_BY_PATH(ename,','),',') as list
FROM(SELECT deptno
            ,ename
            ,ROW_NUMBER() OVER (PARTITION BY deptno ORDER BY ename) AS seq
     FROM  testTable)
WHERE  connect_by_isleaf = 1
CONNECT BY seq = PRIOR seq +1 AND deptno = PRIOR deptno
START WITH seq = 1;

———————————————————–Sql Server 2005——————————————————-

–Create table

CREATE TABLE testTable(
deptno numeric(18) ,
ename varchar(50)
);

–Fill table with data

insert into testTable
values(1,'Mari');

insert into testTable
values(1,'Gio');

insert into testTable
values(1,'Anna');

insert into testTable
values(2,'Sopo');

insert into testTable
values(2,'Vaso');

insert into testTable
values(2,'Temo');

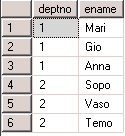
–Let see the data in testTable

select *
from testTable

–Output

Query from the table(SQL server)

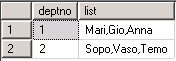
–But  our desired output is the following:

Multiple rows in a single row(SQL server)

–To achieve this,we should write the following query:

SELECT DISTINCT deptno,
       STUFF(value_list, 1, 1, '') AS list
FROM testTable AS A
CROSS APPLY (
     SELECT ',' + ename
     FROM testTable AS B
     WHERE B.deptno =A.deptno
     FOR XML PATH('')
) AS t(value_list);

–Let’s discuss the following functions:

*STUFF-It will replace substring started by position 1 with length 1 by '',
       which means substring started by position 1 with length 1 will be removed.
Note:  We need to remove first character,because it is extra comma(output was ,Mari...)
* CROSS APPLY-this function will return corresponding rows from right table expression
              to left table expression.
* FOR XML PATH-returns a single string in xml format.