Configure Oracle database to use SSL with self-signed certificate
November 6, 2013 10 Comments
You can use Oracle SSL to encrypt data exchange between Oracle database and Oracle client.
For the first time, let’s check that data is not encrypted by default when the client is selecting some info from the database.
For demonstration of this I will use WireShark.
Checking…
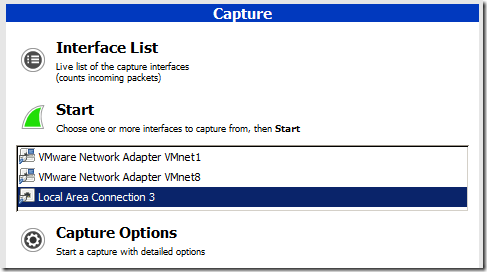
1. Run WireShark and highlight network card by which you use to connect to the database. For me it is “”Local Area Connection 3”.
2. click Capture Options and in Capture Filter write :
src host 192.168.171.153 and dst host 192.168.59.51 and tcp port 1521
Description: src host –is client ip
dst host – is database ip
tcp port – is the database port number
This means to capture requests from client(192.168.171.153) to the database(192.168.59.51) using tcp port 1521.
3. click Start.
4. Connect to the database and run testing select:
select *
from dual
WireShark with a lot of rows will contain the row consisting the following text, that contains our select
Configuring SSL…
Wallet configuration on DB server
0. Lets create working folder called /0 for simplicity.
mkdir /0
chmod –R 777 /0
1. Create certification request using Oracle Wallet Manager (/u01/app/oracle/product/11.2.0/db_1/bin/owm).
su – oracle
owm
2. Wallet->New
3. Enter the password, which protects wallet from opening. OK
4. Click Yes(for creating necessary folders for wallet)
5. Click Yes(for creating certification request)
6. Fill the items by your info.
7. click OK
8. Highlight certification request and from menu choose Operations->Export Certificate Request
9. Save the file with the extension .csr in /0 folder
10. Download ssl.ca-0.1.tar.gz file for to generate trusted and user certificates.
Here I want to note that trusted certificate is like a public key which will be sent to the client and user certificate is like a private key which has only the database server.
Move downloaded file to the /0 folder and extract. Then move certification request to the extracted folder.
cd /0/
tar -xvf ssl.ca-0.1.tar.gz
mv /0/CerReq.csr /0/ssl.ca-0.1/
1.10 Create a self-signed root certificate by running the new-root-ca.sh script. This will create a file called ca.crt
cd /0/ssl.ca-0.1/
./new-root-ca.sh
No Root CA key round. Generating one
Generating RSA private key, 1024 bit long modulus
…………………++++++
………………………………………………………..++++++
e is 65537 (0x10001)
Enter pass phrase for ca.key:enter the password
Verifying – Enter pass phrase for ca.key:enter the passwordSelf-sign the root CA…
Enter pass phrase for ca.key:enter the password
You are about to be asked to enter information that will be incorporated
into your certificate request.
What you are about to enter is what is called a Distinguished Name or a DN.
There are quite a few fields but you can leave some blank
For some fields there will be a default value,
If you enter ‘.’, the field will be left blank.
—–
Country Name (2 letter code) [MY]:GE
State or Province Name (full name) [Perak]:. <- here is written dot (.)
Locality Name (eg, city) [Sitiawan]:Tbilisi
Organization Name (eg, company) [My Directory Sdn Bhd]:MjM
Organizational Unit Name (eg, section) [Certification Services Division]:IT
Common Name (eg, MD Root CA) []:ca_root
Email Address []:mariam.kupa@gmail.com
1.11 Create the self-signed server certificate by running the sign-server-cert.sh script.
./sign-server-cert.sh CerReq
CA signing: CerReq.csr -> CerReq.crt:
Using configuration from ca.config
Enter pass phrase for ./ca.key:enter the password for the ca
Check that the request matches the signature
Signature ok
The Subject’s Distinguished Name is as follows
commonName : .PRINTABLE:’MjM’
organizationalUnitName: .PRINTABLE:’IT’
organizationName : .PRINTABLE:’MjM’
localityName : .PRINTABLE:’Tbilisi’
countryName : .PRINTABLE:’GE’
Certificate is to be certified until Nov 5 12:40:48 2014 GMT (365 days)
Sign the certificate? [y/n]:y
1 out of 1 certificate requests certified, commit? [y/n]y
Write out database with 1 new entries
Data Base Updated
CA verifying: CerReq.crt <-> CA cert
CerReq.crt: OK
1.12 From the wallet manager import these certificates.
Operations-> Import Trusted Certificate
Select a file that contains the certificate. click OK.
Choose ca.crt
Choose CerReq.crt
Save the wallet from the menu Wallet->Save
click OK.
Check Auto Login and Exit.
Oracle Advanced Security and listener Configuration on DB Server
1.
su – oracle
netmgr
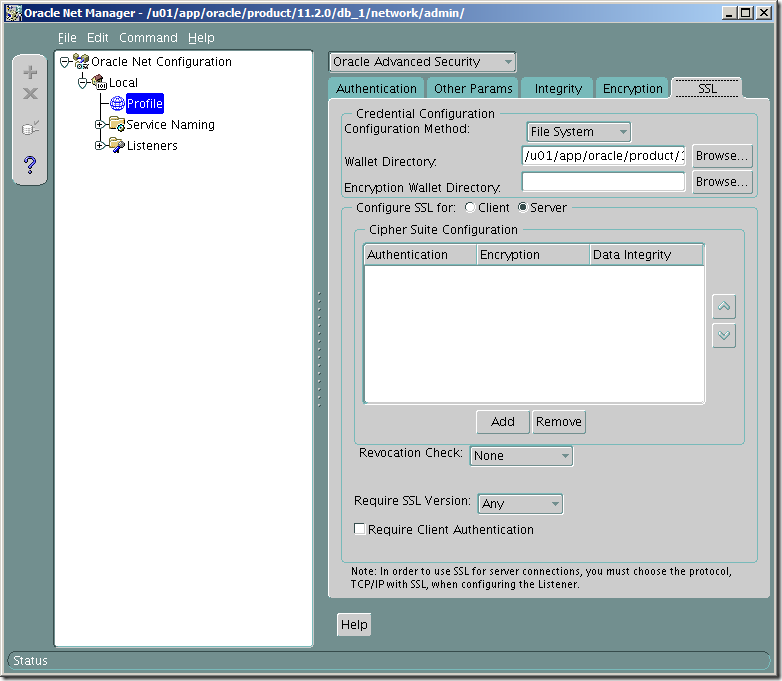
Choose Profile->Oracle Advanced Security-> SSL
choose server
Fill the items as it is shown on the picture, except that you should indicate your own wallet location. For me it is /u01/app/oracle/product/11.2.0/db_1/owm/wallets/oracle
Click File->Save Network Configuration.
2. Change listener entry on the database server by adding port 2484 using protocol TCPS :
# listener.ora Network Configuration File: /u01/app/oracle/product/11.2.0/db_1/network/admin/listener.ora
# Generated by Oracle configuration tools.SID_LIST_LISTENER =
(SID_LIST =
(SID_DESC =
(GLOBAL_DBNAME = orcl)
(ORACLE_HOME = /u01/app/oracle/product/11.2.0/db_1)
(SID_NAME = orcl)
)
)SSL_CLIENT_AUTHENTICATION = FALSE
WALLET_LOCATION =
(SOURCE =
(METHOD = FILE)
(METHOD_DATA =
(DIRECTORY = /u01/app/oracle/product/11.2.0/db_1/owm/wallets/oracle)
)
)LISTENER =
(DESCRIPTION_LIST =
(DESCRIPTION =
(ADDRESS = (PROTOCOL = TCP)(HOST = server.gov.ge)(PORT = 1521))
)
(DESCRIPTION =
(ADDRESS = (PROTOCOL = TCPS)(HOST = server.gov.ge)(PORT = 2484))
)
)ADR_BASE_LISTENER = /u01/app/oracle
Look at the highlighted section , I am using 2484 as a port number ,which is Oracle recommended port for SSL , and TCPS as a protocol .
Restart the listener
lsnrctl stop
lsnrctl start
Client Configuration
1. Do the same steps as we did on the database server.
1.1 Create new wallet
1.2 Create certificate request
1.3 Copy trusted certificate, which we have generated on the database server
1.4 Import only trusted certificate.
1.5 Save
1.6 Check Auto Login and Save.
2. Run Network Manager
2.1 Profile->Oracle Advanced Security –>SSL
choose client.
Fill items as it is shown on the picture(indicate your wallet location)
3. Configure tnsnames.ora by the following entry:
orcl_ssl=
(DESCRIPTION =
(ADDRESS = (PROTOCOL = TCPS)(HOST = server.gov.ge)(PORT = 2484))
(CONNECT_DATA =
(SERVER = DEDICATED)
(SERVICE_NAME = orcl)
)
)
Check again by WhireShark.
You will see that no rows will contain clear words. Everything is encrypted.
Note: If you have any certification validation failure errors, first try to stop listener and start again..or write me on the comment and I will try to help you.


I’m following your details but I’m getting a
ORA-28860: Fatal SSL error
Any suggestions will be greatly appreciated
Please trace and find more descriptive error in trace files.
you can enable tracing by adding the following lines into sqlnet.ora
TRACE_LEVEL_CLIENT = SUPPORT
TRACE_UNIQUE_CLIENT = on
TRACE_DIRECTORY_CLIENT = D:\app\oracle
TRACE_FILE_CLIENT = client
DIAG_ADR_ENABLED = OFF
TRACE_TIMESTAMP_CLIENT = ON
On client side
hey,
I have two questions:
1. based on Oracle white paper (Doc ID 1361634.1), if I just want to implement TCPS for current database (now using TCP), Do I must set up wallet/certificate as you show above?
2. Download ssl.ca-0.1.tar.gz file for to generate trusted and user certificates
—the above link pointing to download seems like won’t work, do you have another place to download?
Thank you
1) Yes you need to configure wallet to use TCPS
Try again and start from third mirror.
2000-04-23 ftp://ftp.gwdg.de/pub/misc/crypt/archive/ftp.modssl.org/contrib/ssl.ca-0.1.tar.gz
I’ve changed the link to another one, please try.
Thanks for the help. Very clear instructions.
just to mention all the weird issues one faces when following even clear instructions, got error because used same CN name in certificate and database, which threw error when self-signing certificate.
2 Mariami: Just wrote you at FB about