Creating an Oracle RAC on Azure cloud with FlashGrid SkyCluster
March 17, 2020 3 Comments
Oracle, Linux, AWS, Azure, GCP
March 5, 2020 2 Comments
In this post I will discuss one of the reasons why golden gate startup may hang and fail on both nodes:
Problem:
[root@primrac1 tmp]# /u01/app/grid/xag/bin/agctl start goldengate gg_replicate
^[[ACRS-2672: Attempting to start 'xag.gg_replicate.goldengate' on 'primrac2'
CRS-2674: Start of 'xag.gg_replicate.goldengate' on 'primrac2' failed
CRS-2679: Attempting to clean 'xag.gg_replicate.goldengate' on 'primrac2'
CRS-2681: Clean of 'xag.gg_replicate.goldengate' on 'primrac2' succeeded
CRS-2563: Attempt to start resource 'xag.gg_replicate.goldengate' on 'primrac2' has failed. Will re-retry on 'primrac1' now.
CRS-2672: Attempting to start 'xag.gg_replicate.goldengate' on 'primrac1'
CRS-2674: Start of 'xag.gg_replicate.goldengate' on 'primrac1' failed
CRS-2679: Attempting to clean 'xag.gg_replicate.goldengate' on 'primrac1'
CRS-2681: Clean of 'xag.gg_replicate.goldengate' on 'primrac1' succeeded
CRS-2632: There are no more servers to try to place resource 'xag.gg_replicate.goldengate' on that would satisfy its placement policy
CRS-4000: Command Start failed, or completed with errors.
Troubleshooting:
Check crsd_scriptagent_oracle.trc trace file on each database node. For my environment the full path of this file is /u01/app/grid/diag/crs/primrac2/crs/trace/crsd_scriptagent_oracle.trc
I found that the following error was repeating in the trace file:
2020-03-05 23:36:30.467 : CLSDADR:3560113920: ERRORdynamic component [R2530613] mapped to [CLSDYNAM]
On the metalink found only this PRCR-1079 : Failed to start resource ora.oc4j, the problem is not the same, but glanced a sentence containing config file.. so here I realized it could be related to the config file. And I was correct.
Solution:
Delete existing GG resource:
# /u01/app/grid/xag/bin/agctl remove goldengate gg_replicate
Readd using correct config file location:--config_home /GG_HOME/sm/etc/conf --var_home /GG_HOME/sm/var
# /u01/app/grid/xag/bin/agctl add goldengate gg_replicate --gg_home /GG_HOME/ma --service_manager --config_home /GG_HOME/sm/etc/conf --var_home /GG_HOME/sm/var --port 9001 --adminuser oggadmin --user oracle --group oinstall --filesystems ora.ggdg.acfsgg.acfs --db_services ora.primorcl.orclservice.svc --use_local_services
Start Golden Gate, relocate and check:
[root@primrac1 ~]# /u01/app/grid/xag/bin/agctl start goldengate gg_replicate
[root@primrac1 ~]# /u01/app/grid/xag/bin/agctl status goldengate gg_replicate
Goldengate instance 'gg_replicate' is running on primrac2
[root@primrac1 ~]# /u01/app/grid/xag/bin/agctl relocate goldengate gg_replicate
[root@primrac1 ~]# /u01/app/grid/xag/bin/agctl status goldengate gg_replicate
Goldengate instance 'gg_replicate' is running on primrac1
February 13, 2020 Leave a comment
Before starting make sure that:
1. NFS server is accessible from DB nodes
2. nfs-utils is installed on all client and DB nodes
3. ASM is running on all nodes
NFS disk configuration steps:
1. On NFS server node (e.g. nfsserver)
# systemctl disable firewalld
# systemctl stop firewalld
# mkdir /NFS_DISKS

--Create quorum disk in nfs share:
# dd if=/dev/zero of=/NFS_DISKS/nfsdisk1 bs=1M count=1024

# chmod -R 755 /NFS_DISKS
# chown -R grid:oinstall /NFS_DISKS

# vim /etc/exports
/NFS_DISKS *(rw,async)

# systemctl enable nfs-server
# systemctl start nfs-server
2. On all DB nodes (e.g. rac1 rac2)
# mkdir /NFS_DISKS
# chown -R grid:oinstall /NFS_DISKS
# vim /etc/fstab

nfsserver:/NFS_DISKS /NFS_DISKS nfs rw,bg,hard,nointr,rsize=32768,wsize=32768,tcp,actimeo=0,noac,vers=3,timeo=600 0 0 0

# mount -a

--Update disk discovery string from grid user:
$ asmcmd dsset '/NFS_DISKS/*','/dev/flashgrid/*'
If this is Flashgrid-enabled cluster, then you can create diskgroup which contains NFS disk as quorum:
[grid@rac1 ~]$ flashgrid-dg create --name TEST --normal --asm-compat 19.0.0.0 --db-compat 19.0.0.0 --disks /dev/flashgrid/rac1.lun4 /dev/flashgrid/rac2.lun4 --quorum-disks /NFS_DISKS/nfsdisk1 FlashGrid 19.6.48.60391~~~~ Querying nodes: rac1, rac2, racq … Creating group… Completing this operation may take long time. Please wait… CREATE DISKGROUP "TEST" NORMAL REDUNDANCY FAILGROUP "rac1" DISK '/dev/flashgrid/rac1.lun4' NAME "rac1$LUN4" SIZE 20480M FAILGROUP "rac2" DISK '/dev/flashgrid/rac2.lun4' NAME "rac2$LUN4" SIZE 20480M QUORUM FAILGROUP "QUORUM0" DISK '/NFS_DISKS/nfsdisk1' NAME "TEST_Q0" ATTRIBUTE 'au_size' = '4M', 'compatible.asm' = '19.0.0.0', 'compatible.rdbms' = '19.0.0.0'; ALTER SYSTEM SET asm_preferred_read_failure_groups='DATA.rac1','FRA.rac1','GGDG.rac1','GRID.rac1','TEST.rac1' SID='+ASM1'; ALTER SYSTEM SET asm_preferred_read_failure_groups='DATA.rac2','FRA.rac2','GGDG.rac2','GRID.rac2','TEST.rac2' SID='+ASM2'; Success
February 12, 2020 Leave a comment
What is Azure Bastion?
The Azure Bastion is PaaS service that you create inside your virtual network. It provides secure RDP and SSH connectivity to all of the VMs in the virtual network in which it is provisioned so that your target virtual machines do not need a public IP address.
Configuration Steps:
1. Connect to the Azure portal and choose the VM to connect to.
2. From the left panel, choose Bastion under the Operations section, or click Connect from the Overview section.
3. To associate a virtual network with a Bastion, it must contain a subnet with the name AzureBastionSubnet. On the following page, click Manage subnet configuration
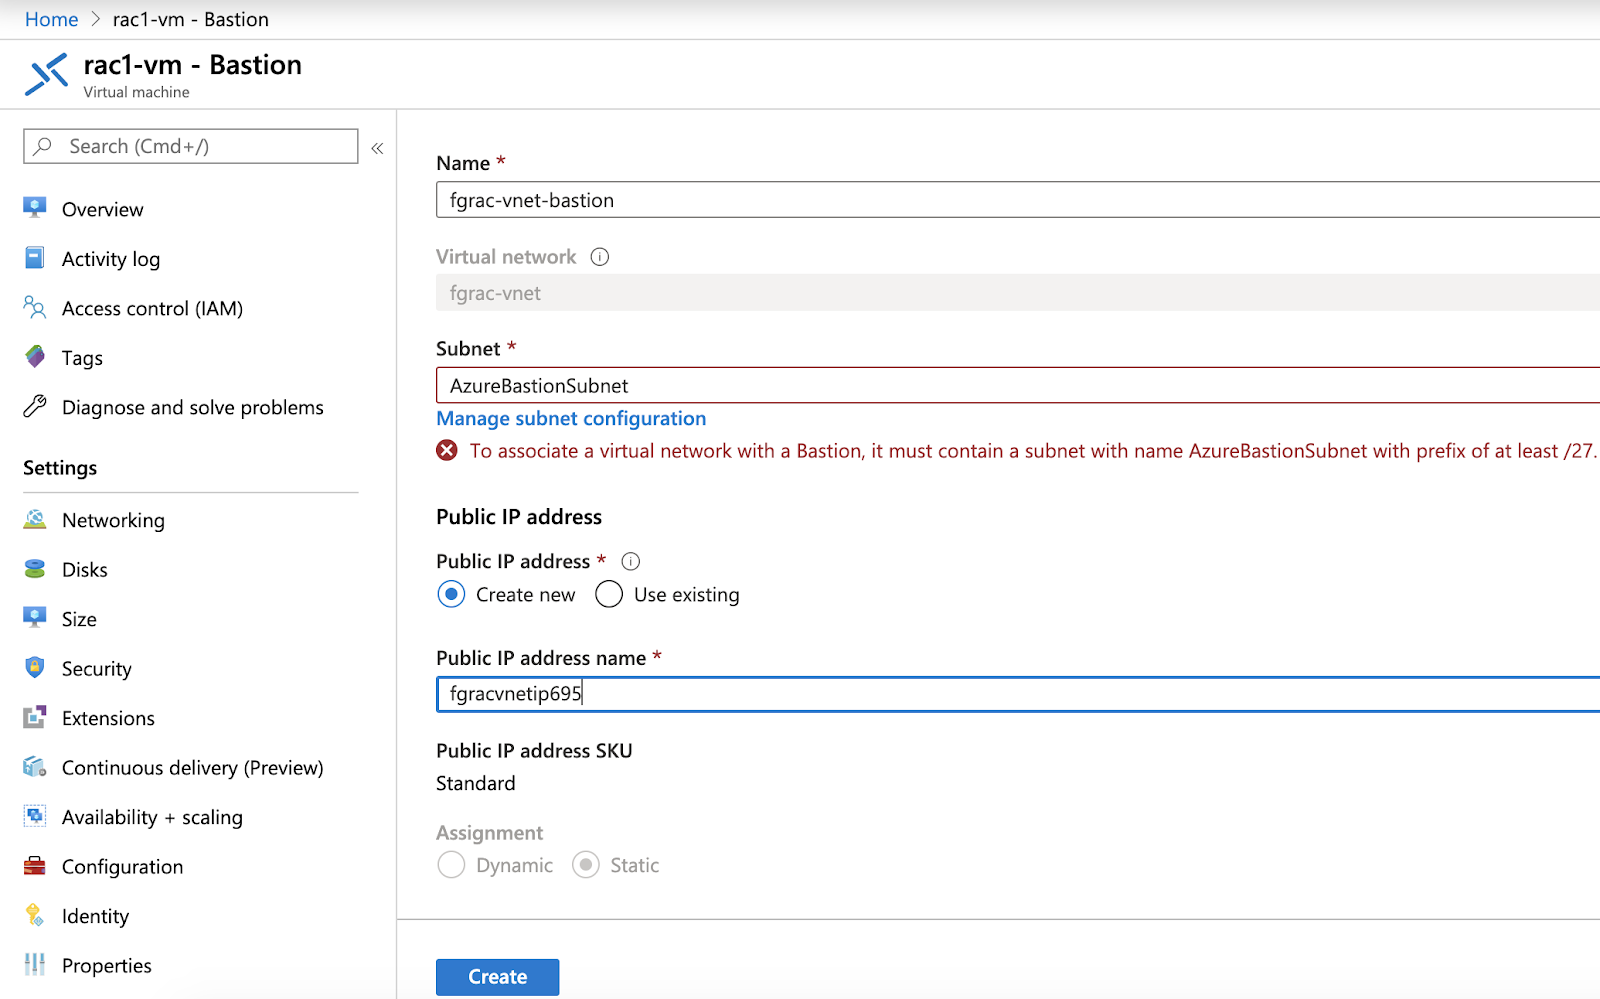
4. Add subnet named AzureBastionSubnet

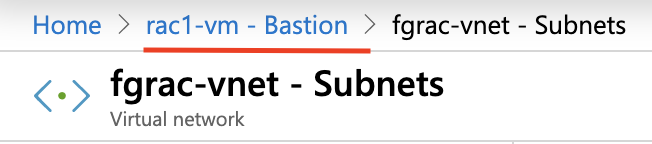
5. After configuring subnet, click link rac1-vm – Bastion in the upper left corner. And then click Create button.
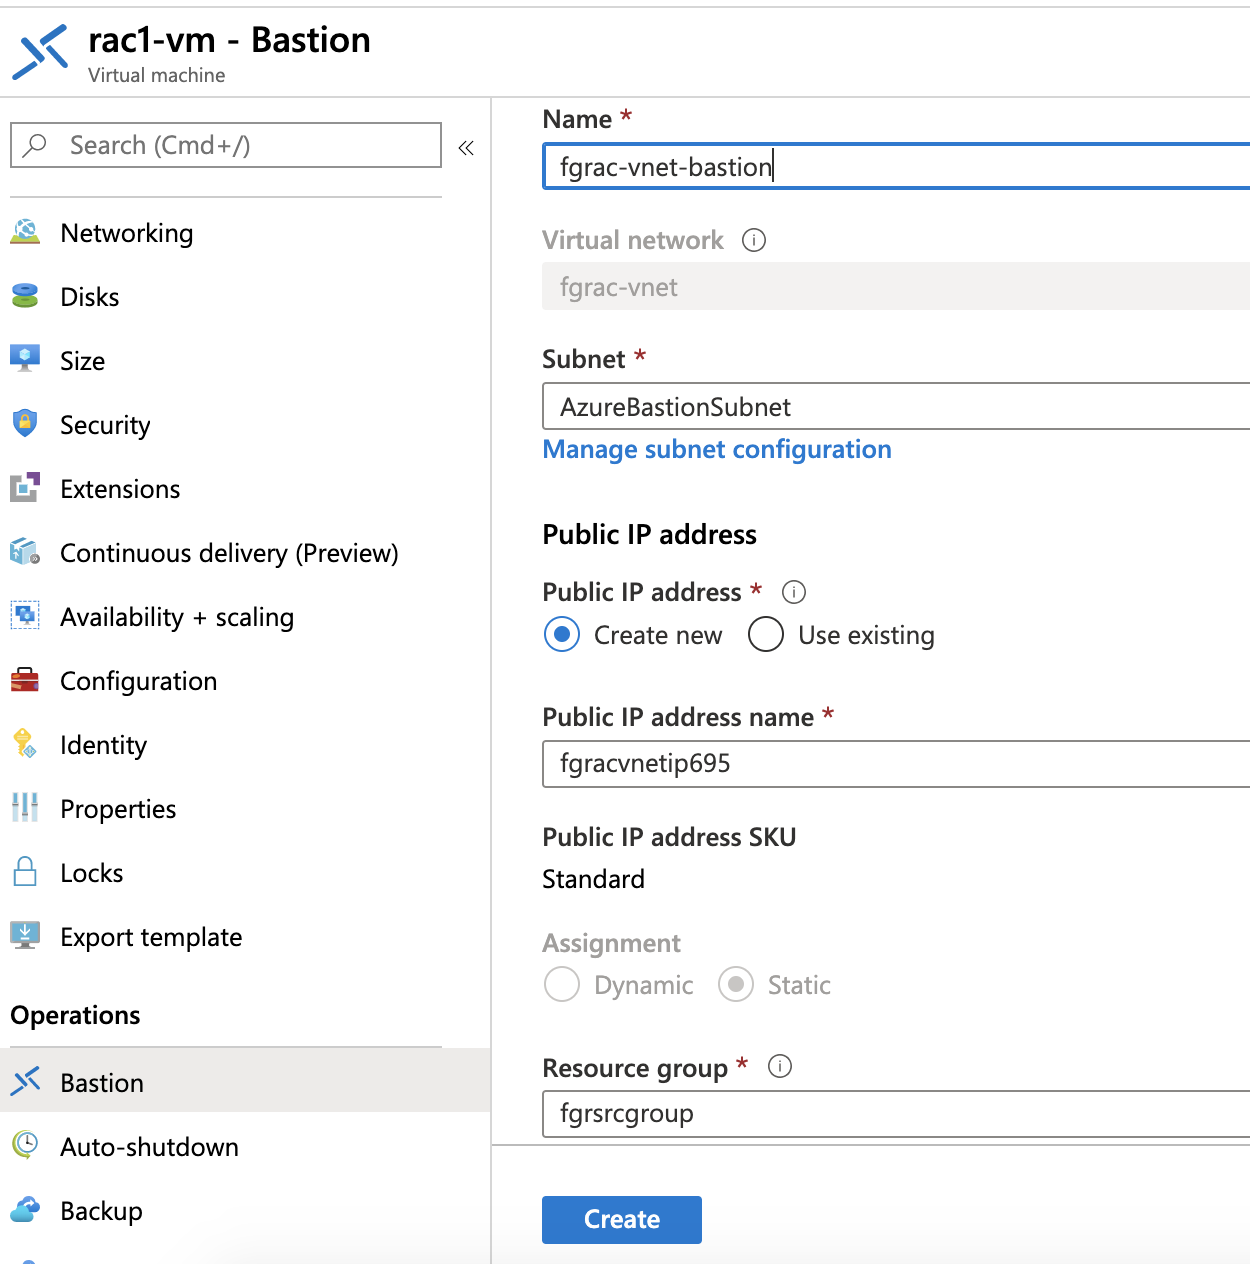
6. Connect to the VM via Azure Bastion
If you have ssh key based authentication, enter correct username and choose the right private key file.
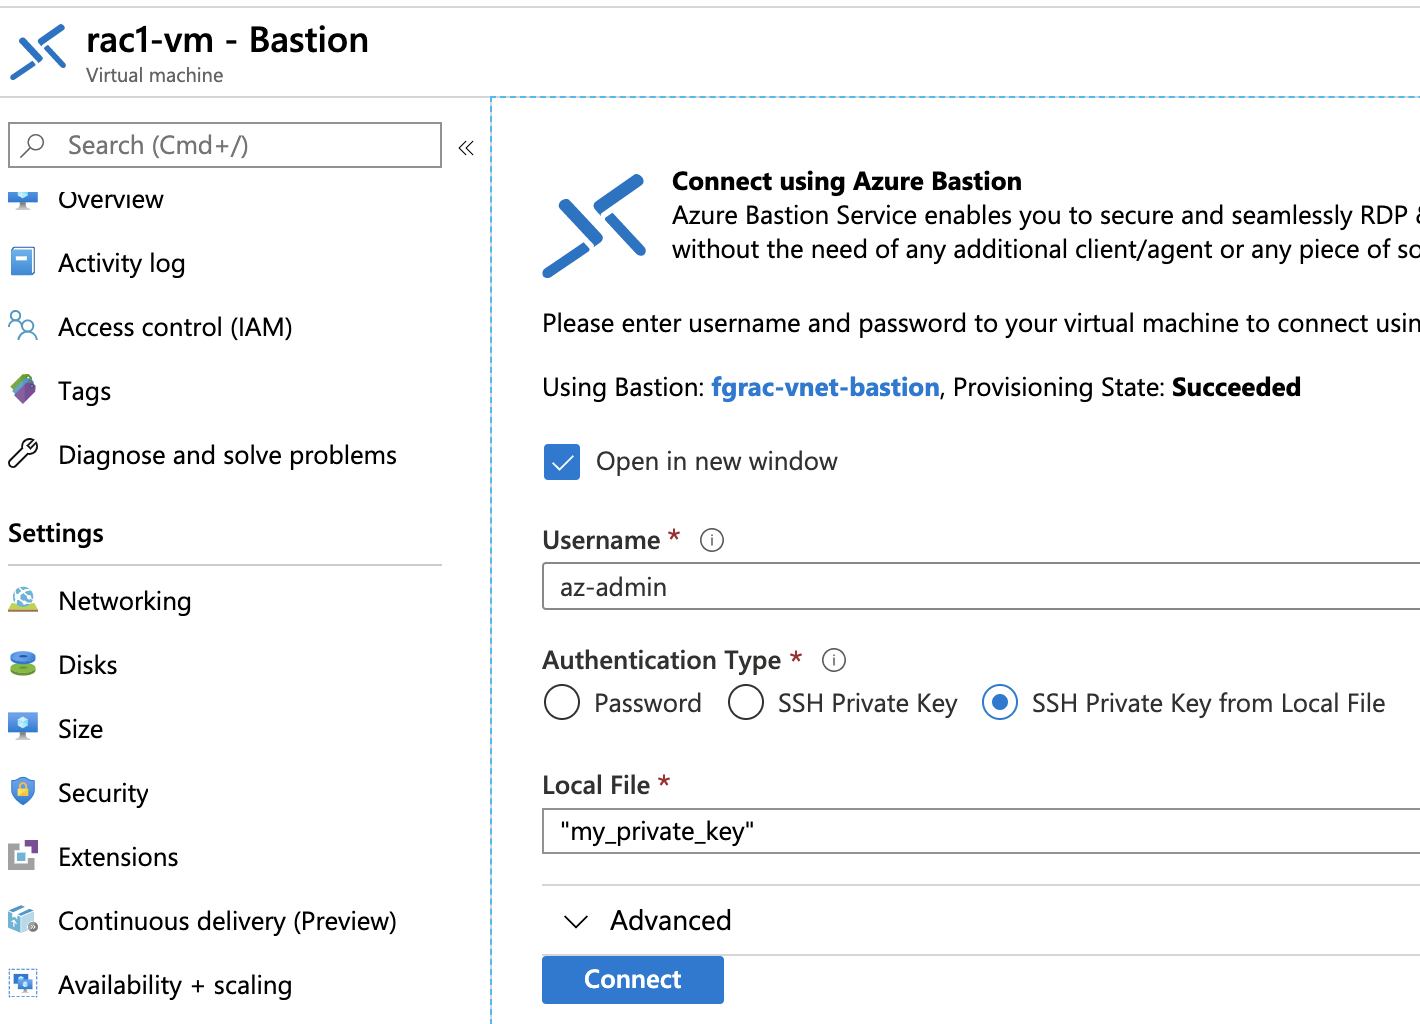
Please note, that the private key file should be in PEM format. If you get the following error message, it means your key file is not in the correct format:

If so, convert it using ssh-keygen (for windows PuTTYgen) :
$ ssh-keygen -p -m PEM -f my_private_key
Choose the key file again and click Connect.
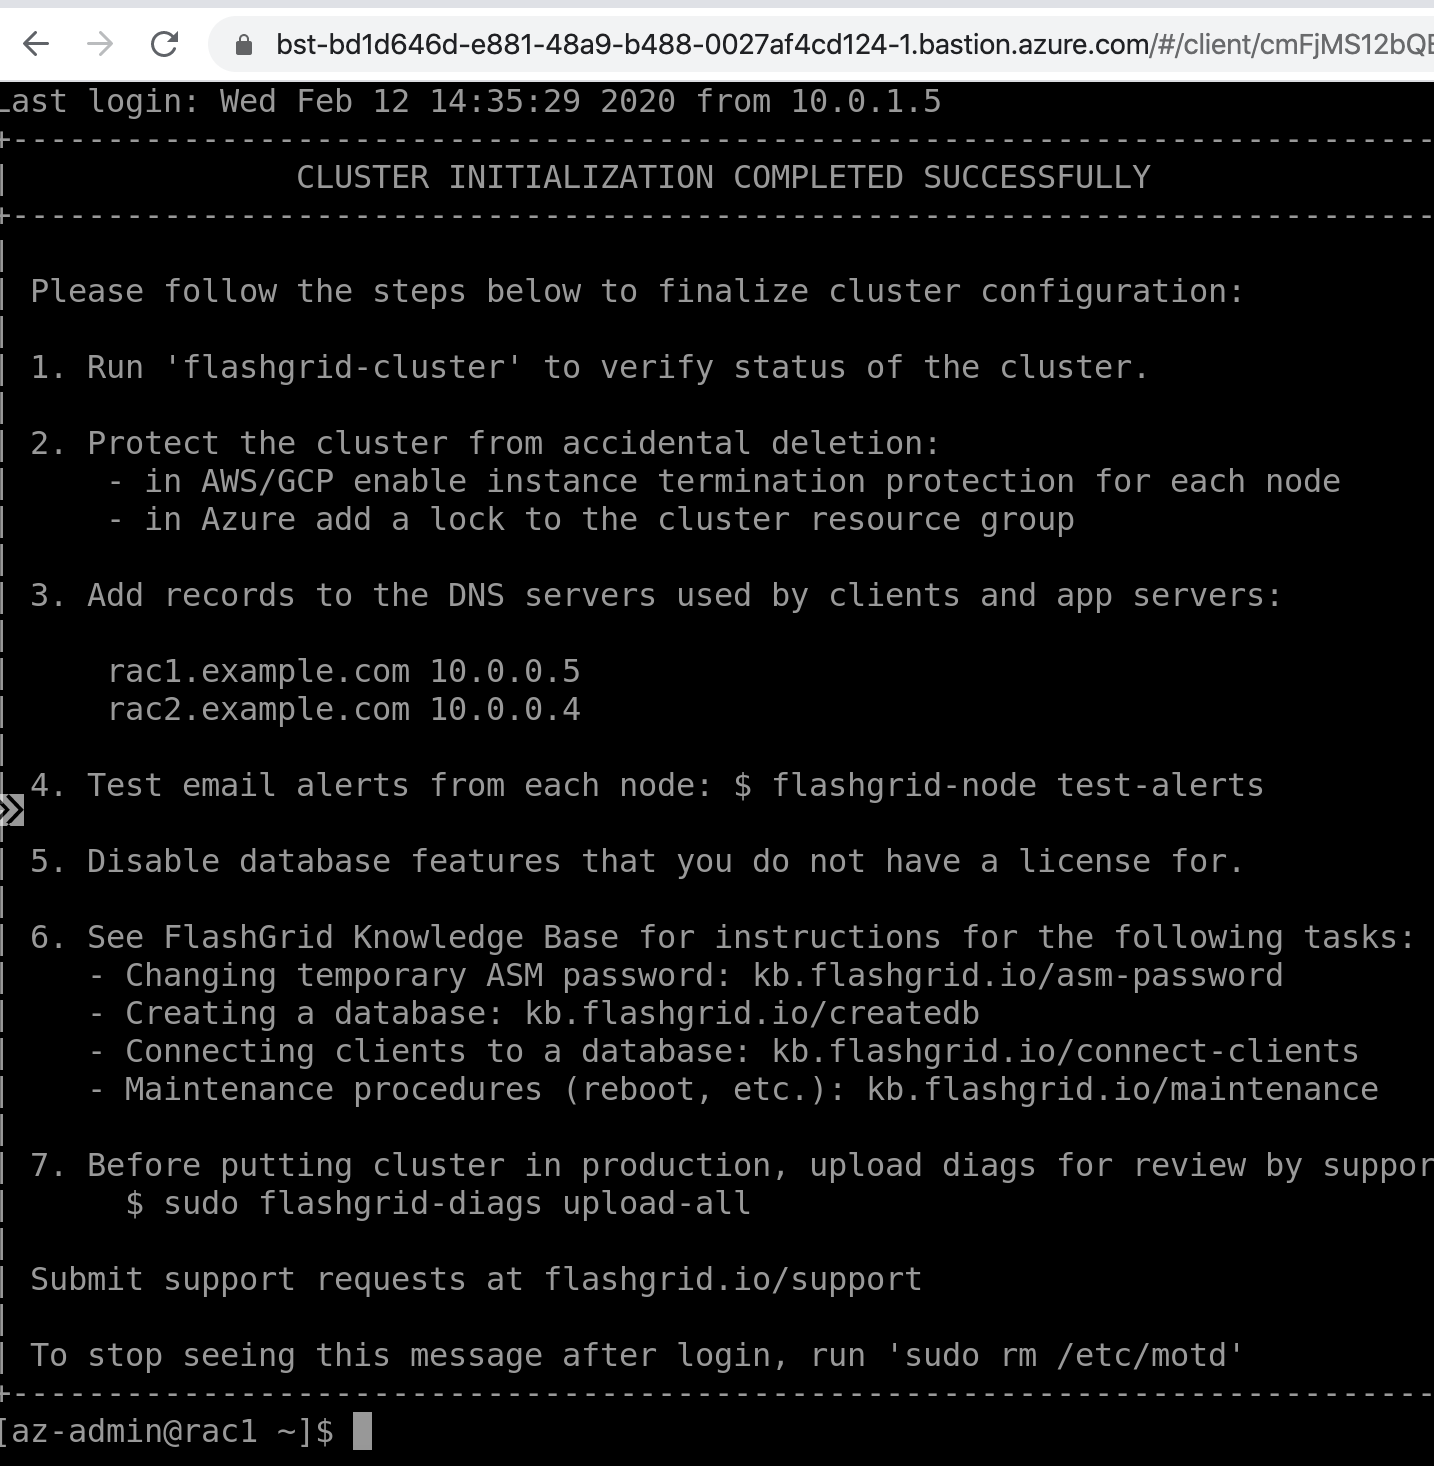
December 30, 2019 Leave a comment
Problem:
During testing Oracle ZDM (Zero Downtime Migration), I’ve stopped ZDM host ungracefully. After that zdmservice was not able to start:
[zdmuser@primracq ~]$ /u01/app/zdmhome/bin/zdmservice start
...
CRS_ERROR:TCC-0004: The container was not able to start.
CRS_ERROR:One or more listeners failed to start. Full details will be found in the appropriate container log fileContext [/rhp] startup failed due to previous errors
...
Start operation could not start zdmservice.
zdmservice start failed…
Troubleshooting:
Check logs under [/rhp], in my case /u01/app/zdmbase/crsdata/primracq/rhp/logs/
[zdmuser@primracq ~]$ ll /u01/app/zdmbase/crsdata/primracq/rhp/logs/
 total 3748
-rw-r--r-- 1 zdmuser zdm   277774 Dec 17 19:19 catalina.2019-12-17.log
-rw-r--r-- 1 zdmuser zdm   186117 Dec 18 18:12 catalina.2019-12-18.log
-rw-r--r-- 1 root    root   24133 Dec 19 19:12 catalina.2019-12-19.log
-rw-r--r-- 1 root    root  541694 Dec 22 20:31 catalina.2019-12-22.log
-rw-r--r-- 1 zdmuser zdm    35666 Dec 23 12:40 catalina.2019-12-23.log
-rw-r--r-- 1 zdmuser zdm  2407571 Dec 23 12:40 catalina.out
-rw-r--r-- 1 zdmuser zdm    12541 Dec 23 12:40 derby.log
-rw-r--r-- 1 zdmuser zdm   273095 Dec 23 12:40 jwc_checker_stdout_err_0.log
-rw-r--r-- 1 zdmuser zdm      155 Dec 23 12:40 JWCStartEvent.log
-rw-r--r-- 1 zdmuser zdm     5083 Dec 17 19:19 localhost.2019-12-17.log
-rw-r--r-- 1 zdmuser zdm     5083 Dec 18 18:12 localhost.2019-12-18.log
-rw-r--r-- 1 root    root    5083 Dec 19 19:12 localhost.2019-12-19.log
-rw-r--r-- 1 root    root    5083 Dec 22 20:31 localhost.2019-12-22.log
-rw-r--r-- 1 zdmuser zdm    18708 Dec 23 12:40 localhost.2019-12-23.log
catalina.out showed the following error:
Internal Exception: java.sql.SQLException: An SQL data change is not permitted for a read-only connection, user or database.
...
Caused by: ERROR 25502: An SQL data change is not permitted for a read-only connection, user or database.
Solution:
Remove db.lck file under /u01/app/zdmbase/derbyRepo:
# rm -rf /u01/app/zdmbase/derbyRepo/db.lck
And start the service again.
December 23, 2019 Leave a comment
Details:
Environment: RAC
Source name: orclA
Target name: orcl
1. Make sure that you have a recoverable whole database backup.
2. In Real Application Cluster we need to set cluster_database parameter to false and mount an instance on only one node:
[oracle@primrac1 ~]$ sqlplus / as sysdba
SQL> alter system set cluster_database=false scope=spfile;

[oracle@primrac1 ~]$ srvctl stop database orclA
[oracle@primrac1 ~]$ sqlplus / as sysdba
SQL> startup mount;
3. From the 1st node run nid utility. Specify username with sysdba privilege, target database name, and SETNAME parameter to yes.
[oracle@primrac1 ~]$ . oraenv
ORACLE_SID = [oracle] ? orclA1
The Oracle base remains unchanged with value /u01/app/oracle

[oracle@primrac1 ~]$ nid TARGET=SYS DBNAME=orcl SETNAME=YES
DBNEWID: Release 19.0.0.0.0 - Production on Mon Dec 16 16:54:36 2019
Copyright (c) 1982, 2019, Oracle and/or its affiliates.  All rights reserved.
Password:
Connected to database ORCLA (DBID=3133348785)
Connected to server version 19.4.0
Control Files in database:
    +DATA/ORCLA/CONTROLFILE/current.290.1020357617
Change database name of database ORCLA to ORCL? (Y/[N]) => Y
Proceeding with operation
Changing database name from ORCLA to ORCL
     Control File +DATA/ORCLA/CONTROLFILE/current.290.1020357617 - modified
     Datafile +DATA/ORCLA/DATAFILE/system.283.102035744 - wrote new name
     Datafile +DATA/ORCLA/DATAFILE/sysaux.286.102035749 - wrote new name
     Datafile +DATA/ORCLA/DATAFILE/undotbs1.287.102035753 - wrote new name
     Datafile +DATA/ORCLA/DATAFILE/undotbs2.300.102035839 - wrote new name
     Datafile +DATA/ORCLA/DATAFILE/users.288.102035754 - wrote new name
     Datafile +DATA/ORCLA/TEMPFILE/temp.296.102035765 - wrote new name
     Control File +DATA/ORCLA/CONTROLFILE/current.290.1020357617 - wrote new name
     Instance shut down
 Database name changed to ORCL.
 Modify parameter file and generate a new password file before restarting.
 Succesfully changed database name.
 DBNEWID - Completed succesfully.
5. Change db_name parameter in the initialization parameter file:
[oracle@primrac1 dbs]$ . oraenv
ORACLE_SID = [orcl1] ? orclA1

[oracle@primrac1 dbs]$ sqlplus / as sysdba
SQL> startup nomount;
SQL> alter system set db_name=orcl scope=spfile;
SQL> alter system set cluster_database=true scope=spfile;
SQL> shut immediate;
6. Modify database name in srvctl:
[oracle@primrac1 dbs]$ srvctl modify database -db orclA -dbname orcl
7. Remove existing password file entry and create a new one:
[oracle@primrac1 dbs]$ srvctl modify database -db orclA -pwfile

[oracle@primrac1 dbs]$ orapwd  dbuniquename=orclA file='+DATA/ORCLA/PASSWORD/pwdorcl.ora'
Enter password for SYS:
8. Start the database using srvctl:
[oracle@primrac1 dbs]$ srvctl start database -db orclA
Depending on your needs you may also update instance names. If so, please make sure that you don’t have instance-specific parameters (e.g orclA1.instance_number), otherwise, it’s better to recreate the parameter file with the correct instance names.
I’ve shown you just a simple example of the database name change. In your specific case, there may be other things that depend on the database name.
December 16, 2019 Leave a comment
1. Discovering all available network interfaces and verifying the connectivity between the nodes in the cluster through those network interfaces:
$ cluvfy comp nodecon -n all -verbose
2. Check the reachability of specified nodes from a source node:
$ cluvfy comp nodereach -n all -verbose
3. Check the integrity of Oracle Cluster Registry (OCR) on all the specified nodes:
$ cluvfy comp ocr -n all -verbose
4. Verifying the integrity of the Oracle high availability services daemon on all nodes in the cluster:
$ cluvfy comp ohasd -n all -verbose
5. Comparing nodes:
$ cluvfy comp peer -n all -verbose
6. Verifying the software configuration on all nodes in the cluster for the Oracle Clusterware home directory:
$ cluvfy comp software -n all -verbose
7. Check the integrity of the cluster on all the nodes in the node list:
$ cluvfy comp clu -n all -verbose
November 19, 2019 Leave a comment
ssh-keygen command can be used on Linux or Mac OS to retrieve the public key from the private SSH key:
$ ssh-keygen -y -f MyKeyPair.pem
ssh-rsa AAAAB3NzaC1yc2EAAAADAQABAAABAQChauLwkBK/vIiFY/t7uY6lzxESqZkZNvCAA3L42OH2fWzKptqGF+N32zjmLLSPFpYjoEHoHpi5e7yypTmiljtHcKUTwJTs3xclQrApCQvR+LneOi/5P5WaYl61G76osJesXiunLTa+RVr3LDR96LjPcql7JDnuh1RFhDqZ87nDfcGmXGV8iG7w3bk3R/2LuzzMYTgEVdv91S1OF1roH1baPXSV8MaYbOKhMUqV61+eP6/F5ZhT5Gk0BKX1KnQ3/gbgMqjMWRMZzYUeVjUbC52lYwrrBTQX5tHphAJtOTNJ/CpyuEuZ7ED+XYhX9Q1DNOZ47K51xbg5lsnyOBYSUqHz
-y – This option will read a private OpenSSH format file and print its public key.
-f – Specifies the filename of the key file.

