Install Backup Exec Client(Remote Agent) on Linux

RALUS is a remote agent installation , simply Linux client of Backup exec that can be retrieved from Backup Exec installation DVD in LinuxUnixMac folder.

Some details:

Client Server IP: 10.0.1.100
Client Hostname: orcl_node
Domain: sa.ge
Media Server IP: 192.168.1.100

Create some installation directory and locate RALUS installation file to this folder.

1. Installation

# mkdir /0
# cd /0
# tar -xvf RALUS_RMALS_RAMS-4164.5.tar
# ./installralus

Step 1:

Enter the system names separated by spaces on which to install RALUS: (oracle-node1.tbilisi.gov.ge)10.0.1.100

Checking system communication:

Checking OS version on 10.0.1.100 ………….. Linux 2.6.18-194.el5
Checking system support for 10.0.1.100 … Linux 2.6.18-194.el5 supported by RALUS

Initial system check completed successfully.

Press Enter.

Step 2:

Press Enter.

Step 3:

If the output is:

Checking file system space ……………. required space is available

Then  press Enter

Step 4:

To display the Remote Agent as a selection in a media server’s backup selection tree, and to be able to specify a local network for use between the Remote Agent and a media server, enter the names or IP addresses of the media servers that you want the Remote Agent on ‘10.0.1.100’ to communicate with.

An IP Address: XXX.XXX.XXX.XXX
A Host Name: COMPUTERNAME

Enter a directory host:192.168.1.100

Do you want to add another name or address for this agent? [y, n] (n)

Step 5:

If the information is correct press Enter

Step 6:

In this step beoper group will be created if it doesn’t exist and root user will be added to this group.

Press Enter

Press Enter

Press Enter (choosing y option by default)

Press Enter(choosing n option by default)

Press Enter (choosing y option by default)

Press Enter

Step 7 :

Checking VRTSralus package ………………………… not installed

Press Enter

Step 8:

Installing VRTSralus 13.0.4164 on 10.0.1.100 …… done 1 of 1 steps

Press Enter

Step 9 :

Creating configuration files on 10.0.1.100  ………………… Done

Press Enter

RALUS installation is complete, now it’s time to configure it.

2. Configuration on Client

Step 1:

Run AgentConfig:

# /opt/VRTSralus/bin/AgentConfig

Symantec Backup Exec Remote Agent Utility
Choose one of the following options:
1. Configure database access
2. Configure Oracle instance information
3. Quit
Please enter your selection: 1

Configuring machine information
Choose one of the following options:
1. Add system credentials for Oracle operations
2. Edit system credentials used for Oracle operations
3. Remove system credentials used for Oracle operations
4. View system credentials used for Oracle operations
5. Quit
Please enter your selection: 1
     Enter a user name that has local system credentials: oracle
Enter the password:
Re-enter password:
Validating credentials…….
Do you want to use a custom port to connect to the media server during Oracle operations? (Y/N): N
     Commit Oracle operation settings to the configuration file? (Y/N): Y
     SUCCESS: Successfully added the entry to the configuration file.

Configuring machine information
Choose one of the following options:
1. Add system credentials for Oracle operations
2. Edit system credentials used for Oracle operations
3. Remove system credentials used for Oracle operations
4. View system credentials used for Oracle operations
5. Quit
Please enter your selection: 5

Symantec Backup Exec Remote Agent Utility
Choose one of the following options:
1. Configure database access
2. Configure Oracle instance information
3. Quit
Please enter your selection: 2

If this computer is a RAC node, you must perform additional steps for configuration before you continue. Refer to the readme for these additional steps.

Configuring the Oracle Agent
Choose one of the following options:
1. Add a new Oracle instance to protect
2. Edit an existing Oracle instance
3. Delete an existing Oracle instance
4. View Oracle instance entries that have been added in the Remote Agent Utility
5. Quit
Please enter your selection: 1
     Select an Oracle instance to configure
Entry 1. orcl
Enter the number 0 to go back
Enter your selection: 1
     Enter the Oracle database SYSDBA user name: SYS
Enter the Oracle database SYSDBA password:
Re-enter password:
Validating credentials…….
Enter the media server name or IP address:      The length of the entered data is greater than the maximum permitted length.
Enter the media server name or IP address: 192.168.1.100
     Do you use a recovery catalog? (Y/N):N
     Do you want to use a customized job template? (Y/N): N
     Commit Oracle operation settings to the configuration file? (Y/N): Y
     Created symbolic link for /opt/VRTSralus/bin/libobk.so at /u01/app/oracle/product/11.2.0/db_1/lib/libobk.so
SUCCESS: Successfully added the entry to the configuration file.

Configuring the Oracle Agent
Choose one of the following options:
1. Add a new Oracle instance to protect
2. Edit an existing Oracle instance
3. Delete an existing Oracle instance
4. View Oracle instance entries that have been added in the Remote Agent Utility
5. Quit
Please enter your selection: 5

Symantec Backup Exec Remote Agent Utility
Choose one of the following options:
1. Configure database access
2. Configure Oracle instance information
3. Quit
Please enter your selection: 3

Start agent:

# /etc/init.d/VRTSralus.init start
Starting Symantec Backup Exec Remote Agent ……
Starting Symantec Backup Exec Remote Agent:                              [  OK  ]

3. Configuration on Media Server

To make media server see your client do the following steps:

Step 1:

Run Start->-All Programs>Symantec Backup Exec->Backup Exec 2010

Step 2:

Tools->Options->Oracle –>click Modify List button->click New button and fill the following fields, by the following way:

Oracle or DB2 Server: 10.0.1.100
Logon Account  ->>>>click New button –>click New button and fill the following fields, by the following way:

User name: oracle
Password: enter oracle password for client server
Confirm Password: enter the password again
Account Name: oracle

click OK.

You will also need to configure SYS  user account.

And choose oracle in Logon Account  field.

click OK.

Do the same steps for 2 more times, just change Oracle or DB2 Server filed to orcl_node(instead of 10.0.1.100) for the first time and orcl_node.sa.ge for the second time

Step 3:

On media server , in hosts file add client entry.

That is all.
Install Oracle 11.2.0.3 with ASM on Centos 6.3

“ For RHEL 6, Oracle will provide ASMLib software and updates only when configured with a kernel distributed by Oracle. Oracle will not provide ASMLib packages for kernels distributed by Red Hat as part of RHEL 6. ASMLib updates will be delivered via Unbreakable Linux Network (ULN), which is available to customers with Oracle Linux support. ULN works with both Oracle Linux or Red Hat Linux installations, but ASMLib usage will require replacing any Red Hat kernel with a kernel provided by Oracle.”

Because of the above announcement we use UDEV rules to prepare disks for ASM installation.

So let’s start.

1. Install required RPMs.

RPM names:

compat-libcap1-1.10-1.i686.rpm
compat-libcap1-1.10-1.x86_64.rpm
compat-libstdc++-33-3.2.3-69.el6.x86_64.rpm
elfutils-devel-0.152-1.el6.x86_64.rpm
elfutils-libelf-devel-0.152-1.el6.x86_64.rpm
gcc-c++-4.4.6-4.el6.x86_64.rpm
glibc-2.12-1.80.el6.i686.rpm
glibc-devel-2.12-1.80.el6.i686.rpm
libaio-0.3.107-10.el6.i686.rpm
libaio-devel-0.3.107-10.el6.x86_64.rpm
libattr-2.4.44-7.el6.i686.rpm
libcap-2.16-5.5.el6.i686.rpm
libgcc-4.4.6-4.el6.i686.rpm
libstdc++-devel-4.4.6-4.el6.x86_64.rpm
libtool-ltdl-2.2.6-15.5.el6.i686.rpm
ncurses-devel-5.7-3.20090208.el6.i686.rpm
ncurses-libs-5.7-3.20090208.el6.i686.rpm
nss-softokn-freebl-3.12.9-11.el6.i686.rpm
pdksh-5.2.14-30.x86_64.rpm
readline-6.0-4.el6.i686.rpm

If you have Centos installation disk, these RPMs should be locate there. Or you can download them from  http://rpm.pbone.net/

Note: if during installing pdksh-5.2.14-30.x86_64.rpm it says that package conflicts with ksh then you should erase ksh package and install pdksh, like this:

# rpm -qa | grep ksh
# rpm -e ksh-…
# rpm –ivh pdksh-5.2.14-30.x86_64.rpm

2. Configure Kernel:

# vi /etc/sysctl.conf

kernel.shmall = 2097152
kernel.shmmax = 982431744
kernel.shmmni = 4096
kernel.sem = 250 32000 100 128
fs.file-max = 6815744
fs.aio-max-nr = 1048576
net.ipv4.ip_local_port_range = 9000 65500
net.core.rmem_default = 262144
net.core.rmem_max = 4194304
net.core.wmem_default = 262144
net.core.wmem_max = 1048576

To make changes take effect:

# sysctl –p

Edit /etc/pam.d/login :

# vi /etc/pam.d/login

session required pam_limits.so

Edit /etc/security/limits.conf:

# vi /etc/security/limits.conf

oracle soft  nproc   2047
oracle hard  nproc   16384
oracle soft  nofile  1024
oracle hard  nofile  65536

grid   soft  nproc   2047
grid   hard  nproc   16384
grid   soft  nofile  1024
grid   hard  nofile  65536

Run the following to add lines in /etc/pam.d/login:

[root@orcl ~]# cat >> /etc/pam.d/login <<EOF
session required pam_limits.so
EOF

Run the following to add lines in /etc/profile:

[root@orcl ~]# cat >> /etc/profile <<EOF
if [ \$USER = "oracle" ] || [ \$USER = "grid" ]; then
if [ \$SHELL = "/bin/ksh" ]; then
ulimit -p 16384
ulimit -n 65536
else
ulimit -u 16384 -n 65536
fi
umask 022
fi
EOF

Run the following to add lines in /etc/csh.login

[root@orcl ~]# cat >> /etc/csh.login <<EOF
if ( \$USER == "oracle" || \$USER == "grid" )
then
limit maxproc 16384
limit descriptors 65536
endif
EOF

Disable SELinux:

# /usr/sbin/getenforce
Enforcing

# /usr/sbin/setenforce 0

To make changes permanent, change /etc/sysconfig/selinux file by the following way:

cat /etc/sysconfig/selinux

# This file controls the state of SELinux on the system.
# SELINUX= can take one of these three values:
#     enforcing – SELinux security policy is enforced.
#     permissive – SELinux prints warnings instead of enforcing.
#     disabled – No SELinux policy is loaded.
SELINUX=disabled
# SELINUXTYPE= can take one of these two values:
#     targeted – Targeted processes are protected,
#     mls – Multi Level Security protection.
SELINUXTYPE=targeted

To check the status again:

# /usr/sbin/getenforce
Disabled

3.  Creating OS groups and users.

#Creating groups for Grid Infrastructure

groupadd asmadmin
groupadd asmdba
groupadd asmoper

#Creating groups for Oracle Software

groupadd oinstall
groupadd dba
groupadd oper

#Creating user for Grid Infrastructure

useradd -g oinstall -G dba,asmadmin,asmdba,asmoper -d /home/grid grid

#Creating user for Oracle Software

useradd -g oinstall -G dba,oper,asmdba -d /home/oracle oracle

#Setting password for users

passwd grid
passwd oracle

4. Creating necessary directories

mkdir -p /u01/app/grid
mkdir -p /u01/app/11.2.0/grid
mkdir -p /u01/app/oracle
chown -R grid:oinstall /u01
chown oracle:oinstall /u01/app/oracle
chmod -R 775 /u01

5. Creating .bash_profile-s

#For Oracle user

su – oracle
vi .bash_profile

if [ -f ~/.bashrc ]; then
. ~/.bashrc
fi

ORACLE_SID=orcl; export ORACLE_SID

ORACLE_UNQNAME=orcl; export ORACLE_UNQNAME

JAVA_HOME=/usr/local/java; export JAVA_HOME

ORACLE_BASE=/u01/app/oracle; export ORACLE_BASE

ORACLE_HOME=$ORACLE_BASE/product/11.2.0/db_1
export ORACLE_HOME

ORACLE_TERM=xterm; export ORACLE_TERM

NLS_DATE_FORMAT="DD-MON-YYYY HH24:MI:SS"
export NLS_DATE_FORMAT

TNS_ADMIN=$ORACLE_HOME/network/admin; export TNS_ADMIN

ORA_NLS11=$ORACLE_HOME/nls/data; export ORA_NLS11

PATH=.:${JAVA_HOME}/bin:${PATH}:$HOME/bin:$ORACLE_HOME/bin
PATH=${PATH}:/usr/bin:/bin:/usr/bin/X11:/usr/local/bin
PATH=${PATH}:/u01/app/common/oracle/bin
export PATH

LD_LIBRARY_PATH=$ORACLE_HOME/lib
LD_LIBRARY_PATH=${LD_LIBRARY_PATH}:$ORACLE_HOME/oracm/lib
LD_LIBRARY_PATH=${LD_LIBRARY_PATH}:/lib:/usr/lib:/usr/local/lib
export LD_LIBRARY_PATH

CLASSPATH=$ORACLE_HOME/JRE
CLASSPATH=${CLASSPATH}:$ORACLE_HOME/jlib
CLASSPATH=${CLASSPATH}:$ORACLE_HOME/rdbms/jlib
CLASSPATH=${CLASSPATH}:$ORACLE_HOME/network/jlib
export CLASSPATH

THREADS_FLAG=native; export THREADS_FLAG

export TEMP=/tmp
export TMPDIR=/tmp

umask 022

#For Grid user

su – grid
vi .bash_profile

if [ -f ~/.bashrc ]; then
. ~/.bashrc
fi

ORACLE_SID=+ASM; export ORACLE_SID

JAVA_HOME=/usr/local/java; export JAVA_HOME

ORACLE_BASE=/u01/app/grid; export ORACLE_BASE

ORACLE_HOME=/u01/app/11.2.0/grid; export ORACLE_HOME

ORACLE_TERM=xterm; export ORACLE_TERM

NLS_DATE_FORMAT="DD-MON-YYYY HH24:MI:SS"; export NLS_DATE_FORMAT

TNS_ADMIN=$ORACLE_HOME/network/admin; export TNS_ADMIN

ORA_NLS11=$ORACLE_HOME/nls/data; export ORA_NLS11

PATH=.:${JAVA_HOME}/bin:${PATH}:$HOME/bin:$ORACLE_HOME/bin
PATH=${PATH}:/usr/bin:/bin:/usr/bin/X11:/usr/local/bin
PATH=${PATH}:/u01/app/common/oracle/bin
export PATH

LD_LIBRARY_PATH=$ORACLE_HOME/lib
LD_LIBRARY_PATH=${LD_LIBRARY_PATH}:$ORACLE_HOME/oracm/lib
LD_LIBRARY_PATH=${LD_LIBRARY_PATH}:/lib:/usr/lib:/usr/local/lib
export LD_LIBRARY_PATH

CLASSPATH=$ORACLE_HOME/JRE
CLASSPATH=${CLASSPATH}:$ORACLE_HOME/jlib
CLASSPATH=${CLASSPATH}:$ORACLE_HOME/rdbms/jlib
CLASSPATH=${CLASSPATH}:$ORACLE_HOME/network/jlib
export CLASSPATH

THREADS_FLAG=native; export THREADS_FLAG

export TEMP=/tmp
export TMPDIR=/tmp

umask 022


6. Add disks for ASM

If your disk is not partitioned yet, partition it by fdisk utility.

At this point you will need SCSI identifier.

So if your disk is physical just run the following command to identify it:

# scsi_id -g -u -d /dev/sdb
36000c292dfddac7b8934d3293313098e

Or if you have virtual disk , you will need to set disk.EnableUUID parameter to TRUE to see this identifier:

Shutdown VM, go to the directory where VM files are stored and edit VMX file. Add the following line:

disk.EnableUUID = "TRUE"

Restart your VM and run the above command (scsi_id -g -u -d /dev/sdb)

We will use this identifier for the UDEV rules to set permissions and alias for the new device in /etc/udev/rules.d/50-udev.rules file.

# vi /etc/udev/rules.d/50-udev.rules

KERNEL=="sd?1", BUS=="scsi", PROGRAM=="/sbin/scsi_id -g -u -d /dev/$parent",
RESULT=="36000c292dfddac7b8934d3293313098e", NAME="oracleasm/asm-disk1",
OWNER="oracle", GROUP="dba", MODE="0660"

Restart udev, by the following way:

# /sbin/start_udev
Starting udev:                                             [  OK  ]

Check that alias exists:

# ls -la /dev/oracleasm/*
brw-rw—- 1 oracle dba 8, 17 Feb 18 12:49 /dev/oracleasm/asm-disk1

7. Install grid

Go to the grid installation folder and run:

./runInstaller

Step 1:

Skip Software Updates.

Step 2:

Configure Oracle Grid Infrastructure for a Standalone Server.

Step 3:

Click Next.

Step 4:

Select the Change Discovery Path button and enter /dev/oracleasm.

There should appear /dev/oracleasm/asm-disk-1 and check it.

Type disk group name as DATA01.

Step 5:

Set the passwords for the SYS and ASMSNMP accounts:

Step 6:

ASM Database Administrator(OSDBA) Group : asmdba
ASM Instance Administration Operator(OSOPER) Group: asmoper
ASM Instance Administrator(OSASM) Group: asmadmin

Step 7:

Click Next.

Step 8:

Click Next.

Step 9:

Click Install.

After pop-upping the window , asking to run

      • /u01/app/oraInventory/orainstRoot.sh
  • /u01/app/oracle/product/11.2.0/db_1/root.sh

run these scripts one by one and click OK on pop-up window.

Note: if root.sh script shows the error like this:

…error while loading shared libraries: libcap.so.1: …

Then in your system libcap-1 and libcap-2 RPMs are missing, first install them.

8. Install database

Go to the database installation folder and run:

./runInstaller

Step 1:

I don’t want any more spam thanks.

Step 2:

Skip the updates.

Step 3:

Create and configure a database.

Step 4:

Server Class.

Step 5:

Single instance database installation.

Step 6:

Advanced install.

Step 7:

Choose the languages you want.

Step 8:

Enterprise Edition.

Step 9:

Choose the defaults.
Note: Grid and Database must be in the different folders.

Step 10:

General Purpose / Transaction Processing.

Step 11:

Write a database name.

Step 12:

Use Oracle Enterprise Manager Database Control for database management.

Step 13:

Use Automatic Storage Management.

Step 15:

Do not enable automated backups

Step 16:

Select the DATA01 diskgroup.

Step 17:

Set the passwords for the database.

Step 18:

Accept the defaults.

Database Administrator(OSDBA) Group: dba
Database Operator(OSOPER) Group: oper

Step 19:

Click Install to start the installer.

After the installation requires to run root.sh script, run it.

That is all.

Change Hostname in Linux(Red Hat)

1. Change the value of the HOSTNAME parameter to the new hostname:

# vi /etc/sysconfig/network

HOSTNAME=newhostname

2.  Edit hosts file:

# vi /etc/hosts

192.168.1.100    newhostname     newhostname.sa.ge

3. Reboot the system.

4. Check that the new hostname is set:

# hostname

newhostname    

SQL Server Reporting Services. Error: …Windows User Account Control (UAC) restrictions have been addressed

Error:
User ‘DomainUser’ does not have required permissions. Verify that sufficient permissions have been granted and Windows User Account Control (UAC) restrictions have been addressed.

Solution:

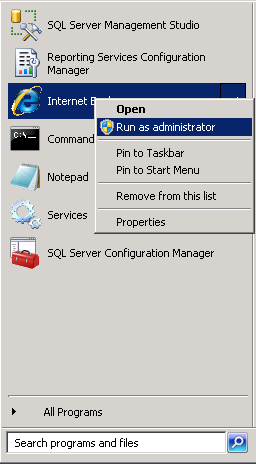
1. Run IE as Administrator:

image

2. Go to the Reporting Services address: http://localhost/Reports

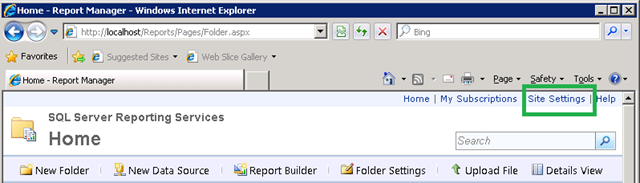
3. Go to the Site Settings:

image

4. In Security section –> click New Role Assignment

image

5. Add username or group that you want to grant permissions and choose appropriate role:

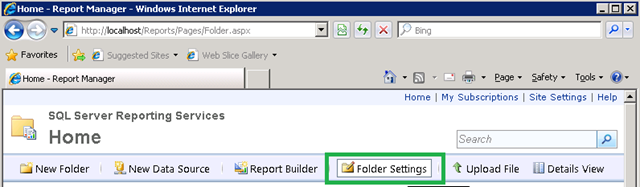
image

6. Go to the Home page and click Folder Settings:

image

7. Add username or group that you want to grant permission.

That’s all.

SQL Server Reporting Services. Error: …Windows User Account Control (UAC) restrictions have been addressed

Error:
User ‘Domain\User’ does not have required permissions. Verify that sufficient permissions have been granted and Windows User Account Control (UAC) restrictions have been addressed.

Solution:

1. Run IE as Administrator:

image

2. Go to the Reporting Services address: http://localhost/Reports

3. Go to the Site Settings:

image

4. In Security section –> click New Role Assignment

image

5. Add username or group that you want to grant permissions and choose appropriate role:

image

6. Go to the Home page and click Folder Settings:

image

7. Add username or group that you want to grant permission.

That’s all.

Migrate SQL Server Reporting Services to another server

Here are the steps how to migrate RS to another server using same database release. For example: From SQL Server 2008-> to SQL Server 2008.

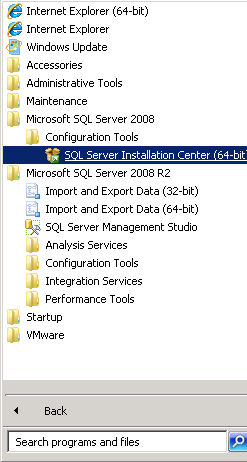
1. Install Database and Reporting Services on target server. If you have just database service installed , you can add Reporting Service by running SQL Server Installation Center:

image

follow the steps and check Reporting Services box for installation.

2.  Backup Reporting Service databases on source server, for me they are: ReportServer and ReportServerTempDB.

3. Backup Encryption Key on source server.

Run Reporting Services Configuration Manager:

image

Connect to the  Reporting Server –> Go to the Encryption Keys section and click Backup button.

image

It will ask you for the password , which will be needed for the restoration on target server.

4. Restore ReportServer and ReportServerTempDB databases(backed up in the 2-nd step) with the overwrite option on the target server.

5. On target server go to the Reporting Services Configuration Manager –> Encryption Keys section and restore the key. (Enter the password, when prompted, which you have indicated during backup of the key on source server )

Note, in Database section reporting service should point to the database named ReportServer .

You should now navigate to the reporting service address: http://target_server_hostname:80/Reports.

Change boot mode in Linux

There are 6 boot modes.

0 –  Halt (Shutdown)
1 – Single user mode
2 – Not yet implemented
3 – Full multi-user command line mode
4 – Not used.
5 – Full multi-user Graphical User Interface mode
6 – Reboot

Default mode is written into /etc/inittab file.

By changing the following line in that file,  the default boot mode will be changed:

id:5:initdefault:

If it is production server and you don’t need to use GUI interface you can set default boot mode to 3. This is beneficial, because  the mode 3 takes less memory(RAM)  than the mode 5.

id:3:initdefault:

Note: Be careful while changing the default mode, because the following values like 0(shutdown) or 6(reboot) will cause problems. Never try to set these values, I mean 0 or 6.

Recreate Oracle 11g OEM DBConsole manually for RAC

If you have problems with existing OEM, the best way is to reconfigure it. Here are the steps, how to do it correctly:

$ emca -config dbcontrol db -repos recreate -cluster

STARTED EMCA at Jan 22, 2013 6:04:10 PM
EM Configuration Assistant, Version 11.2.0.3.0 Production
Copyright (c) 2003, 2011, Oracle. All rights reserved.

Enter the following information:
Database unique name: orcl
Service name: orcl
Listener ORACLE_HOME [ /u01/app/11.2.0/grid ]:
Password for SYS user:
Database Control is already configured for the database orcl
You have chosen to configure Database Control for managing the database orcl
This will remove the existing configuration and the default settings and perform a fresh configuration
———————————————————————-
WARNING : While repository is dropped the database will be put in quiesce mode.
———————————————————————-
Do you wish to continue? [yes(Y)/no(N)]: y
Password for DBSNMP user:
Password for SYSMAN user:
Cluster name: oracle-db

!!!Stop here for a while: if you don’t know your cluster name run the following command:

$ su – grid
cemutlo -n

…continuing configuration

Email address for notifications (optional):
Outgoing Mail (SMTP) server for notifications (optional):
ASM ORACLE_HOME [ /u01/app/11.2.0/grid ]:
ASM port [ 1521 ]:
ASM username [ ASMSNMP ]:
ASM user password:
Jan 22, 2013 6:05:02 PM oracle.sysman.emcp.util.GeneralUtil initSQLEngineRemotely
WARNING: Error during db connection : ORA-12514: TNS:listener does not currently know of service requested in connect descriptor

—————————————————————–

You have specified the following settings

Database ORACLE_HOME ……………. /u01/app/oracle/product/11.2.0/db_1

Database instance hostname ……………. Listener ORACLE_HOME ……………. /u01/app/11.2.0/grid
Listener port number ……………. 1521
Cluster name ……………. oracle-db
Database unique name ……………. orcl
Email address for notifications …………… mariam.kupa@gmail.com
Outgoing Mail (SMTP) server for notifications …………… mail.tbilisi.gov.ge
ASM ORACLE_HOME ……………. /u01/app/11.2.0/grid
ASM port ……………. 1521
ASM user role ……………. SYSDBA
ASM username ……………. ASMSNMP

—————————————————————–
———————————————————————-
WARNING : While repository is dropped the database will be put in quiesce mode.
———————————————————————-
Do you wish to continue? [yes(Y)/no(N)]: y
Jan 22, 2013 6:05:18 PM oracle.sysman.emcp.EMConfig perform
INFO: This operation is being logged at /u01/app/oracle/cfgtoollogs/emca/orcl/emca_2013_01_22_18_04_10.log.
Jan 22, 2013 6:05:20 PM oracle.sysman.emcp.util.PortManager isPortInUse
WARNING: Specified port 5540 is already in use.
Jan 22, 2013 6:05:20 PM oracle.sysman.emcp.util.PortManager isPortInUse
WARNING: Specified port 5520 is already in use.
Jan 22, 2013 6:05:20 PM oracle.sysman.emcp.util.PortManager isPortInUse
WARNING: Specified port 1158 is already in use.
Jan 22, 2013 6:05:20 PM oracle.sysman.emcp.util.DBControlUtil stopOMS
INFO: Stopping Database Control (this may take a while) …
Jan 22, 2013 6:06:01 PM oracle.sysman.emcp.EMReposConfig invoke
INFO: Dropping the EM repository (this may take a while) …
Jan 22, 2013 6:08:00 PM oracle.sysman.emcp.EMReposConfig invoke
INFO: Repository successfully dropped
Jan 22, 2013 6:08:01 PM oracle.sysman.emcp.EMReposConfig createRepository
INFO: Creating the EM repository (this may take a while) …
Jan 22, 2013 6:11:39 PM oracle.sysman.emcp.EMReposConfig invoke
INFO: Repository successfully created
Jan 22, 2013 6:11:44 PM oracle.sysman.emcp.EMReposConfig uploadConfigDataToRepository
INFO: Uploading configuration data to EM repository (this may take a while) …
Jan 22, 2013 6:12:17 PM oracle.sysman.emcp.EMReposConfig invoke
INFO: Uploaded configuration data successfully
Jan 22, 2013 6:12:18 PM oracle.sysman.emcp.EMDBCConfig instantiateOC4JConfigFiles
INFO: Propagating /u01/app/oracle/product/11.2.0/db_1/oc4j/j2ee/OC4J_DBConsole_oracle-node1_orcl to remote nodes . ..
Jan 22, 2013 6:12:20 PM oracle.sysman.emcp.EMDBCConfig instantiateOC4JConfigFiles
INFO: Propagating /u01/app/oracle/product/11.2.0/db_1/oc4j/j2ee/OC4J_DBConsole_oracle-node2_orcl to remote nodes . ..
Jan 22, 2013 6:12:26 PM oracle.sysman.emcp.EMAgentConfig deployStateDirs
INFO: Propagating /u01/app/oracle/product/11.2.0/db_1/oracle-node1_orcl to remote nodes …
Jan 22, 2013 6:12:28 PM oracle.sysman.emcp.EMAgentConfig deployStateDirs
INFO: Propagating /u01/app/oracle/product/11.2.0/db_1/oracle-node2_orcl to remote nodes …
Jan 22, 2013 6:12:31 PM oracle.sysman.emcp.util.DBControlUtil secureDBConsole
INFO: Securing Database Control (this may take a while) …
Jan 22, 2013 6:13:00 PM oracle.sysman.emcp.util.DBControlUtil startOMS
INFO: Starting Database Control (this may take a while) …
Jan 22, 2013 6:13:20 PM oracle.sysman.emcp.EMDBPostConfig performConfiguration
INFO: Database Control started successfully
Jan 22, 2013 6:13:20 PM oracle.sysman.emcp.EMDBPostConfig performConfiguration
INFO: >>>>>>>>>>> The Database Control URL is https://oracle-node1.mr.gov.ge:1158/em <<<<<<<<<<<
Jan 22, 2013 6:13:22 PM oracle.sysman.emcp.EMDBPostConfig showClusterDBCAgentMessage
INFO:
**************** Current Configuration ****************
INSTANCE NODE DBCONTROL_UPLOAD_HOST
———- ———- ———————

orcl oracle-node1 oracle-node1.mr.gov.ge
orcl oracle-node2 oracle-node1.mr.gov.ge
Jan 22, 2013 6:13:22 PM oracle.sysman.emcp.EMDBPostConfig invoke
WARNING:
************************ WARNING ************************

Management Repository has been placed in secure mode wherein Enterprise Manager data will be encrypted. The encry ption key has been placed in the file: /u01/app/oracle/product/11.2.0/db_1/oracle-node1_orcl/sysman/config/emkey.o ra. Ensure this file is backed up as the encrypted data will become unusable if this file is lost.

***********************************************************
Enterprise Manager configuration completed successfully
FINISHED EMCA at Jan 22, 2013 6:13:22 PM

For me to access OEM the URL is  https://oracle-node1.mr.gov.ge:1158/em

Good Luck!

Table Locks and Foreign Keys

Brief Description:

After reading “Expert Indexing in Oracle Database 11g ” book, I decided to share the following information with you. Which, I think, is very very useful.

It is better to index foreign key columns to avoid locking issues. Note, that locking issues are avoided when index type is B-tree, not Bitmap.

The Scenario:

Note: This is the quote from the following book:

Expert Indexing in Oracle Database 11g
Maximum Performance for Your Database

Darl Kuhn
Sam R. Alapati
Bill Padfield

“Here’s a simple example that demonstrates the locking issue when foreign key columns are not indexed.

First, create two tables (DEPT and EMP) and associate them with a foreign key constraint.

create table emp(emp_id number primary key, dept_id number);

create table dept(dept_id number primary key);

alter table emp add constraint emp_fk1 foreign key (dept_id) references dept(dept_id);

Now insert some data.

insert into dept values(10);
insert into dept values(20);
insert into dept values(30);
insert into emp values(1,10);
insert into emp values(2,20);
insert into emp values(3,10);
commit;

Open two terminal sessions. From one, delete one record from the child table (don’t commit).

delete from emp where dept_id = 10;

Now attempt to delete from the parent table some data not impacted by the child table delete.

delete from dept where dept_id = 30;

The delete from the parent table hangs until the child table transaction is committed. Without a regular B-tree index on the foreign key column in the child table, any time you attempt to insert or delete in the child table, it places a table-wide lock on the parent table, which prevents deletes or updates in the parent table until the child table transaction completes.

Now run the prior experiment, except this time additionally create an index on the foreign key column of
the child table.

create index emp_fk1 on emp(dept_id);

You should be able to independently run the prior two delete statements. When you have a B-tree index on
the foreign key columns, if deleting from the child table, Oracle will not excessively lock all rows in the
parent table.”

ORA-00600: internal error code, arguments: [kmgs_parameter_update_timeout_1], [17510]

Error message:

ORA-00600: internal error code, arguments: [kmgs_parameter_update_timeout_1], [17510], [], [], [], [], [], [], [], [], [], []
ORA-17510: Attempt to do i/o beyond file size

One of the solution:

1. First of all check oracle file permissions.

cd $ORACLE_HOME/bin
ls -l oracle

-r-xr-s–x 1 oracle oinstall 210824720 Sep 15  2010 oracle

As you can see , my oracle file permissions are wrong, because it should be -rwsr-s—x.

So change it:

chmod 6751 oracle

ls -l oracle
-rwsr-s–x 1 oracle oinstall 210824720 Sep 15  2010 oracle


2. Re-create spfile.

The problem may be caused by a possible corruption of spfile. Oracle is not able to write entry into the spfile and the error occurs.

The solution:

export ORACLE_SID=orcl

sqlplus / as sysdba

create pfile from spfile;

shutdown immediate;

startup pfile=’/u01/app/oracle/product/11.2.0/db_1/dbs/initorcl.ora’;

create spfile from pfile=’/u01/app/oracle/product/11.2.0/db_1/dbs/initorcl.ora’;

shutdown immediate;

startup;


Good Luck!