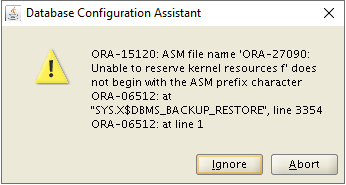
ORA-15120: ASM file name ‘ORA-27090: Unable to reserve kernel resources f’ does not begin with the ASM prefix character

Problem:

The customer created 36 databases on the same server and while creating the 37th using dbca got the following error:

Reason:

fs.aio-max-nr value was set too low in /etc/sysctl.conf. In general, value 3145728 that was set in their case, suits many environments, but if the number of databases on the server increases then this parameter should be adjusted accordingly.

Solution:

The formula used while calculating the value for this parameter is the following:

aio-max-nr = no of process per DB * no of databases * 4096

In their case, the number of processes per DB was 1000, the number of databases that planned to be created was 80. Based on the above value should be:

aio-max-nr = 327680000
  1. Add/update value in /etc/sysctl.conf:
# vim /etc/sysctl.conf

fs.aio-max-nr = 327680000


2. Run /sbin/sysctl -p to immediately enforce the changes:

# sysctl -p 

Delete already created files and recreate the database, it will succeed this time.

RMAN spread a backup job between many RAC instances in parallel to increase throughput

There are two options to allocate RMAN channels on different RAC instances to increase the throughput.

I will start with the option, that assures all RAC instances get one channel. Regarding the other option, it does load balance but in a random way, so with a small number of channels, you may see that all of them are allocated in one instance. So you decide which option is better for you.

The test is done on a 2-node cluster.

  1. Configure parallelism and two channels in RMAN. Indicate a connect string, one per instance:
$ RMAN target /
RMAN> CONFIGURE DEVICE TYPE disk PARALLELISM 2;
RMAN> CONFIGURE CHANNEL 1 DEVICE TYPE DISK CONNECT 'sys/Oracle123@ORCL1 as sysdba';
RMAN> CONFIGURE CHANNEL 2 DEVICE TYPE DISK CONNECT 'sys/Oracle123@ORCL2 as sysdba';

2. Define ORCL1 and ORCL2 aliases on each database node under $ORACLE_HOME/network/admin/tnsnames.ora:

ORCL1=
(DESCRIPTION=
           (ADDRESS= (PROTOCOL=tcp) (HOST=rac1.example.com) (PORT=1522))
           (CONNECT_DATA =
              (SERVER = DEDICATED)
              (SERVICE_NAME = orcl)
           )
      )
 
ORCL2=
(DESCRIPTION=
           (ADDRESS= (PROTOCOL=tcp) (HOST=rac2.example.com) (PORT=1522))
           (CONNECT_DATA =
              (SERVER = DEDICATED)
              (SERVICE_NAME = orcl)
           )
      )

Please note, in my case 1522 is a local listener port.

3. Run backup:

RMAN> backup database;
 
Starting backup at 22-MAR-22
using target database control file instead of recovery catalog
allocated channel: ORA_DISK_1
channel ORA_DISK_1: SID=507 instance=orcl1 device type=DISK
allocated channel: ORA_DISK_2
channel ORA_DISK_2: SID=753 instance=orcl2 device type=DISK
channel ORA_DISK_1: starting full datafile backup set
channel ORA_DISK_1: specifying datafile(s) in backup set
input datafile file number=00001 name=+DATA/ORCL/DATAFILE/system.257.1098460673
input datafile file number=00004 name=+DATA/ORCL/DATAFILE/undotbs1.259.1098460743
channel ORA_DISK_1: starting piece 1 at 22-MAR-22
channel ORA_DISK_2: starting full datafile backup set
channel ORA_DISK_2: specifying datafile(s) in backup set
input datafile file number=00003 name=+DATA/ORCL/DATAFILE/sysaux.258.1098460717
input datafile file number=00005 name=+DATA/ORCL/DATAFILE/undotbs2.265.1098461311
input datafile file number=00007 name=+DATA/ORCL/DATAFILE/users.260.1098460743

As you see, two files were backed up by the 1st channel (1st instance) and the other three files by the 2nd channel (2nd instance).

Now let’s explain another possible variant:

  1. Configure one TNS string with load balance parameter:
ORCL_BALANCE=
     (DESCRIPTION=
           (TRANSPORT_CONNECT_TIMEOUT=3) (RETRY_COUNT=6)(LOAD_BALANCE=on)
           (ADDRESS= (PROTOCOL=tcp) (HOST=rac1.example.com) (PORT=1522))
           (ADDRESS= (PROTOCOL=tcp) (HOST=rac2.example.com) (PORT=1522))
           (CONNECT_DATA =
              (SERVER = DEDICATED)
              (SERVICE_NAME = orcl)
           )
      )

Both node addresses are defined and Oracle will pick each address randomly.

2. Configure parallelism and one channel with ORCL_BALANCE string:

Please note, I did this test case on the same server where I’ve already defined CHANNEL 1 and CHANNEL 2, so I had to clear them:

RMAN> CONFIGURE CHANNEL DEVICE TYPE DISK clear;
RMAN> CONFIGURE CHANNEL 1 DEVICE TYPE DISK clear;
RMAN> CONFIGURE CHANNEL 2 DEVICE TYPE DISK clear;

Define channel and parallelism:

RMAN> CONFIGURE DEVICE TYPE disk PARALLELISM 2;
RMAN> CONFIGURE CHANNEL 1 DEVICE TYPE DISK CONNECT 'sys/Oracle123@ORCL_BALANCE as sysdba';

RMAN> backup database;
 
Starting backup at 22-MAR-22
allocated channel: ORA_DISK_1
channel ORA_DISK_1: SID=752 instance=orcl1 device type=DISK
allocated channel: ORA_DISK_2
channel ORA_DISK_2: SID=138 instance=orcl1 device type=DISK

Both channels were allocated on orcl1. Try one more time, or better configure parallelism 3, CHANNEL parameter is already defined and it is permanent until changed:

RMAN>  CONFIGURE DEVICE TYPE disk PARALLELISM 3;
 
RMAN> backup database;
 
Starting backup at 22-MAR-22
allocated channel: ORA_DISK_1
channel ORA_DISK_1: SID=752 instance=orcl1 device type=DISK
allocated channel: ORA_DISK_2
channel ORA_DISK_2: SID=138 instance=orcl1 device type=DISK
allocated channel: ORA_DISK_3
channel ORA_DISK_3: SID=753 instance=orcl2 device type=DISK

As you see it really did a random choice. But two channels were allocated on the 1st node and the last one on the 2nd node.

I think here random algorithm is not a good option, but you better know which variant is appropriate in your case.

Change default kernel using grubby Tool

There are several ways to fulfill the same task, I am providing one of them.

  1. Check the information about currently loaded kernel:
# uname -r
5.4.17-2036.101.2.el7uek.x86_64

2. Find all available kernels in your system and locate their index number:

# grubby --info=ALL
index=0
kernel=/boot/vmlinuz-5.4.17-2036.101.2.el7uek.x86_64
args="ro console=tty1 console=ttyS0,115200n8 earlyprintk=ttyS0,115200 rootdelay=300 numa=off transparent_hugepage=never net.ifnames=0"
root=/dev/mapper/rootvg-rootlv
initrd=/boot/initramfs-5.4.17-2036.101.2.el7uek.x86_64.img
title=Oracle Linux Server 7.9, with Unbreakable Enterprise Kernel 5.4.17-2036.101.2.el7uek.x86_64

index=1
kernel=/boot/vmlinuz-3.10.0-1160.42.2.el7.x86_64
args="ro console=tty1 console=ttyS0,115200n8 earlyprintk=ttyS0,115200 rootdelay=300 numa=off transparent_hugepage=never net.ifnames=0"
root=/dev/mapper/rootvg-rootlv
initrd=/boot/initramfs-3.10.0-1160.42.2.el7.x86_64.img
title=Oracle Linux Server 7.9, with Linux 3.10.0-1160.42.2.el7.x86_64

index=2
kernel=/boot/vmlinuz-0-rescue-d3dd3af16fd242cebb997c6041d68ad3
args="ro console=tty1 console=ttyS0,115200n8 earlyprintk=ttyS0,115200 rootdelay=300 numa=off transparent_hugepage=never net.ifnames=0"
root=/dev/mapper/rootvg-rootlv
initrd=/boot/initramfs-0-rescue-d3dd3af16fd242cebb997c6041d68ad3.img

3. Check currently loaded kernel index using grubby tool (actually, we could find the same from 1st and 2nd steps, but let’s do one more time):

# grubby --default-index
0

4. Change the default kernel, in my case I want to set it to vmlinuz-3.10.0-1160.42.2.el7.x86_64 and it’s index number is 1:

# grubby --set-default 1

5. Reboot the system and check the kernel again:

# reboot
# uname -r
3.10.0-1160.42.2.el7.x86_64

OPATCHAUTO-72050: System instance creation failed, cluvfy fails Verifying ‘/tmp/’ …FAILED (PRVF-7546)

Problem:

While running cluvfy we get the following error:

[grid@rac1 grid]$ ./runcluvfy.sh stage -pre crsinst -n rac1,rac2 -verbose
...
Failures were encountered during execution of CVU verification request "stage -pre crsinst".
...
Verifying '/tmp/' ...FAILED
Cannot run program "/usr/bin/scp": error=13, Permission denied

You should not continue patching when runcluvfy fails, strongly recommended to solve all failed items and only after that run opatchauto. But if you do insist to run patching then you will get the following:

[root@rac1 33509923]# /u01/app/19.3.0/grid/OPatch/opatchauto apply /u01/app/patchinstall/33509923 -oh /u01/app/19.3.0/grid
OPatchauto session is initiated at Sun Mar 20 06:27:17 2022

System initialization log file is /u01/app/19.3.0/grid/cfgtoollogs/opatchautodb/systemconfig2022-03-20_06-27-42AM.log.
...
OPATCHAUTO-72050: System instance creation failed.
OPATCHAUTO-72050: Failed while retrieving system information.
OPATCHAUTO-72050: Please check log file for more details.

Reason:

The issue in our case was that /usr/bin/scp did not have correct permissions. It had 600 while it should have had 755. Why this happened? Don’t really know… it should not be happening.

Solution:

Set correct permissions on both nodes for scp binary using the following way:

# chmod 755 /bin/scp

Retry patching, in our case it was successful:

ora.storage fails, Error 4 querying length of attr ASM_DISCOVERY_ADDRESS, ORA-01017

Problem:

CRS on the 1st node is able to start, but not on the 2nd node.

CRS on the 2nd node hangs and later fails:

CRS-2672: Attempting to start 'ora.storage' on 'rac2'
ORA-01017: invalid username/password; logon denied
CRS-5055: unable to connect to an ASM instance because no ASM instance is running in the cluster

during that time CRS alert.log shows:

2022-03-15 20:15:23.722 [ORAROOTAGENT(63477)]CRS-5019: All OCR locations are on ASM disk groups [GRID], and none of these disk groups are mounted. Details are at "(:CLSN00140:)" in "/u01/app/grid/diag/crs/rac2/crs/trace/ohasd_orarootagent_root.trc".

ohasd_orarootagent_root.trc shows:

2022-03-15 20:23:35.108 : USRTHRD:1769867008: [     INFO] {0:5:3} [ora.storage] 9788 Error 4 querying length of attr ASM_DISCOVERY_ADDRESS

2022-03-15 20:23:35.110 : USRTHRD:1769867008: [     INFO] {0:5:3} [ora.storage] 9788 Error 4 querying length of attr ASM_STATIC_DISCOVERY_ADDRESS

2022-03-15 20:23:35.136 : USRTHRD:1769867008: [     INFO] {0:5:3} [ora.storage] 9506 Error 4 opening dom root in 0x7fa3100013a0

Reason:

Either the password file is corrupted or it does not exist. In our case, GRID diskgroup was created after clearing disk headers and forgot to copy ASM password file.

Solution:

  1. If you have ASM password file backup, then you can simply place it to the asm diskgroup:
$ asmcmd pwcopy --asm /tmp/asm_passwordfile +GRID/orapwASM -f

and stop/start CRS.

2. If you don’t have password file backup, you need to create a new one and add necessary users into it:

[grid@rac1 ~]$ asmcmd pwcreate --asm +GRID/orapwasm -f
Enter password: **********

Check existing users:

[grid@rac1 ~]$ asmcmd lspwusr
Username sysdba sysoper sysasm
SYS TRUE TRUE FALSE

Add necessary users and grant permissions:

$ asmcmd orapwusr --grant sysasm SYS
$ asmcmd orapwusr --add ASMSNMP
Enter password: *********
$ asmcmd orapwusr --grant sysdba ASMSNMP

Check permissions again:

$ asmcmd lspwusr
Username sysdba sysoper sysasm
     SYS   TRUE    TRUE   TRUE
 ASMSNMP   TRUE   FALSE  FALSE

Find out the user name and password for CRSD to connect, GI uses internal user CRSUSER__ASM_001 with an internally generated password to access ASM during startup:

Find the string SYSTEM.ASM.CREDENTIALS.USERS.CRSUSER__ASM_001 in the following output and save. ORATEXT value:

# ocrdump -stdout | less
...
[SYSTEM.ASM.CREDENTIALS.USERS.CRSUSER__ASM_001]
ORATEXT : d68aec9585136fa8ff8f79f483e4ae64:grid
SECURITY : {USER_PERMISSION : PROCR_ALL_ACCESS, GROUP_PERMISSION : PROCR_READ, OTHER_PERMISSION : PROCR_NONE, USER_NAME : grid, GROUP_NAME : oinstall}

Query password for GUID-user. GUID will be different in your case. Retrieve value from your output:

# crsctl get credmaint -path /ASM/Self/d68aec9585136fa8ff8f79f483e4ae64 -credtype userpass -id 0 -attr passwd -local
mB28wSM4AVFAVEYamUIvrMjEo2Nfa

Add this user to ASM password file:

$ asmcmd orapwusr --add CRSUSER__ASM_001
>>>>> provide <password> you retrieved earlier

Add necessary credentials to this user:

$ asmcmd orapwusr --grant sysdba CRSUSER__ASM_001
$ asmcmd orapwusr --grant sysasm CRSUSER__ASM_001

Check the list again:

$ asmcmd lspwusr
        Username sysdba sysoper sysasm
             SYS   TRUE    TRUE   TRUE
         ASMSNMP   TRUE   FALSE  FALSE
CRSUSER__ASM_001   TRUE   FALSE   TRUE

Stop/Start CRS on the remaining node.
Oracle 12c relink resets oracle group to oinstall, while 19c sets asmadmin

Problem:

In a mixed environment when you have 19c GI, but several versions of Oracle RDBMS home (19c, 12c), initially during 12c database restore you may encounter the following error:

ORA-15001: diskgroup "DATA" does not exist or is not mounted
ORA-15040: diskgroup is incomplete

There are several reasons for the above error and one of them is when the $ORACLE_HOME/bin/oracle binary under rdbms home does not have group asmadmin. After identifying it, you try to change permissions to oracle:asmadmin and but after a while, you may notice that the group is reset to oinstall. It can happen after patching or after running relink manually. So let’s see test case:

[oracle@rac1 lib]$ ll /u01/app/oracle/product/12.1.0/dbhome_1/bin/oracle
-rwsr-s--x 1 oracle asmadmin 323613256 Feb 19 17:00 /u01/app/oracle/product/12.1.0/dbhome_1/bin/oracle

Run relink:

[oracle@rac1 lib]$ make -f ins_rdbms.mk ioracle

Check permissions again:

[oracle@rac1 lib]$ ll /u01/app/oracle/product/12.1.0/dbhome_1/bin/oracle
-rwsr-s--x 1 oracle oinstall 323613256 Feb 19 17:03 /u01/app/oracle/product/12.1.0/dbhome_1/bin/oracle

If you do the same for 19c home, group is still asmadmin.

Reason:

ins_rdbms.mk script is different in 19c and 12c, comparing ioracle section:

12c:

ioracle: preinstall $(ORACLE)
        -$(NOT_EXIST) $(ORACLE_HOME)/bin/oracle ||\
           mv -f $(ORACLE_HOME)/bin/oracle $(ORACLE_HOME)/bin/oracleO
        -mv $(ORACLE_HOME)/rdbms/lib/oracle $(ORACLE_HOME)/bin/oracle
        -chmod 6751 $(ORACLE_HOME)/bin/oracle

19c:

ioracle: preinstall $(ORACLE)
        -$(RMF) $(ORACLE_HOME)/bin/oracle
        -mv $(ORACLE_HOME)/rdbms/lib/oracle $(ORACLE_HOME)/bin/oracle
        -chmod 6751 $(ORACLE_HOME)/bin/oracle

        -(if [ ! -f $(ORACLE_HOME)/bin/crsd.bin ]; then \
            getcrshome="$(ORACLE_HOME)/srvm/admin/getcrshome" ; \
            if [ -f "$$getcrshome" ]; then \
                crshome="`$$getcrshome`"; \
                if [ -n "$$crshome" ]; then \
                    if [ $$crshome != $(ORACLE_HOME) ]; then \
                        oracle="$(ORACLE_HOME)/bin/oracle"; \
                        $$crshome/bin/setasmgidwrap oracle_binary_path=$$oracle; \
                    fi \
                fi \
            fi \
        fi\
        );

As you see ioracle section in 12c does not contain the last IF statement which sets oracle binary group to asmadmin (using setasmgidwrap)

Solution:

Unfortunately, I cannot recommend adding that if statement in 12c ins_rdbms.mk although I did it in my test environment and works as expected.
After running make -f ins_rdbms.mk ioracle for 12c the group is set to asmadmin.

It is better to ask Oracle about this change and do only after you get an approval from them.

The only non-harmful recommendation from my side would be to have permission change script and run after every patch or relink:

# chown oracle:asmadmin  /u01/app/oracle/product/12.1.0/dbhome_1/bin/oracle
​# chmod 6751  /u01/app/oracle/product/12.1.0/dbhome_1/bin/oracle
# ll   /u01/app/oracle/product/12.1.0/dbhome_1/bin/oracle

If you still decide to add IF statement as I did, please make sure there is TAB instead of spaces before IF clause. Otherwise, you will get the following error and you can easily understand which line should be corrected.

[oracle@rac1 lib]$ make -f ins_rdbms.mk ioracle
ins_rdbms.mk:120: *** missing separator (did you mean TAB instead of 8 spaces?).  Stop.

Useful tools for analyzing OS diagnostic data

Apply GI patch 19.14 (33509923) on GI 19.3

Current environment:

$ $ORACLE_HOME/OPatch/opatch lspatches
29585399;OCW RELEASE UPDATE 19.3.0.0.0 (29585399)
29517247;ACFS RELEASE UPDATE 19.3.0.0.0 (29517247)
29517242;Database Release Update : 19.3.0.0.190416 (29517242)
29401763;TOMCAT RELEASE UPDATE 19.0.0.0.0 (29401763)

1. You must use the OPatch utility version 12.2.0.1.28 or later to apply this patch

Download p6880880_190000_Linux-x86-64.zip – OPatch 12.2.0.1.28 for DB 19.0.0.0.0 (Nov 2021), or later.

Replace existing opatch with the new one:

# export ORACLE_HOME=/u01/app/19c/grid
# rm -rf $ORACLE_HOME/OPatch
# su - grid 
$ export ORACLE_HOME=/u01/app/19c/grid
$ unzip -o /u01/swtmp/p6880880_190000_Linux-x86-64.zip -d $ORACLE_HOME

$ $ORACLE_HOME/OPatch/opatch version
OPatch Version: 12.2.0.1.28

2. Unzip the patch 33509923 as the Grid home owner:

# su - grid
$ cd /u01/swtmp
$ unzip p33509923_190000_Linux-x86-64.zip

3. Determine whether any currently installed one-off patches conflict with this patch 33509923 as follows:

# su - grid

$ $ORACLE_HOME/OPatch/opatch prereq CheckConflictAgainstOHWithDetail -phBaseDir /u01/swtmp/33509923/33515361

Oracle Home       : /u01/app/19c/grid
Central Inventory : /u01/app/oraInventory
   from           : /u01/app/19c/grid/oraInst.loc
OPatch version    : 12.2.0.1.28
OUI version       : 12.2.0.7.0
Log file location : /u01/app/19c/grid/cfgtoollogs/opatch/opatch2022-01-31_11-58-55AM_1.log

Invoking prereq "checkconflictagainstohwithdetail"
Prereq "checkConflictAgainstOHWithDetail" passed.
OPatch succeeded.

$ $ORACLE_HOME/OPatch/opatch prereq CheckConflictAgainstOHWithDetail -phBaseDir /u01/swtmp/33509923/33529556

$ $ORACLE_HOME/OPatch/opatch prereq CheckConflictAgainstOHWithDetail -phBaseDir /u01/swtmp/33509923/33534448

$ $ORACLE_HOME/OPatch/opatch prereq CheckConflictAgainstOHWithDetail -phBaseDir /u01/swtmp/33509923/33239955

$ $ORACLE_HOME/OPatch/opatch prereq CheckConflictAgainstOHWithDetail -phBaseDir /u01/swtmp/33509923/33575402

In case conflict is detected, stop the patch installation and contact Oracle Support Services, otherwise continue.

4. Stop database instances running on that server.

5. Apply patch using opatchauto:

# cd /u01/swtmp/33509923/
# export ORACLE_HOME=/u01/app/19c/grid/
# export PATH=$ORACLE_HOME/bin:$PATH
# $ORACLE_HOME/OPatch/opatchauto apply
...
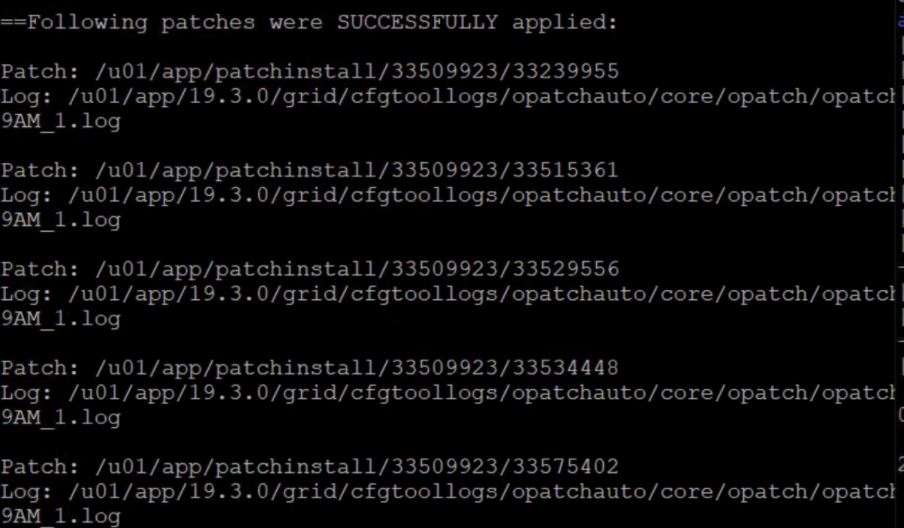
==Following patches were SUCCESSFULLY applied:

Patch: /u01/swtmp/33509923/33239955
Log: /u01/app/19c/grid/cfgtoollogs/opatchauto/core/opatch/opatch2022-02-03_11-33-44AM_1.log

Patch: /u01/swtmp/33509923/33515361
Log: /u01/app/19c/grid/cfgtoollogs/opatchauto/core/opatch/opatch2022-02-03_11-33-44AM_1.log

Patch: /u01/swtmp/33509923/33529556
Log: /u01/app/19c/grid/cfgtoollogs/opatchauto/core/opatch/opatch2022-02-03_11-33-44AM_1.log

Patch: /u01/swtmp/33509923/33534448
Log: /u01/app/19c/grid/cfgtoollogs/opatchauto/core/opatch/opatch2022-02-03_11-33-44AM_1.log

Patch: /u01/swtmp/33509923/33575402
Log: /u01/app/19c/grid/cfgtoollogs/opatchauto/core/opatch/opatch2022-02-03_11-33-44AM_1.log

Check current version:

$ $ORACLE_HOME/OPatch/opatch lspatches
33575402;DBWLM RELEASE UPDATE 19.0.0.0.0 (33575402)
33534448;ACFS RELEASE UPDATE 19.14.0.0.0 (33534448)
33529556;OCW RELEASE UPDATE 19.14.0.0.0 (33529556)
33515361;Database Release Update : 19.14.0.0.220118 (33515361)
33239955;TOMCAT RELEASE UPDATE 19.0.0.0.0 (33239955)

6. After finishing patch it is recommened to backup clusterware components:

Azure: Get email when VM instance state changes

To set up email notification in Azure environment when VM changes the state, you should do the following:

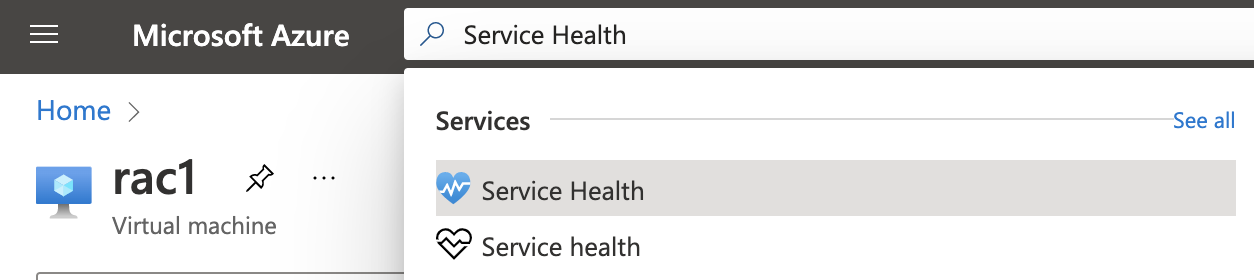
1. In the Azure portal, select Service Health

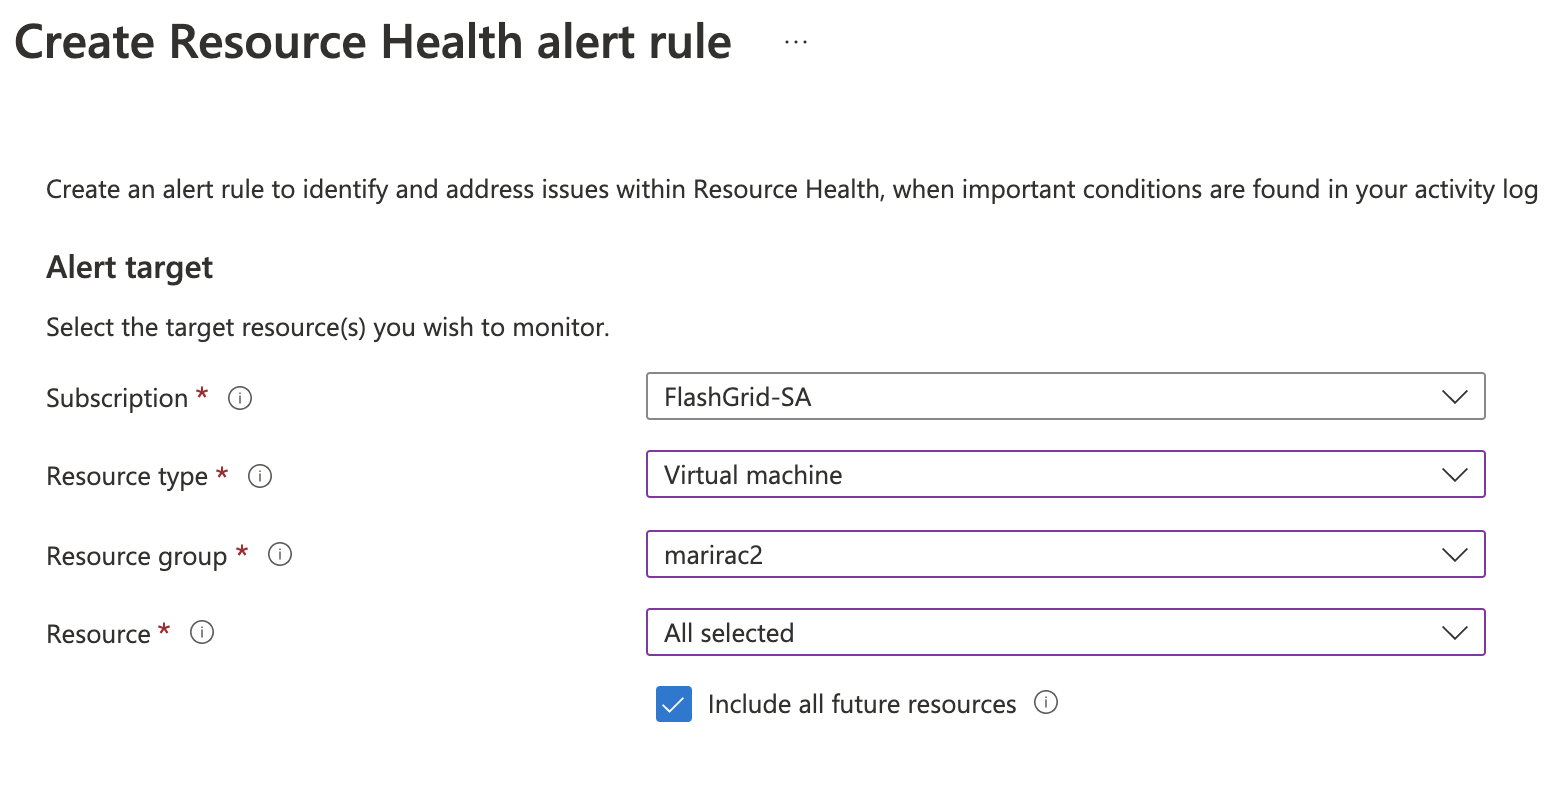
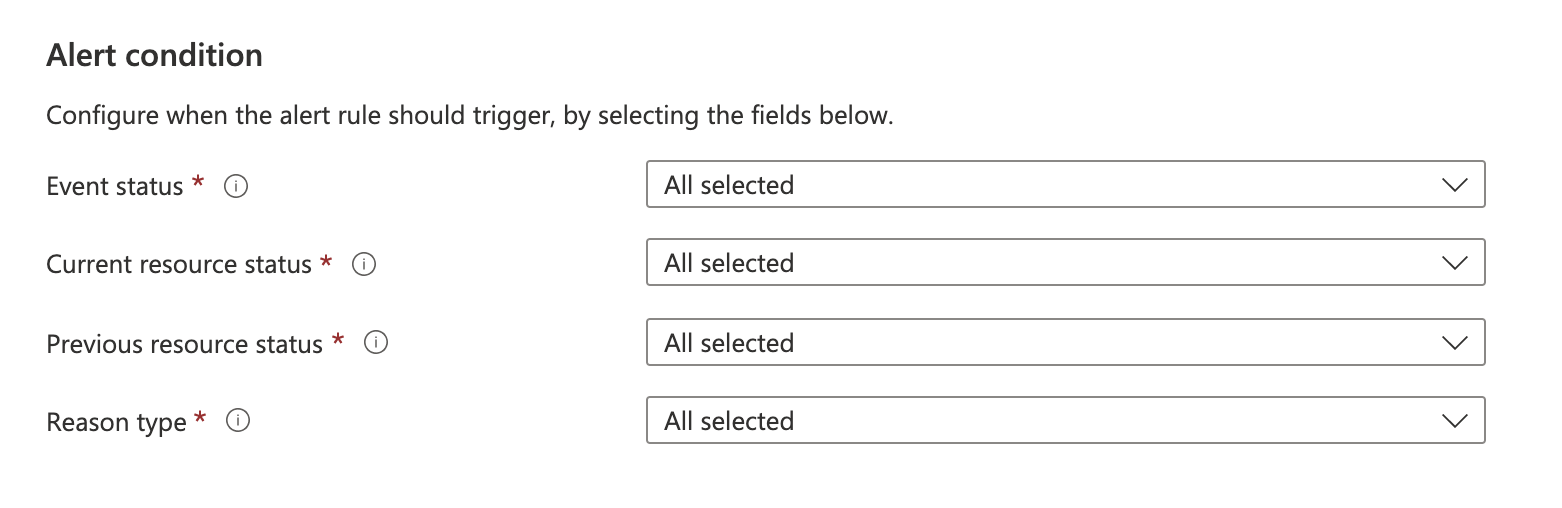
2. From the left side panel choose Resource health -> click Create Resource Health alert rule

Fill in the necessary fields:

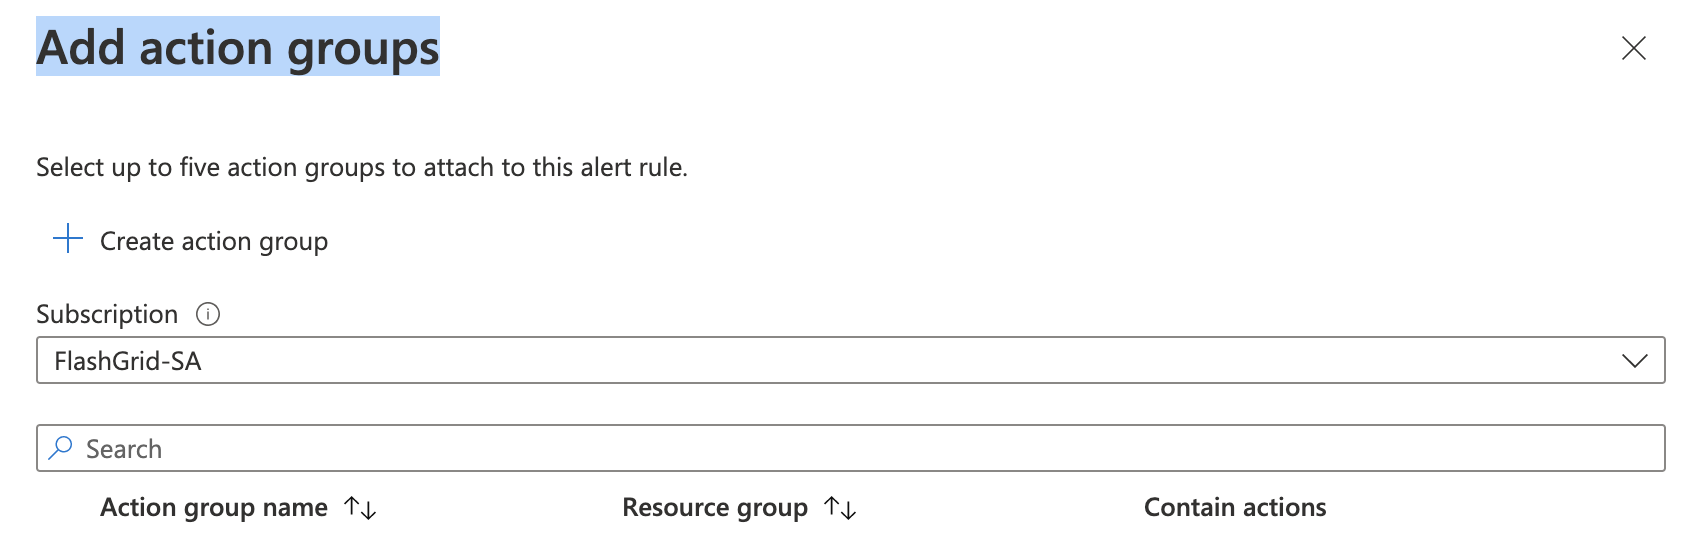
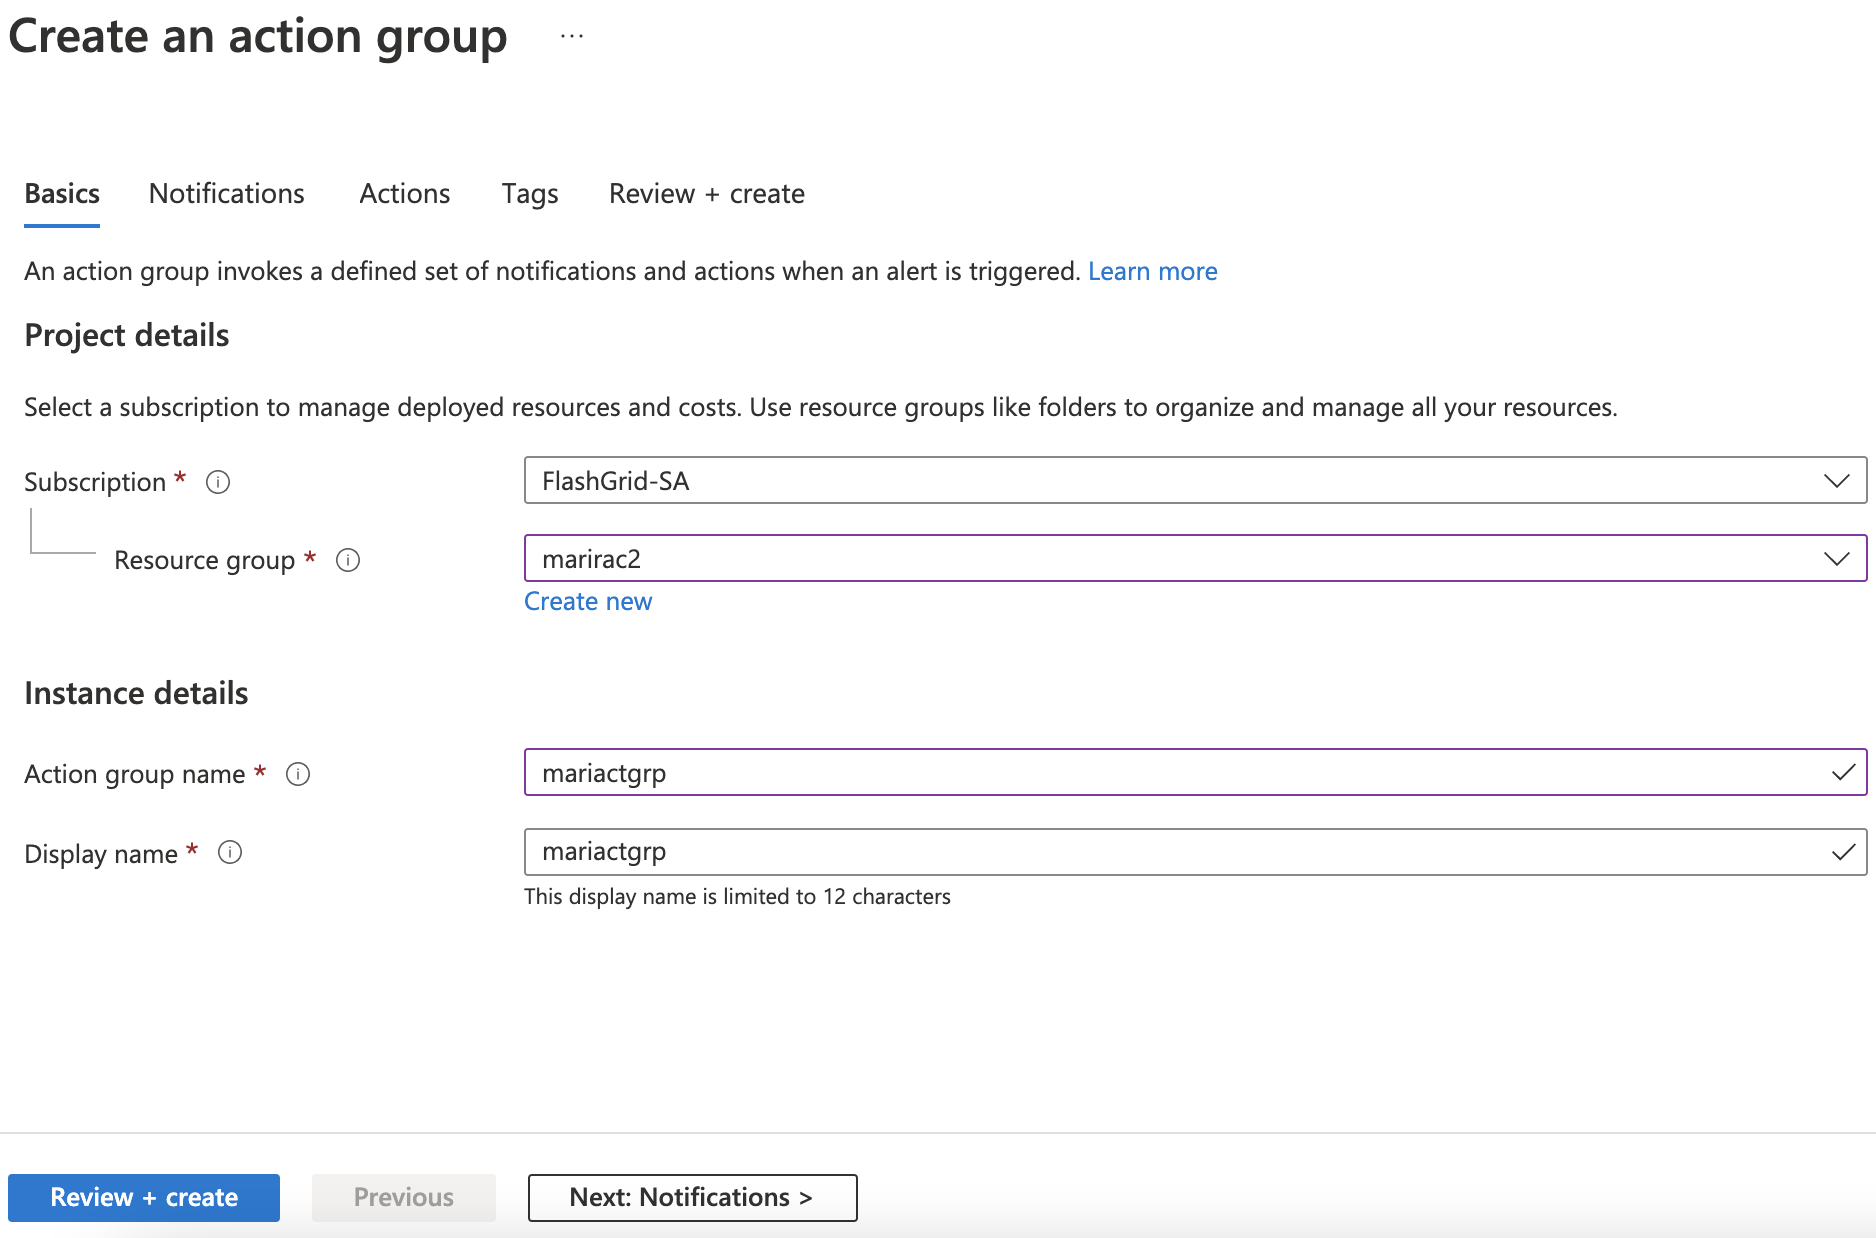
In the Actions section, you have to indicate action groups. As long as we have not created any before, let’s click Add action groups -> Create action group

And fill in the following fields:

Click Review + create -> Create.

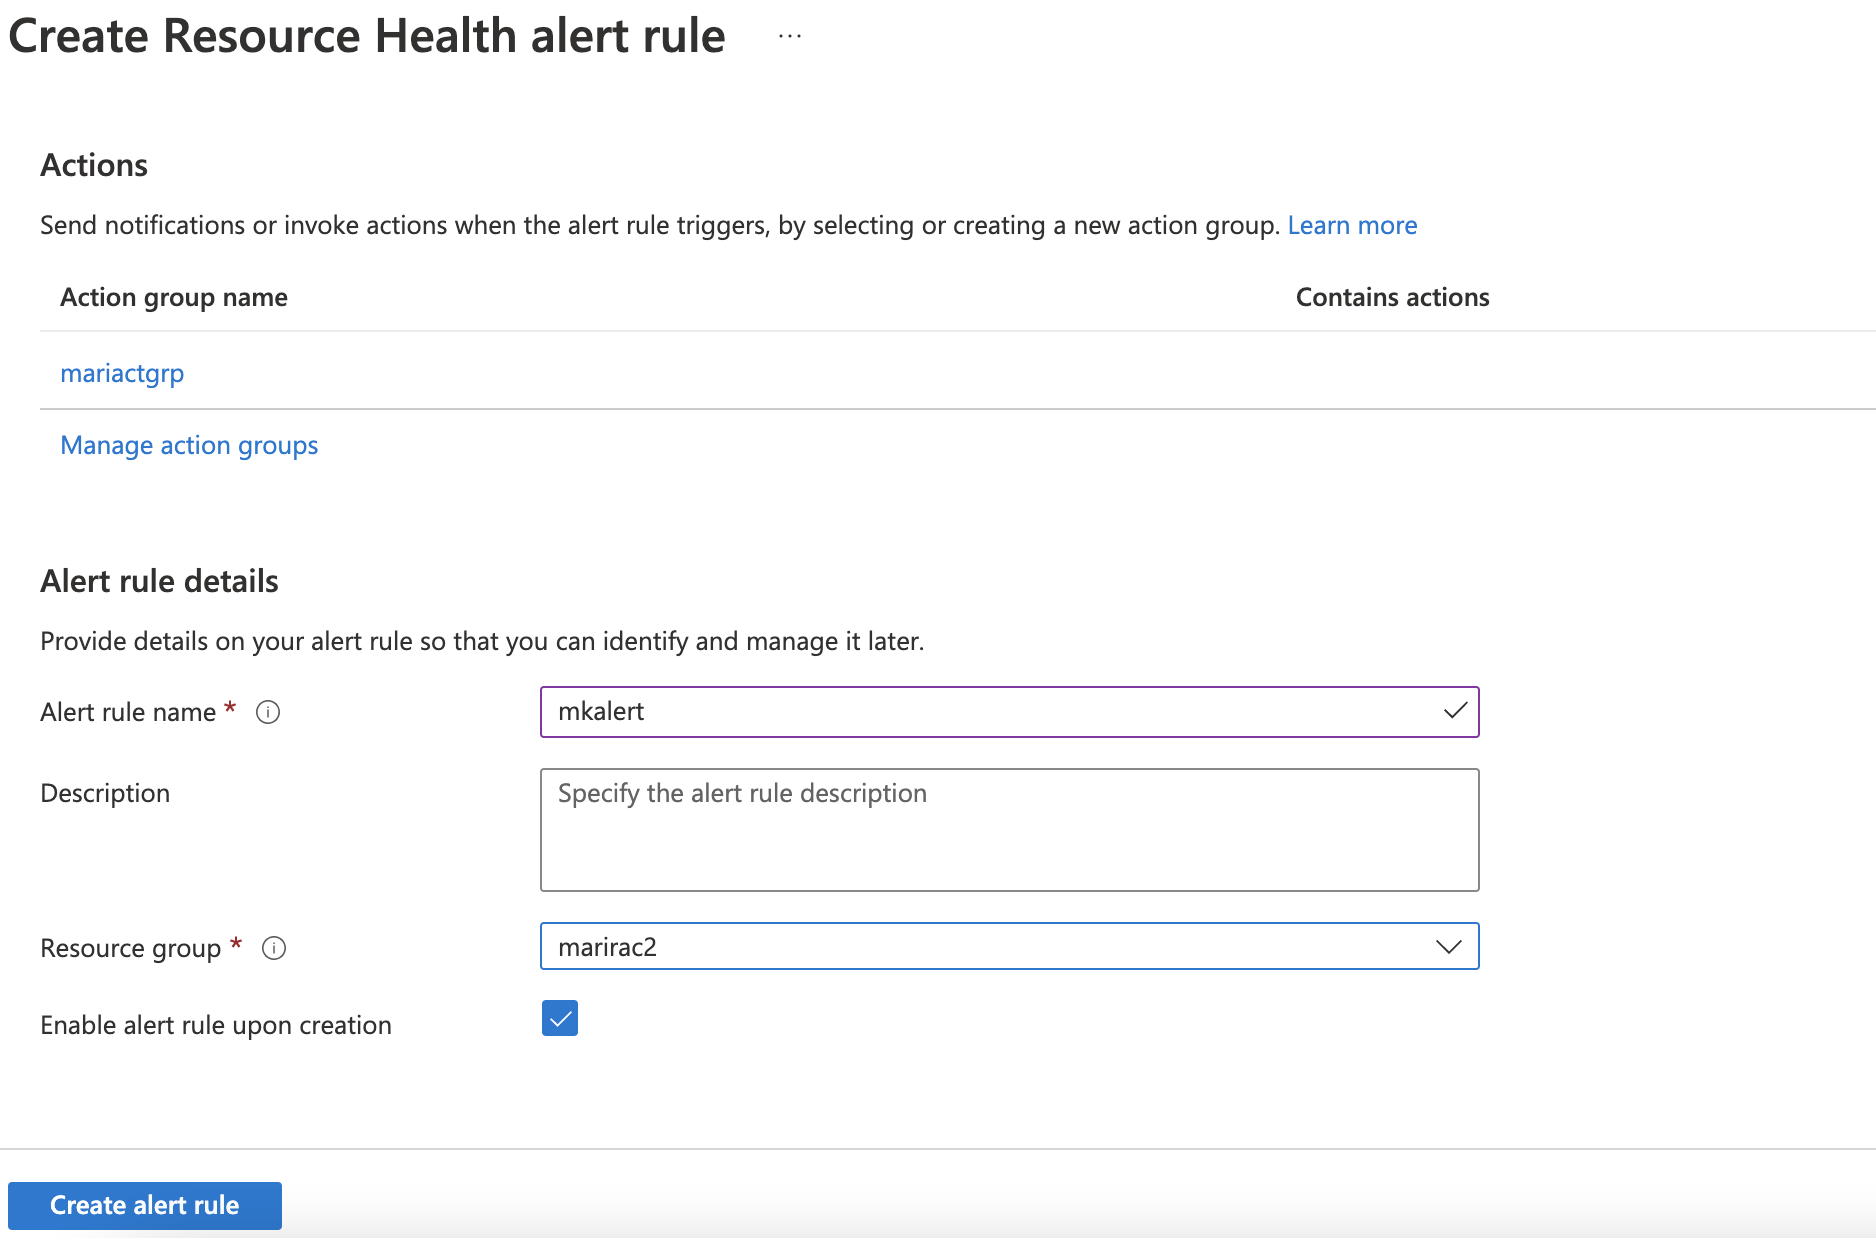
After creating the group you will see that the new group was chosen automatically. Fill in fields under Alert rule details:

Click Create alert rule.

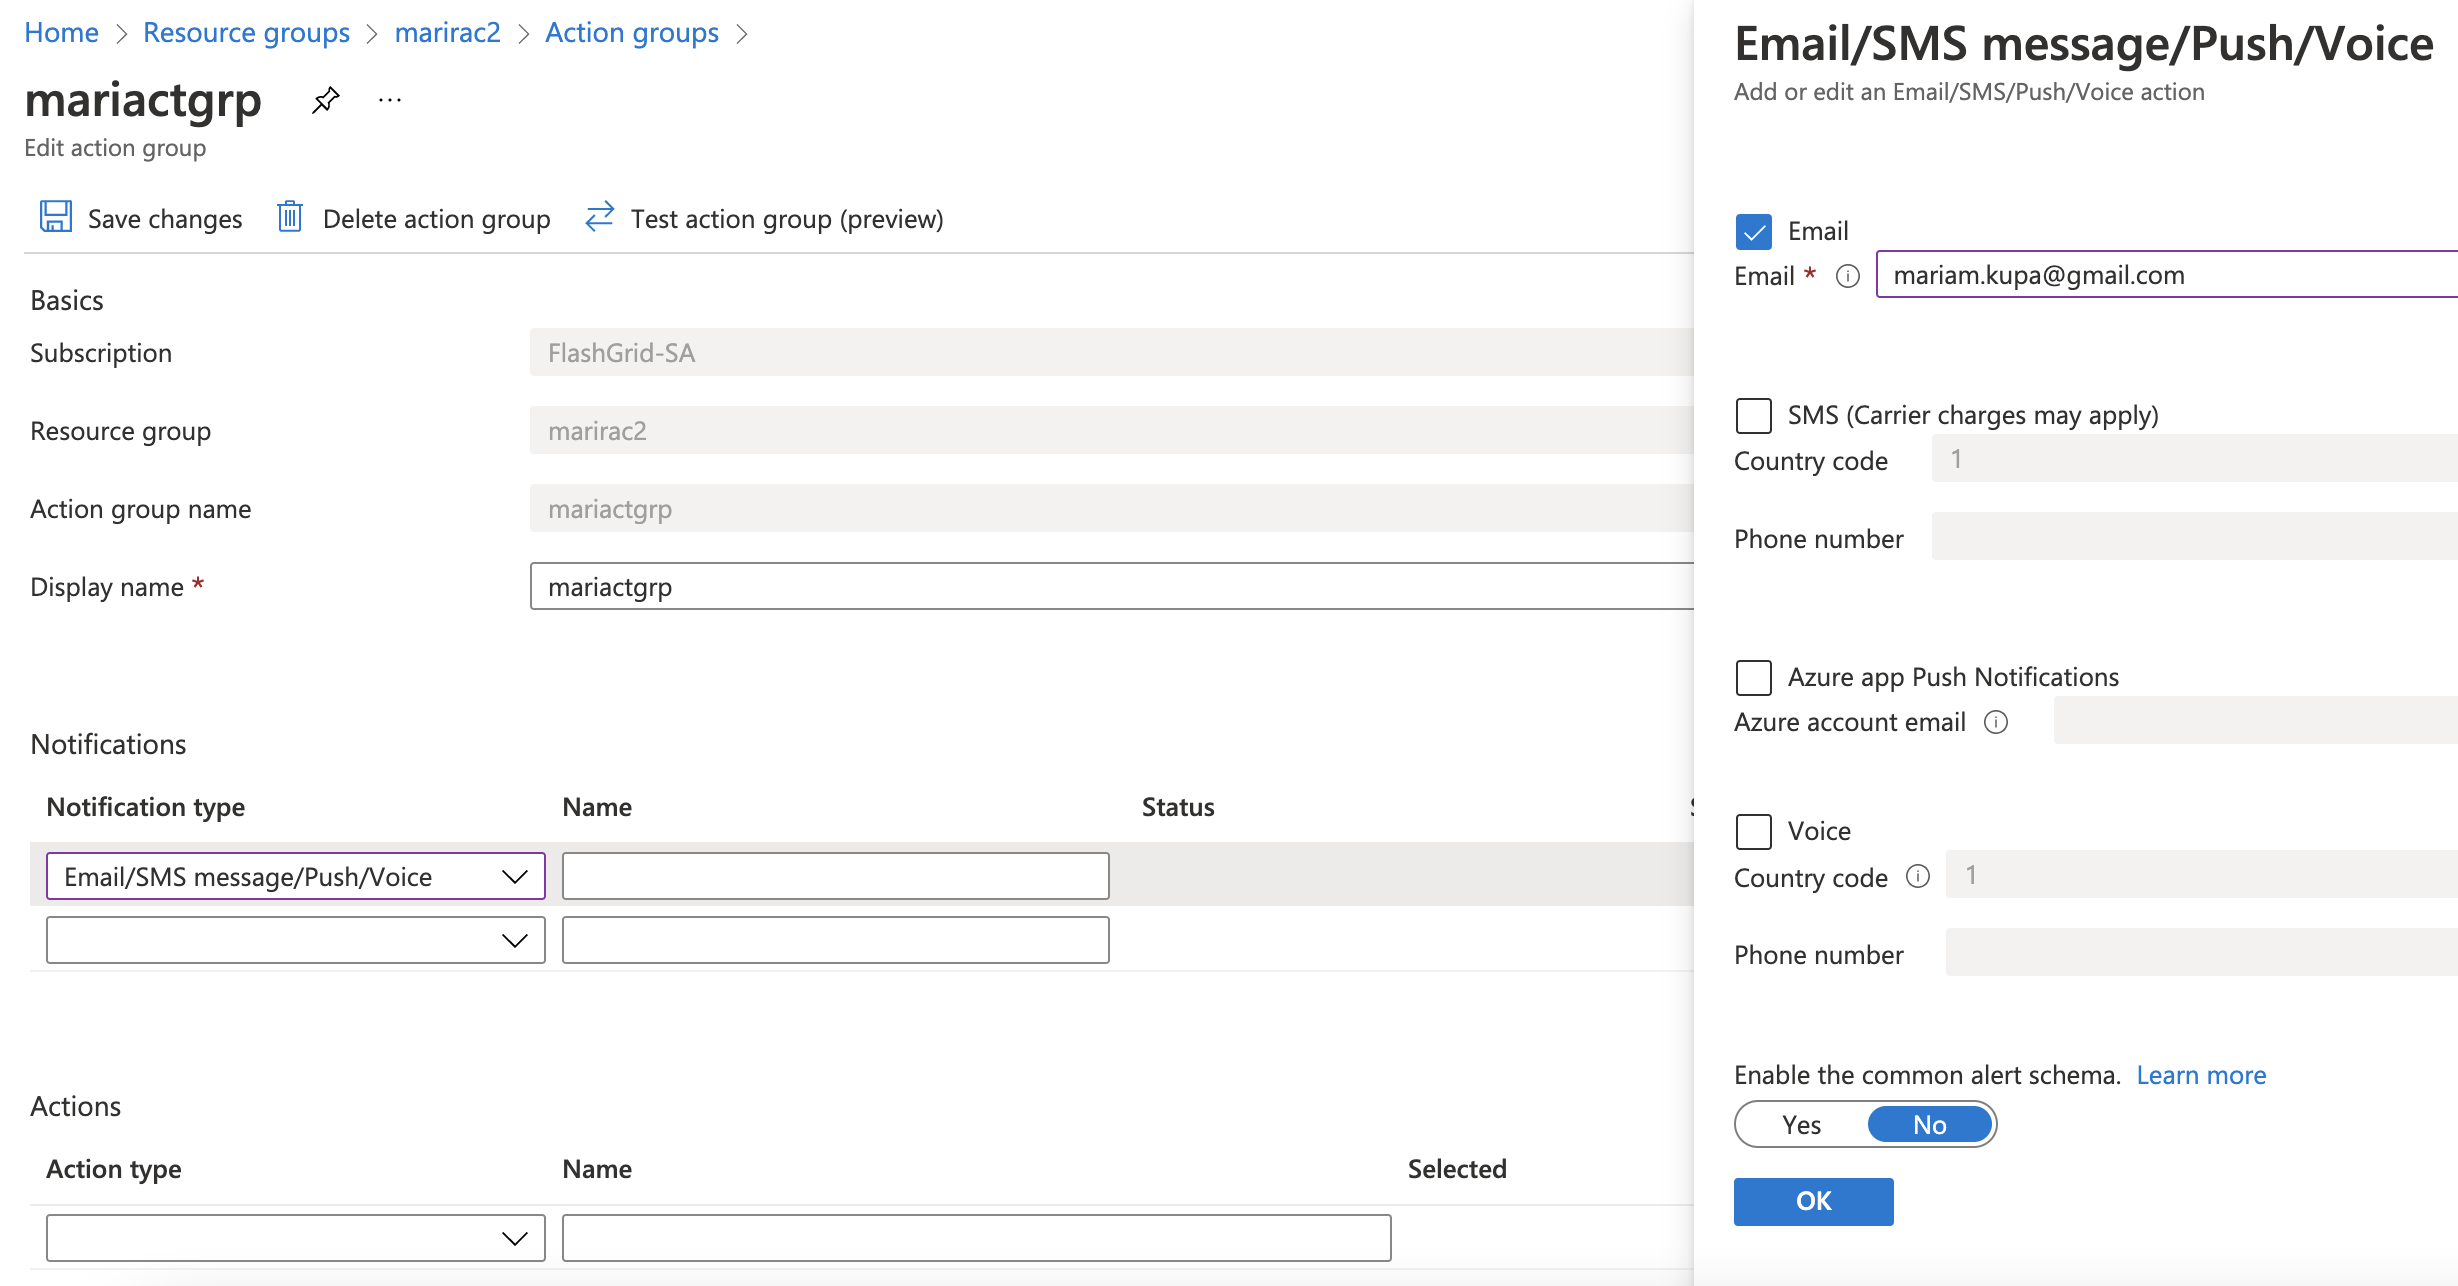
3. Go to the Resource Group (in my case marirac2) where you have created Action Group.

Resource groups -> marirac2 -> from the left-side panel choose Alerts -> Action groups -> choose action group name in my case mariactgrp -> on the Notifications section choose Email/SMS message/Push/Voice -> on the right-side panel click Email checkbox -> enter email address who will be responsible for receiving and handling these alerts -> click OK -> enter desirable name under Notifications section -> click Save changes.

4. Test alert by stopping and starting the VM (assuming it is a test environment)

After changing the state of the VM you will receive the following notification.

Please note notification should have been sent as soon as VM changes the state but email can come 2 – 3 min later.

AWS: Get email when EC2 instance state changes

To setup email notification when your EC2 instances change state, you should configure the following:

  • Amazon SNS topic – where you define recepients
  • Create an EventBridge event – where you define rule on instances that will trigger the notification

1. Create an Amazon Simple Notification Service (Amazon SNS) topic:

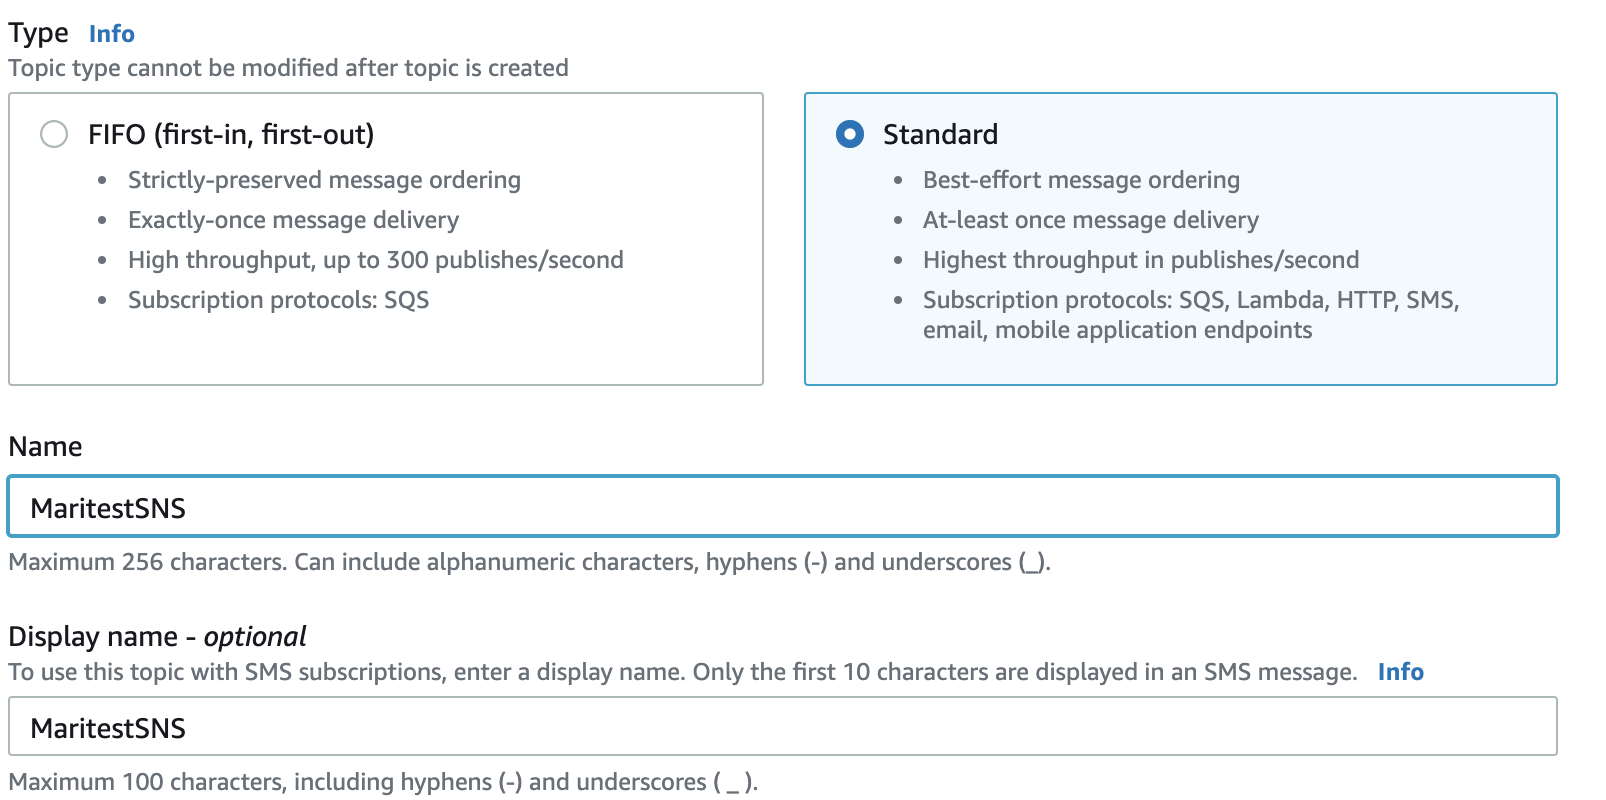
Go to Amazon SNS -> Create topic ->

Screen 1

-> Click Create topic

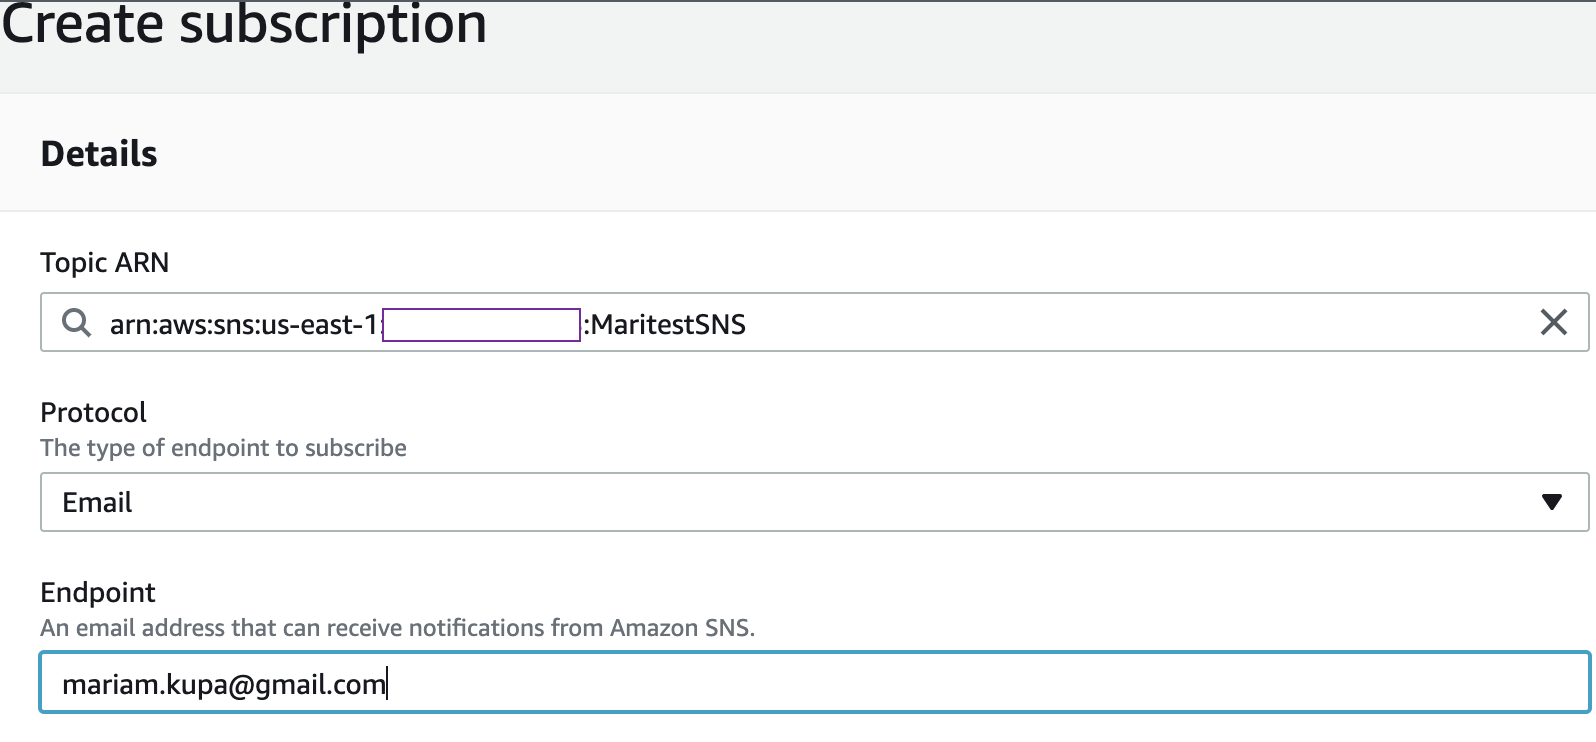
Go to Subscriptions -> Create subscription

Screen 2

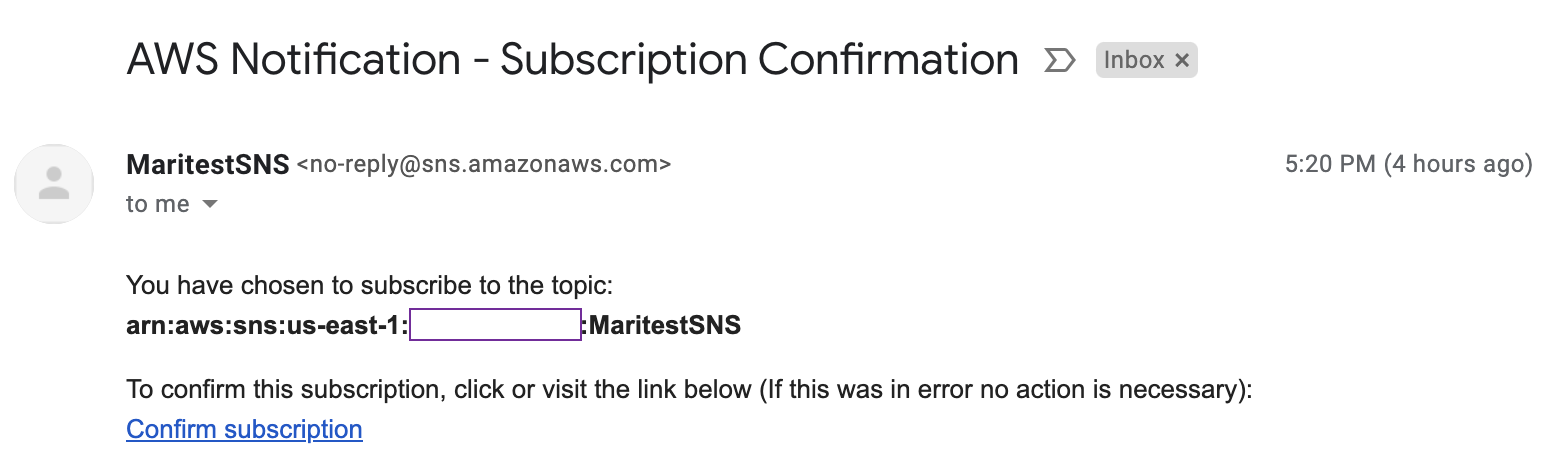
A subscription confirmation email is sent to the address you have entered. Choose Confirm subscription in the email (Screen 3):

Screen 3

2. Create an EventBridge event

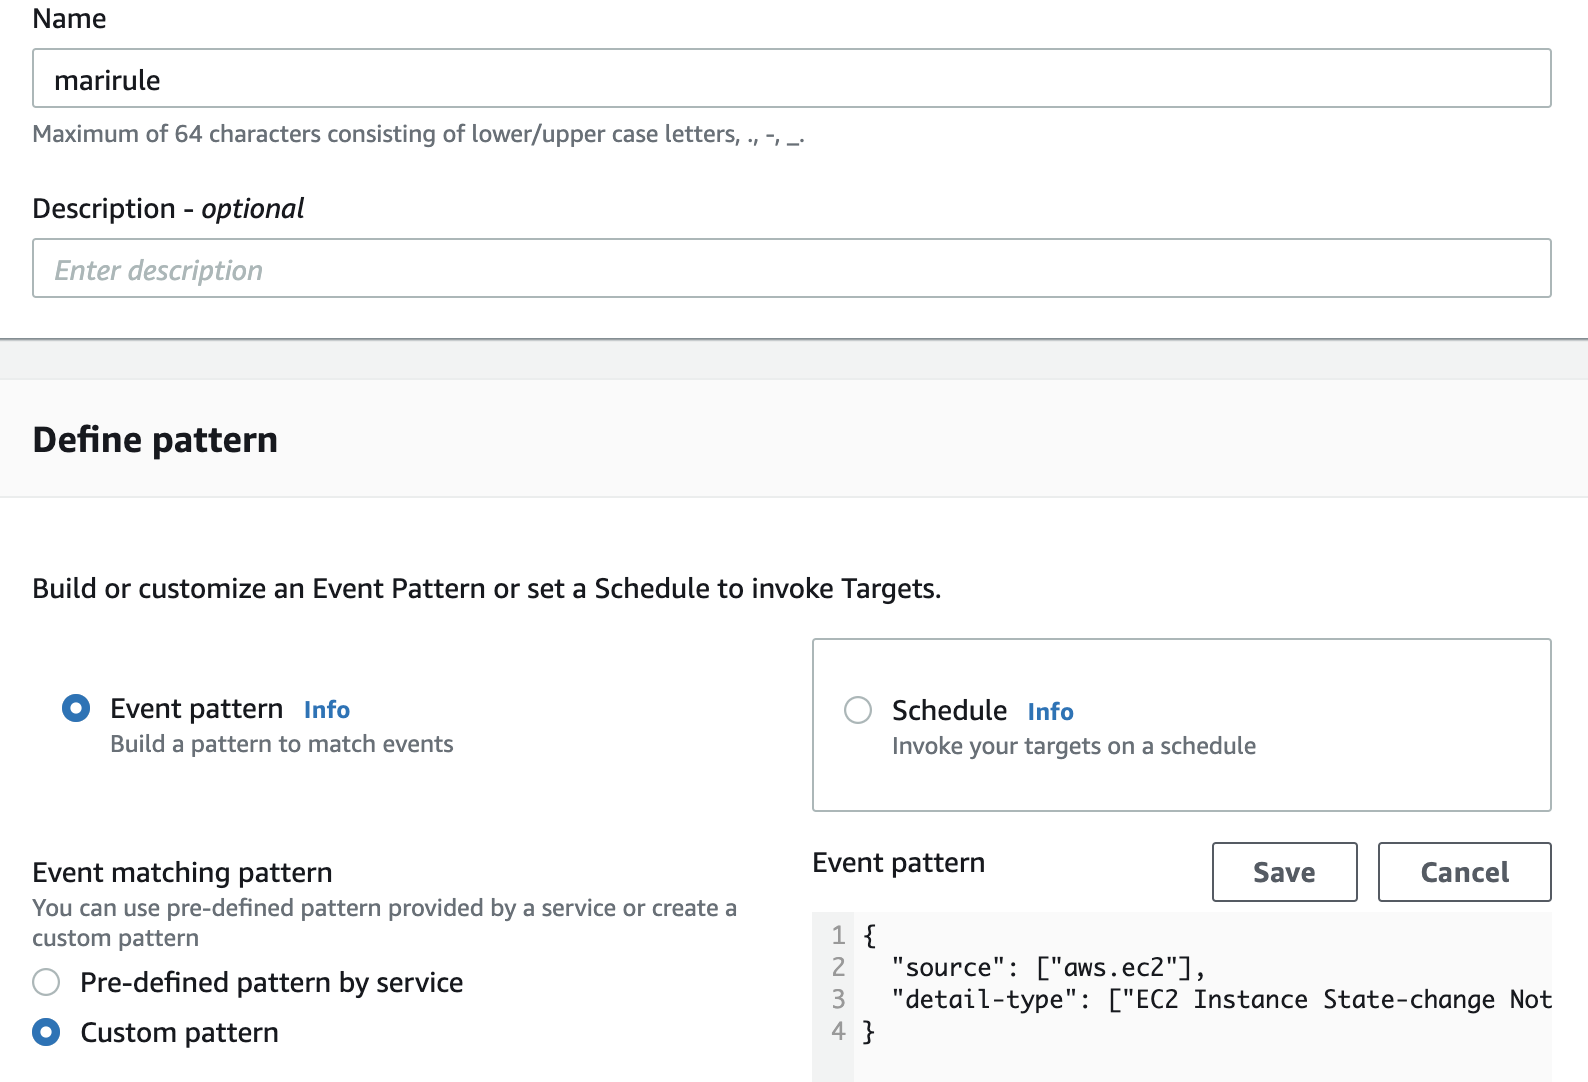
Open the EventBridge console -> Create rule

Screen 4

 To monitor all instances, in the Event pattern enter the following (Screen 4)

{
"source": ["aws.ec2"],
"detail-type": ["EC2 Instance State-change Notification"]
}

If you are planing to monitor particular instances then you need to indicate their instance IDs using the following way:

{
"source": ["aws.ec2"],
"detail-type": ["EC2 Instance State-change Notification"],
"detail": {
"instance-id": ["i-0897b9d936bda3bda", "i-0c76e28b0ec1a099c"]
}
}

Please note, this pattern can also be generated by choosing “Pre-defined pattern by service” radio button and choosing appropriate services. But for simplicity the above pattern can be entered.

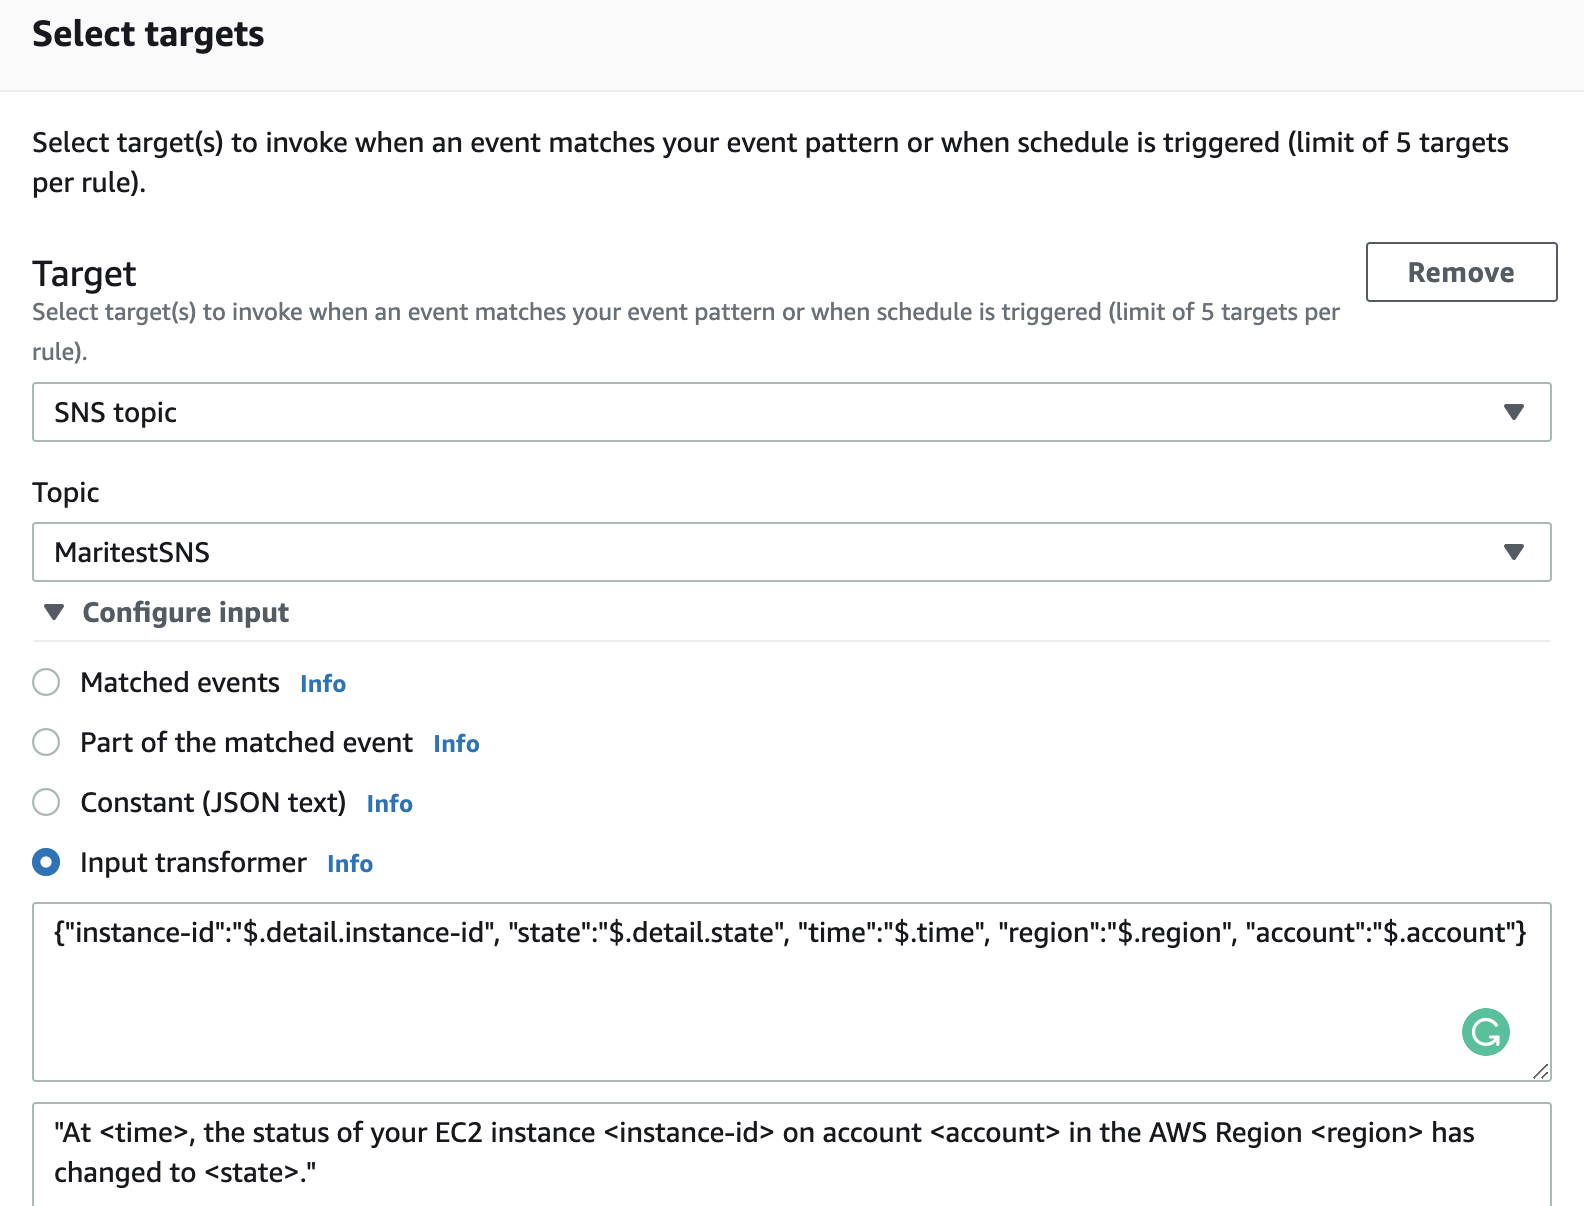
In the Select targets section, choose previously created SNS topic.


Screen 5

In the Input transformer (Screen 5) paste the following strings accordingly:

Input Path

{"instance-id":"$.detail.instance-id", "state":"$.detail.state", "time":"$.time", "region":"$.region", "account":"$.account"}

Input Template

"At <time>, the status of your EC2 instance <instance-id> on account <account> in the AWS Region <region> has changed to <state>."

Click Create.

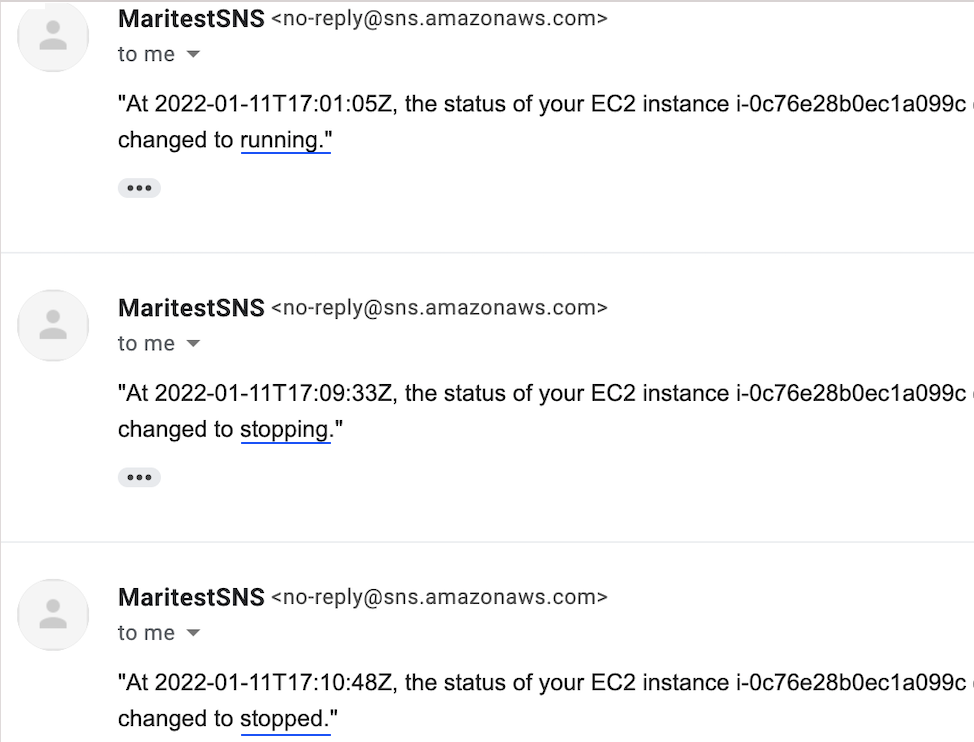
3. Test the configuration

Start/stop target instanes and check your email: