Oracle EM 24ai: _allow_insert_with_update_check failed

Problem:

While installing Oracle Enterprise Manager 24ai, the check for the parameter value _allow_insert_with_update_check failed:

Solution:

If the repository database is a PDB, you need to set this parameter at PDB level.

1) Connect to the repository database using sqlplus as SYS user and run:

SQL> alter system set "_allow_insert_with_update_check"=true;

2) Rerun the check:

It succeeded this time:

Oracle EM 24ai: Install the partitioning option on the EM repository database

Problem:

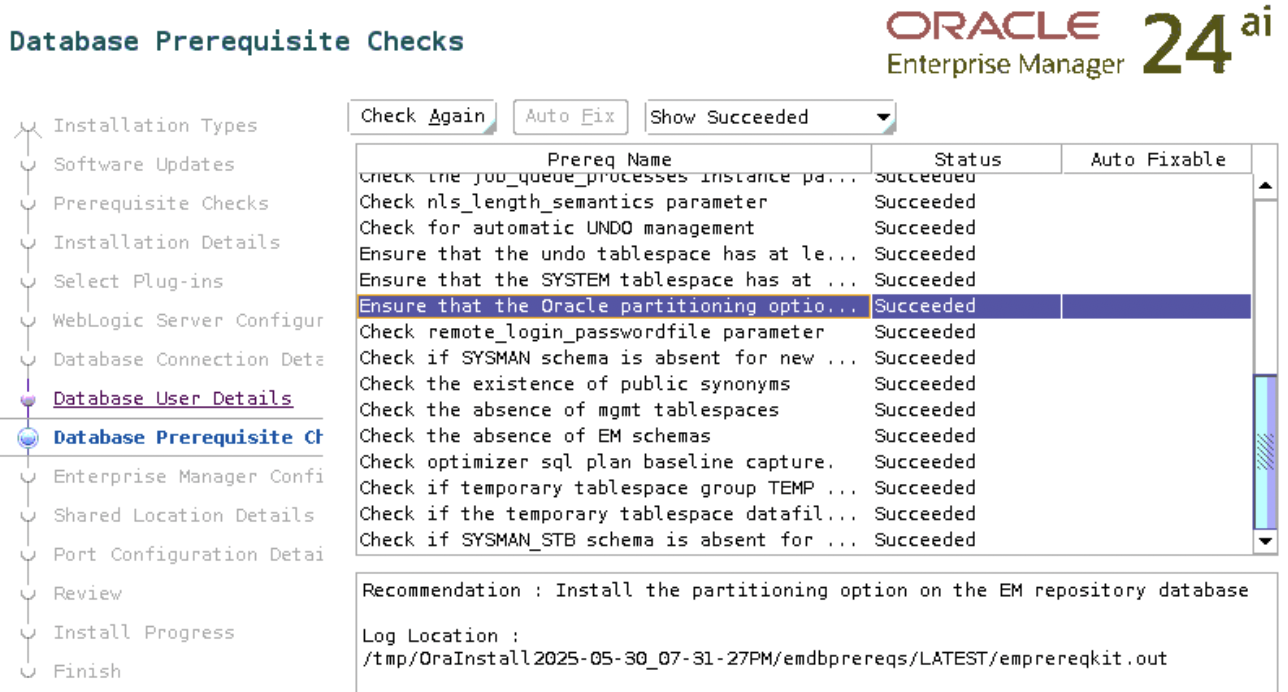
While installing Oracle Enterprise Manager 24ai, the check “Ensure that the Oracle partitioning option is installed” failed.

Toubleshooting:

Check if the EM repository database (the database you selected for the EM repository) has partitioning enabled:

SQL> select value from v$option where parameter = 'Partitioning';

VALUE
----------------------------------------------------------------
FALSE

The output above indicates that the partitioning is disabled.

Solution:

Let’s not think about the licensing part yet, since we are currently using Oracle for learning.

If partitioning is disabled, enable it on the database as follows:

1. Shut down the database using srvctl or sqlplus:

    srvctl stop database -d orclasm

    2. Connect to the database server as RBDMS owner and run the following commands:

    $ su - oracle
    $ cd $ORACLE_HOME/bin
    $ chopt enable partitioning

    The output of the command would appear as follows:

      Writing to /u01/app/oracle/product/23ai/dbhome_1/install/enable_partitioning_2025-05-30_21-46-30PM.log...
      /usr/bin/make -f /u01/app/oracle/product/23ai/dbhome_1/rdbms/lib/ins_rdbms.mk part_on ORACLE_HOME=/u01/app/oracle/product/23ai/dbhome_1
      /usr/bin/make -f /u01/app/oracle/product/23ai/dbhome_1/rdbms/lib/ins_rdbms.mk ioracle ORACLE_HOME=/u01/app/oracle/product/23ai/dbhome_1

      3. Start the database using srvctl or sqlplus:

      srvctl start database -d orclasm

      4. Connect to the database using sqlplus and verify the option status again:

      SQL> select value from v$option where parameter = 'Partitioning';

      VALUE
      ----------------------------------------------------------------
      TRUE

        5. Rerun the check again

        It shows succeeded this time:

        PRVG-11960 : Set user ID bit is not set for file oradism

        Problem:

        While running asmca, I have got the following error:

        Cause - Following nodes does not have required file ownership/permissions: Node :mk23ai-b PRVG-11960 : Set user ID bit is not set for file "/u01/app/oracle/product/23ai/dbhome_1/bin/oradism" on node "mk23ai-b".   Action - Run the Oracle home root script as the "root" user to fix the permissions.

        Troubleshoot:

        Check the current permissions on the file:

        oracle@mk23ai-b:~$ ll /u01/app/oracle/product/23ai/dbhome_1/bin/oradism
        -rwxr-x---. 1 root oinstall 1138016 Jul 11 2024 /u01/app/oracle/product/23ai/dbhome_1/bin/oradism

        Solution:

        The error message includes an action section that states the steps to follow. Connect to the database server as the root user and execute the root.sh script from the RDBMS home directory, since oradism mentioned in the error is located there.

        root@mk23ai-b:~# /u01/app/oracle/product/23ai/dbhome_1/root.sh
        Performing root user operation.

        The following environment variables are set as:
        ORACLE_OWNER= oracle
        ORACLE_HOME= /u01/app/oracle/product/23ai/dbhome_1

        Enter the full pathname of the local bin directory: [/usr/local/bin]:
        The contents of "dbhome" have not changed. No need to overwrite.
        The contents of "oraenv" have not changed. No need to overwrite.
        The contents of "coraenv" have not changed. No need to overwrite.

        Entries will be added to the /etc/oratab file as needed by
        Database Configuration Assistant when a database is created
        Finished running generic part of root script.
        Now product-specific root actions will be performed.

        Check the file permissions again:

        oracle@mk23ai-b:~$ ll /u01/app/oracle/product/23ai/dbhome_1/bin/oradism
        -rwsr-x---. 1 root oinstall 1138016 Jul 11 2024 /u01/app/oracle/product/23ai/dbhome_1/bin/oradism

        This time it has user ID bit is set.

        Normally, when you run a program (an executable file), it runs with your own permissions – meaning it can only do what your user account is allowed to do. But if the setuid bit is set on a file, the program runs with the permissions of the file’s owner, regardless of who is running it.

        You can continue using ASMCA this time.

        CLSRSC-400: A system reboot is required to continue installing during root.sh

        Problem:

        While running the root.sh script, I encountered the following error:

        root@mk23ai-b:~# /u01/app/23ai/grid/root.sh
        Performing root user operation.
        ...
        /u01/app/oracle/crsdata/mk23ai-b/crsconfig/roothas_2025-05-16_07-10-12PM.log
        2025/05/16 19:10:17 CLSRSC-400: A system reboot is required to continue installing.
        Died at /u01/app/23ai/grid/crs/install/oraafd.pm line 688.

        If you think rebooting the system and rerunning the root.sh script will help, well, no… I’ve already tried :).

        Troubleshoot:

        Check if the secure boot is enabled:

        root@mk23ai-b:~# mokutil --sb-state
        SecureBoot enabled

        Based on the previous output, Secure Boot is enabled. If you received a different output, such as “Secure Boot disabled,” continue your search.

        Solution:

        To disable Secure Boot, you cannot do it from the terminal; you need to access your computer’s firmware settings (BIOS or UEFI) and disable the Secure Boot option there.

        In my case, I am using an Azure VM, and I can show you how I disabled it using the Azure console.

        Note: This action requires VM downtime.

        VM -> Configuration -> Security type section -> uncheck “Enable secure boot” -> Apply

        Connect to the VM and rerun root.sh script:

        root@mk23ai-b:~# /u01/app/23ai/grid/root.sh
        ...

        mk23ai-b 2025/05/16 19:32:48 /u01/app/oracle/crsdata/mk23ai-b/olr/backup_20250516_193248.olr 0
        2025/05/16 19:32:50 CLSRSC-327: Successfully configured Oracle Restart for a standalone server

        Reduction rxdrop/s – receive packet drops per second

        Note: The post may seem related to Linux only. However, the issue of high rxdrop/s affects anything, especially Oracle database performance, if it occurs on the database server.

        In this post, I will explain the parameters that affect the behavior of receive packet drops per second (rxdrop/s).
        The post is more about workarounds and tuning values rather than identifying exactly what has changed and why the fragmentation level has increased.
        We will discuss several key /etc/sysctl.conf parameters that can help make fragmentation more manageable, these are:

        net.ipv4.ipfrag_high_thresh = 67108864
        net.ipv4.ipfrag_low_thresh = 66060288
        net.ipv4.ipfrag_time = 10

        Problem:

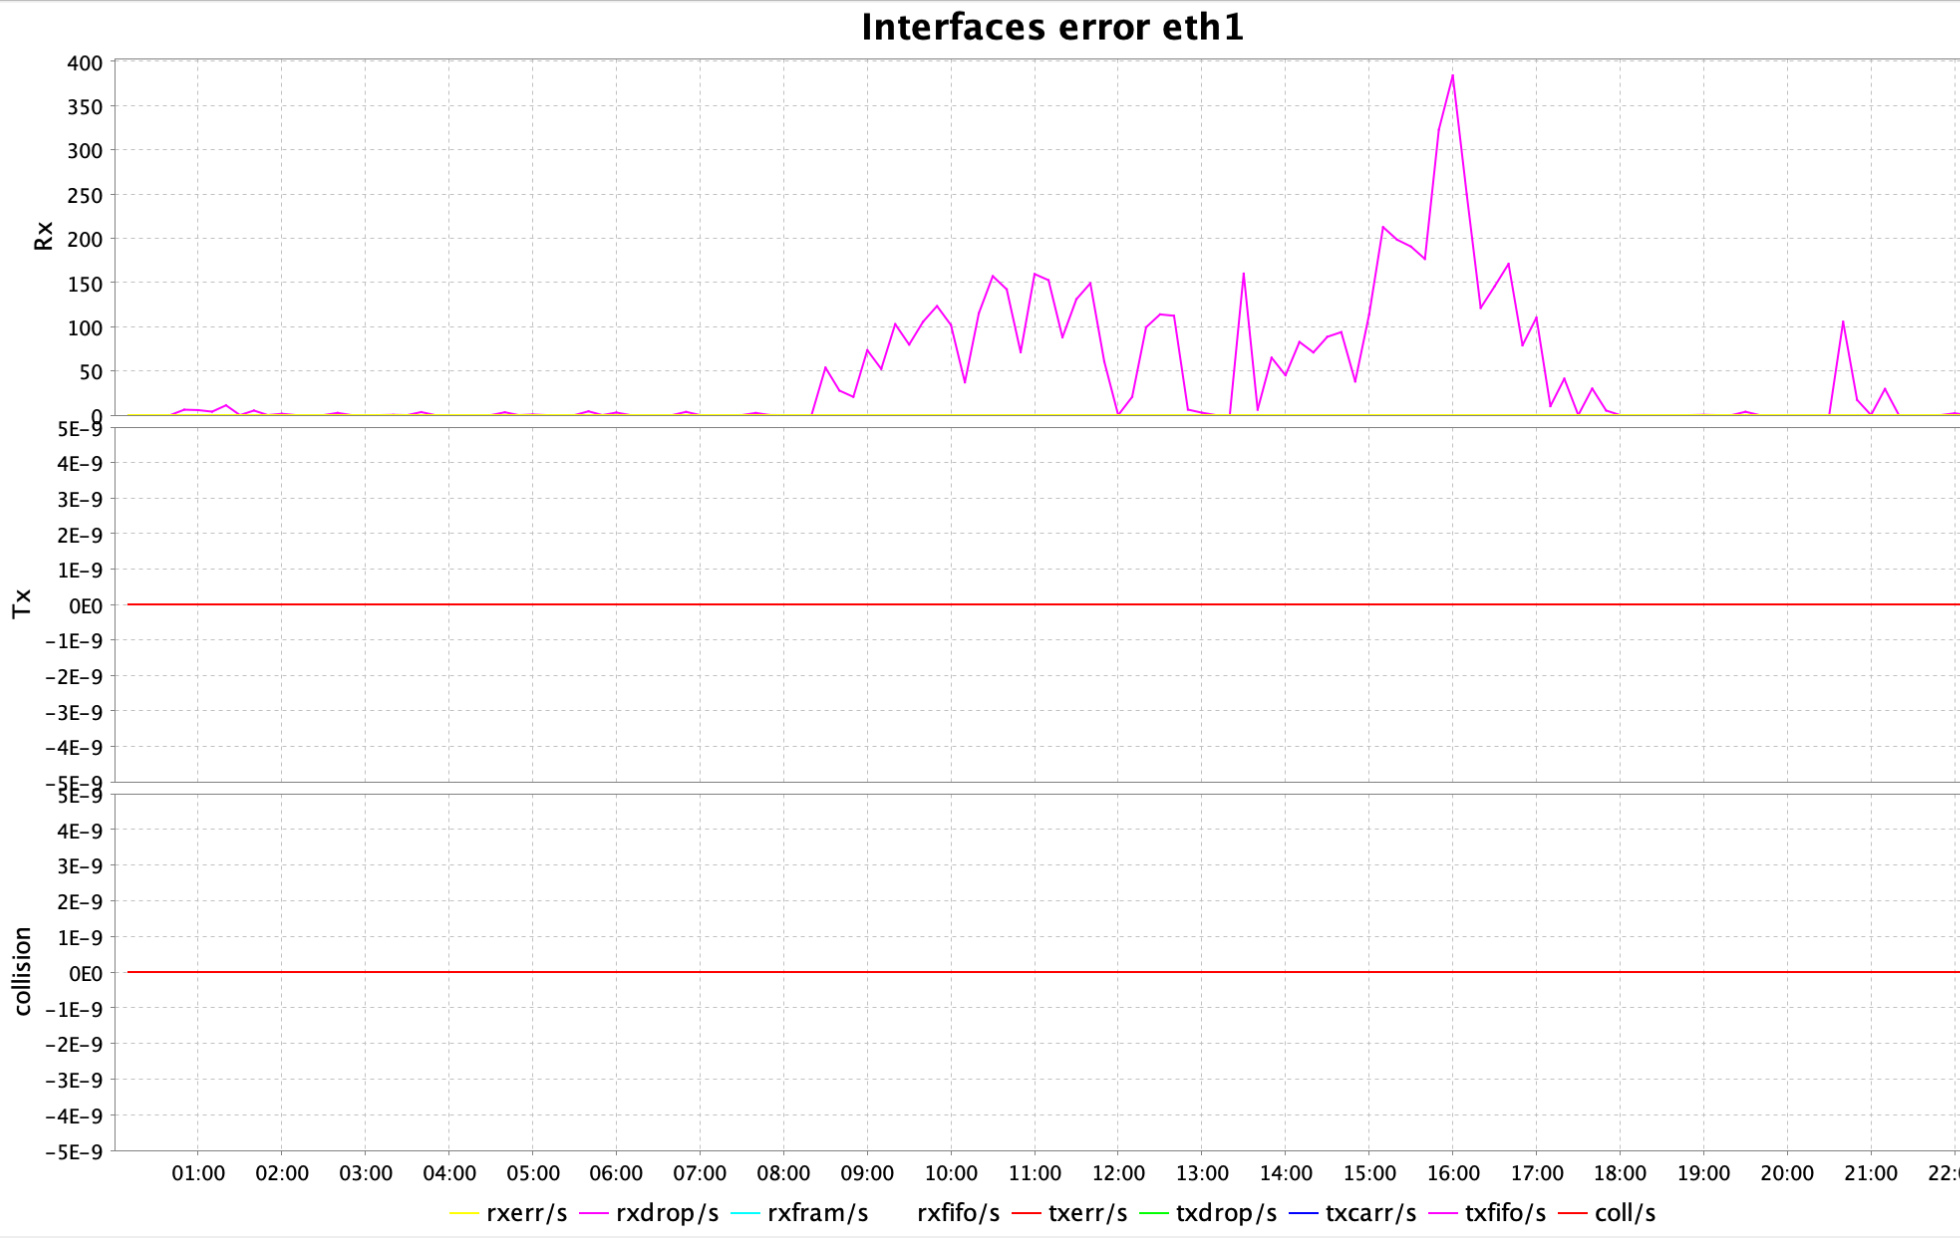
        The ksar graph (a tool that interprets output from sar) was displaying peaks for interface errors on eth1 interface, particularly rxdrop/s:

        Workaround:

        The following kernel parameters in Linux control how the system handles IP packet fragments in the IPv4 stack.

        • The maximum memory threshold (in bytes) that the kernel can use to store IPv4 fragmented packets:

          net.ipv4.ipfrag_high_thresh = 67108864

        When the total memory used for IP fragments exceeds 64 MB (67108864), the kernel will start dropping fragments until memory usage falls below the low threshold (ipfrag_low_thresh next parameter).

        • The minimum memory threshold to stop dropping fragments:

          net.ipv4.ipfrag_low_thresh = 66060288

        Once memory drops below ~63 MB (66060288), fragment discarding stops.

        • The time (in seconds) the kernel will keep an incomplete, fragmented packet in memory before discarding it:

          net.ipv4.ipfrag_time = 10

        The default is often 30 seconds. Here it’s reduced to 10 seconds.

          This helps prevent memory from being held too long by incomplete or malicious fragment streams, which are common in DoS attacks.

          After changing these parameters in /etc/sysctl.conf you need to run sysctl -p to apply the modified kernel parameters and make them effective at runtime.

          Oracle 23ai: ORA-40490 COLUMNS clause required

          Problem:

          While working with Oracle’s native JSON data type, I ran into a bit of a hiccup while trying to insert JSON data into a table:

          SQL> insert into json_table(data) 
          values(
          json_object(
          'name' value 'Mari',
          'age' value 34,
          'city' value 'Tbilisi'));

          I get the following error:

          ERROR at line 1:
          ORA-40490: COLUMNS clause required

          And similarly, for creating a JSON Search Index (this is the syntax that is provided by Oracle documentation by now)

          CREATE SEARCH INDEX mk_search_idx ON json_table(data) FOR JSON;

          It returns the same error:

          ERROR at line 1:
          ORA-40490: COLUMNS clause required

          At this point, I figured the issue had to be about the “COLUMNS clause”, which the error clearly mentions – but where exactly is it supposed to go?

          Solution:

          Turns out, Oracle wants you to explicitly declare the COLUMNS clause right after the table name. Here’s the syntax that finally worked for me:

          SQL> insert into json_table columns(data)
          values(
          json_object(
          'name' value 'Salome',
          'age' value 12,
          'city' value 'Tbilisi'));
          1 row created.

          SQL> commit;

          And similarly, for creating a JSON Search Index:

          SQL> CREATE SEARCH INDEX mk_search_idx ON json_table columns(data) FOR JSON;

          Index created.

          Checking supported MTU (Maximum Transmission Unit) for a system using PING

          When troubleshooting network issues, ensuring that packets are not being fragmented is crucial. One way to check the Maximum Transmission Unit (MTU) of a network path is by using the ping command with specific flags that test for fragmentation.

          What is MTU?

          MTU (Maximum Transmission Unit) is the largest size of a packet that can be sent over a network without fragmentation. If a packet exceeds the MTU, it is either fragmented or dropped (if fragmentation is disabled).

          To determine the MTU value that works for your connection, you can use the ping command with the Don’t Fragment (DF) flag, ensuring that packets exceeding the MTU are rejected instead of being fragmented.

          Using PING to check MTU

          A simple way to test MTU is by sending a ping with a specified packet size and ensuring it does not get fragmented:

          # ping 10.7.0.4 -c 2 -M do -s 1400

          Where:

          • 10.7.0.4: The destination IP address to which we are sending the ping
          • -c 2: Sends 2 pings before stopping
          • -M do: Enables strict Path MTU Discovery, meaning fragmentation is not allowed
          • -s 1400: Sets the ICMP payload size to 1400 bytes. The total packet size will be:
            • 1400 bytes (payload) + 8 bytes (ICMP header) + 20 bytes (IP header) = 1428 bytes.

          In the following example, we are successfully sending a packet with a size of 1400:

          [root@rac1 ~]# ping 10.0.1.4 -c 2 -M do -s 1400
          PING 10.0.1.4 (10.0.1.4) 1400(1428) bytes of data.
          1408 bytes from 10.0.1.4: icmp_seq=1 ttl=63 time=0.726 ms
          1408 bytes from 10.0.1.4: icmp_seq=2 ttl=63 time=0.720 ms

          --- 10.0.1.4 ping statistics ---
          2 packets transmitted, 2 received, 0% packet loss, time 1046ms

          Sending a packet of the size 1472 is also successful:

          [root@rac1 ~]# ping 10.0.1.4 -c 2 -M do -s 1472
          PING 10.0.1.4 (10.0.1.4) 1472(1500) bytes of data.
          1480 bytes from 10.0.1.4: icmp_seq=1 ttl=63 time=0.780 ms
          1480 bytes from 10.0.1.4: icmp_seq=2 ttl=63 time=0.759 ms

          --- 10.0.1.4 ping statistics ---
          2 packets transmitted, 2 received, 0% packet loss, time 1034ms
          rtt min/avg/max/mdev = 0.759/0.769/0.780/0.029 ms

          But sending a packet with the size 1473 is not successful:

          [root@rac1 ~]# ping 10.0.1.4 -c 2 -M do -s 1473
          PING 10.0.1.4 (10.0.1.4) 1473(1501) bytes of data.

          --- 10.0.1.4 ping statistics ---
          2 packets transmitted, 0 received, 100% packet loss, time 1023ms

          This indicates that the largest packet size you can send without fragmentation is 1472.

          Azure: Search for a specific VM series availability in region

          Use Azure CLI to retrieve available VM SKUs (sizes) in a specified region, filter them by a VM type, and formats the output.

          In this specific case, I am checking whether the E20as_v6 and E20s_v6 sizes are available in the eastus2 region and determining the zones in which they are offered:

          mari@Azure:~$ az vm list-skus --location eastus2 --all true --resource-type virtualMachines --output table | grep -E "E20as_v6|E20s_v6"

          virtualMachines eastus2 Standard_E20as_v6 1,2 None
          virtualMachines eastus2 Standard_E20s_v6 1,2 None

          Explanation of command/options:

          Command/OptionDescription
          az vm list-skusLists available VM SKUs (sizes)
          --location eastus2Specifies the Azure region (eastus2) where the VM SKUs should be retrieved.
          --all trueShow all information including vm sizes not available under the current subscription.
          --resource-type virtualMachinesFilters the SKU list specifically for virtual machines.
          --output tableFormats the output into a readable table format instead of JSON.
          | grep -E "E20as_v6|E20s_v6"Pipes (|) the output into grep, filtering only the lines containing E20as_v6 or E20s_v6.

          Explanation of the result:

          ValueDescription
          NoneThis column usually shows restrictions, such as NotAvailableForSubscription. Here, “None” means no restrictions apply, and the VM SKU can be deployed without limitations.
          1, 2VMs are available in 1 and 2 availability zones

          E-Series VMs are optimized for memory-intensive workloads such as in-memory databases, and big data applications.

          Release Schedule of Current Database Releases

          Determining the schedule for a new database release can be challenging. Online, you may encounter misleading information suggesting that the database has already launched when it is still not generally available (GA). To ensure you have accurate details, refer to the following metalink article.

          Release Schedule of Current Database Releases (Doc ID 742060.1)

          Also, verify the document’s update date found on the right side under Document Details -> Last Major Update -> Last Update.

          ORA-00904: “DBMS_XSTREAM_GG_ADM”.”SYNCHRONIZATION”, PLS-00201: identifier ‘DBMS_XSTREAM_GG_ADM’ must be declared

          Problem:

          While running command in GGSCI, I received the following messages:

          GGSCI (rac1.mycompany.mydomain as ggcw@orcl2) 4>  ADD TRANDATA HR.*
          ...
          2024-04-06 00:13:51 WARNING OGG-00706 Failed to add supplemental log group on table HR.TEST due to ORA-06550: line 1, column 46:
          PL/SQL: ORA-00904: "DBMS_XSTREAM_GG_ADM"."SYNCHRONIZATION": invalid identifier
          ORA-06550: line 1, column 39:
          PL/SQL: SQL Statement ignored
          ORA-06550: line 1, column 109:
          PLS-00201: identifier 'DBMS_XSTREAM_GG_ADM' must be declared
          ORA-06550: line 1, column 109:
          PL/SQL: Statement ignored
          ORA-06550: line 1, column 156:
          PLS-00201: identifier 'DBMS_CAPTURE_ADM' must be declared
          ORA-06550: line 1, column 156:
          PL/SQL: Statement ignored
          ORA-06550: line 1, column 263:
          PLS-00201: identifier 'DBMS_XSTREAM_GG_ADM' must be declared
          ORA-06550: line 1, column 263:
          PL/SQL: Statement ignored
          SQL DECLARE saved_sync varchar2(4); BEGIN select dbms_xstream_gg_adm.synchronization into saved_sync from dual; dbms_xstream_gg_adm.synchronization := 'NONE'; DBMS_CAPTURE_ADM.PREPARE_TABLE_INSTANTIATION(table_name => '"HR"."TEST"', supplemental_logging => 'none'); dbms_xstream_gg_adm.synchronization := saved_sync; END;.

          Solution:

          Connect to the database via sqlplus and grant the below privileges to GG user (ggcw in my case):

          exec dbms_goldengate_auth.grant_admin_privilege('ggcw');
          grant select any dictionary to ggcw;
          grant insert any table to ggcw;
          grant update any table to ggcw;
          grant delete any table to ggcw;

          Rerun the statement:

          GGSCI (rac1.mycompany.mydomain as ggcw@orcl2) 4>  ADD TRANDATA HR.*