Resize ASM disks in GCP (FG enabled cluster)

Increasing disks in GCP is an online procedure and you don’t have to stop the VM.

1. If the node is a database node, stop all local database instances running on the node.

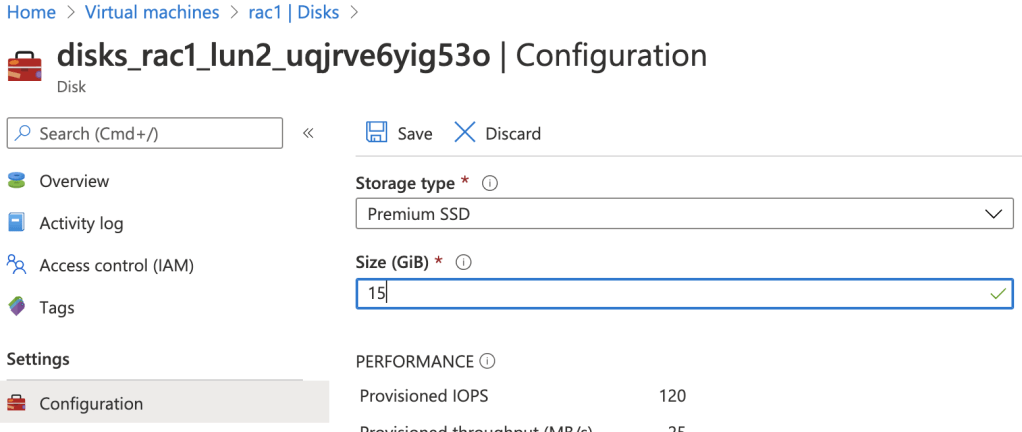
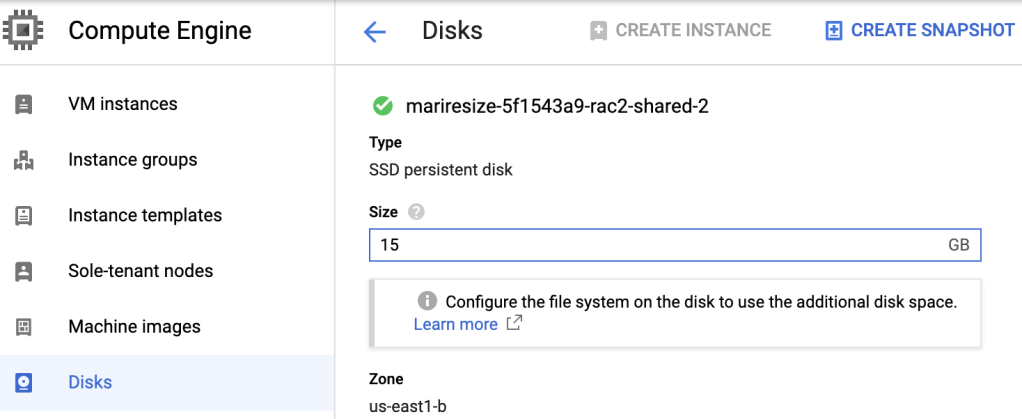
2. Go to the Disks page -> click the name of the disk that you want to resize -> click Edit -> enter the new size in Size field -> Save.

Please note that all data disks (not quorum disk) must be increased under the same diskgroup, otherwise ASM will not let you to have different sized disks.

Choose another data disks and repeat the same steps.

3. Run the following on database nodes via root user:

# for i in /sys/block/*/device/rescan; do echo 1 > $i; done

4. Check new disk sizes:

If it is Fg cluster, Phys_GiB column must show increased size:

[root@rac1 ~]# flashgrid-dg show -G DATA
...
------------------------------------------------------------
FailGroup ASM_Disk_Name Drive Phys_GiB  ASM_GiB  Status
------------------------------------------------------------
RAC1 RAC1$SHARED_2 /dev/flashgrid/rac1.shared-2 15 10 ONLINE
RAC2 RAC2$SHARED_2 /dev/flashgrid/rac2.shared-2 15 10 ONLINE
RACQ RACQ$SHARED_3 /dev/flashgrid/racq.shared-3 1  1  ONLINE
------------------------------------------------------------

In case it is a normal cluster, OS_MB must show increased size:

# su - grid
$ sqlplus / as sysasm
SQL> select TOTAL_MB/1024,OS_MB/1024 from v$asm_disk where GROUP_NUMBER=2;

TOTAL_MB/1024 OS_MB/1024
------------- ----------
	   10	      15
	   10	      15
	    1	       1

5. Connect to the ASM from any database node and run:

# su - grid
$ sqlplus / as sysasm
SQL> ALTER DISKGROUP DATA RESIZE ALL; 

The above command will resize all disks in the specified diskgroup based on their size returned by OS.

6. Check new sizes:

Fg cluster:

[root@rac1 ~]# flashgrid-dg show -G DATA
...
------------------------------------------------------------
RAC1 RAC1$SHARED_2 /dev/flashgrid/rac1.shared-2 15 15 ONLINE
RAC2 RAC2$SHARED_2 /dev/flashgrid/rac2.shared-2 15 15 ONLINE
RACQ RACQ$SHARED_3 /dev/flashgrid/racq.shared-3 1  1  ONLINE
------------------------------------------------------------

Normal cluster:

SQL> select TOTAL_MB/1024,OS_MB/1024 from v$asm_disk where GROUP_NUMBER=2 ;

TOTAL_MB/1024 OS_MB/1024
------------- ----------
	   15	      15
	   15	      15
	    1	       1

Phys_GiB and ASM_GiB should have the same increased size, which means disks are resized and you can use extended space.

Advertisement

Resize ASM disks in Azure (FG enabled cluster)

1. If the node is a database node, stop all local database instances running on the node.

2. Stop database VM from Azure console. In azure you are not able to resize disks while VM is running, so we need to stop it first.

3. Increase all database disks belonging to the same diskgroup to the desired size. Make sure disks in the same diskgroup have the same sizes.

To resize disk, click VM -> Disks -> choose data disk (in my case 10GB disk is a DATA disk)

After clicking the above disk, you will be redirected to the following screen, choose Configuration -> enter desired disk size (in my case I’ve changed from 10 to 15) -> Save

4. Start the database node.

5. Repeat 1-4 steps for the next database nodes (no need to increase disks for quorum, it is only necessary for the database nodes)

6. Check new disk sizes:

If it is Fg cluster, Phys_GiB column must show increased size:

[root@rac1 ~]# flashgrid-dg show -G DATA
...
------------------------------------------------------------
FailGroup ASM_Disk_Name Drive Phys_GiB  ASM_GiB  Status
------------------------------------------------------------
RAC1    RAC1$LUN2     /dev/flashgrid/rac1.lun2 15  10 ONLINE
RAC2    RAC2$LUN2     /dev/flashgrid/rac2.lun2 15  10 ONLINE
RACQ    RACQ$LUN3     /dev/flashgrid/racq.lun3  1  1  ONLINE
------------------------------------------------------------

In case it is a normal cluster, OS_MB must show increased size:

# su - grid
$ sqlplus / as sysasm
SQL> select TOTAL_MB/1024,OS_MB/1024 from v$asm_disk where GROUP_NUMBER=2 ;

TOTAL_MB/1024 OS_MB/1024
------------- ----------
	   10	      15
	   10	      15
	    1	       1

7. Connect to the ASM from any database node and run:

# su - grid
$ sqlplus / as sysasm
SQL> ALTER DISKGROUP DATA RESIZE ALL; 

The above command will resize all disks in the specified diskgroup based on their size returned by OS.

8. Check new sizes:

Fg cluster:

[root@rac1 ~]# flashgrid-dg show -G DATA
...
------------------------------------------------------------
FailGroup ASM_Disk_Name Drive Phys_GiB  ASM_GiB  Status
------------------------------------------------------------
RAC1    RAC1$LUN2     /dev/flashgrid/rac1.lun2 15  15 ONLINE
RAC2    RAC2$LUN2     /dev/flashgrid/rac2.lun2 15  15 ONLINE
RACQ    RACQ$LUN3     /dev/flashgrid/racq.lun3  1  1  ONLINE
------------------------------------------------------------

Normal cluster:

SQL> select TOTAL_MB/1024,OS_MB/1024 from v$asm_disk where GROUP_NUMBER=2 ;

TOTAL_MB/1024 OS_MB/1024
------------- ----------
	   15	      15
	   15	      15
	    1	       1

Phys_GiB and ASM_GiB should have the same increased size, which means disks are resized and you can use extended space.

‘udev’ rules continuously being reloaded resulted in ASM nvme disks going offline

Environment:

Linux Server release 7.2
kernel-3.10.0-514.26.2.el7.x86_64

Problem:

When Oracle processes are opening the device for writing and then closing it, this synthesizes a change event. And udev rules having  ACTION=="add|change" gets reloaded. This behavior causes ASM nvme disks to go offline:

Thu Jul 09 16:33:16 2020
WARNING: Disk 18 (rac1$disk1) in group 2 mode 0x7f is now being offlined

Fri Jul 10 10:04:34 2020
WARNING: Disk 19 (rac1$disk5) in group 2 mode 0x7f is now being offlined

Fri Jul 10 13:45:45 2020
WARNING: Disk 15 (rac1$disk8) in group 2 mode 0x7f is now being offlined

Solution:

To suppress the false positive change events disable the inotify watch for devices used for Oracle ASM using following steps:

  1.  Create /etc/udev/rules.d/96-nvme-nowatch.rules file with just one line in it:
ACTION=="add|change", KERNEL=="nvme*", OPTIONS:="nowatch"

2. After creating the file please run the following to activate the rule:

# udevadm control --reload-rules
# udevadm trigger --type=devices --action=change

The above command will reload the complete udev configuration and will trigger all the udev rules. On a busy production system this could disrupt ongoing operations, applications running on the server. Please use the above command during a scheduled maintenance window only.

Source: https://access.redhat.com/solutions/1465913 + our experience with customers.

Add/Drop ASM disks to DISKGROUP on RAC(or Standalone)

Note: The steps are described for RAC, but you can easily guess what are the steps for the standalone database.

1. First of all find the disk or partition name, that should be added to the ASM.

fdisk -l

My disk partition name is /dev/sdi1.

2. Assign the disk to ORACLEASM.

–On node1

/etc/init.d/oracleasm createdisk DISK7 /dev/sdi1

3. Scan disks in ALL NODES and list them to check if is presented.

–On node1

/etc/init.d/oracleasm scandisks
/etc/init.d/oracleasm listdisks

–On node2

/etc/init.d/oracleasm scandisks
/etc/init.d/oracleasm listdisks

4. Change the environment to the grid infrastructure, by setting ORACLE_SID to +ASM and so on :

$ . oraenv
ORACLE_SID = [media1] ? +ASM1
The Oracle base for ORACLE_HOME=/u01/app/11.2.0/grid is /u01/app/oracle

# Connect as an SYSASM

sqlplus / as sysasm

Note: If you don’t remember the password for the sysasm user see How to reset SYSASM password.

# Find the diskgroup name

SQL> select name from v$asm_diskgroup;

NAME
——————————
DATA01

# Increase power limit, if you want, to complete rebalance operation in a short time.

SQL>  alter system set asm_power_limit=10

# Indicate disks location by the parameter asm_diskstring

SQL> alter system set asm_diskstring=’ORCL:DISK*’

SQL> alter diskgroup DATA01 add disk ‘ORCL:DISK7’;

It will do the rebalance automatically.

# To drop the disk , do the following:

SQL >  alter diskgroup DATA01 drop disk DISK7;

It will rebalance first and then drops the disk automatically.

You can see the current operation in v$asm_operation view.

Note: Until the view v$asm_operation contains a record you are able to undrop the disks by the following way:

SQL> alter diskgroup DATA01 undrop disks;

If the operation is already completed , you are not able to undrop the disk . But you can re-add the disk , if you want.

That is all.

ASM disk mapping to physical device

To find which ASM disk maps to which physical device, run  the following:

[root@orcl ~]# /etc/init.d/oracleasm querydisk -p VOL1
Disk “VOL1″ is a valid ASM disk
/dev/sdd1: LABEL=”VOL1″ TYPE=”oracleasm”

Candidate ASM disks not showing

If you are in the middle of grid installation, and trying to create ASM disk group but Eligible(Candidate) disks location is empty, for example like this:Screenshot-Create Disk Group

moreover you have configured candidate disks using /etc/init.d/oracleasm and listdisks command showing the disk.

bash-3.2$ /etc/init.d/oracleasm listdisks

VOL1

Then follow my steps that may help:

1. Click “Change Disk Discovery Path” button

2. Enter the path /dev/oracleasm/disks and click OK

Screenshot-Change Disk Discovery Path

3. The picture should look like this:

Screenshot-Create Disk Group-1

That’s it. GOOD LUCK!