Increase root volume size in AWS

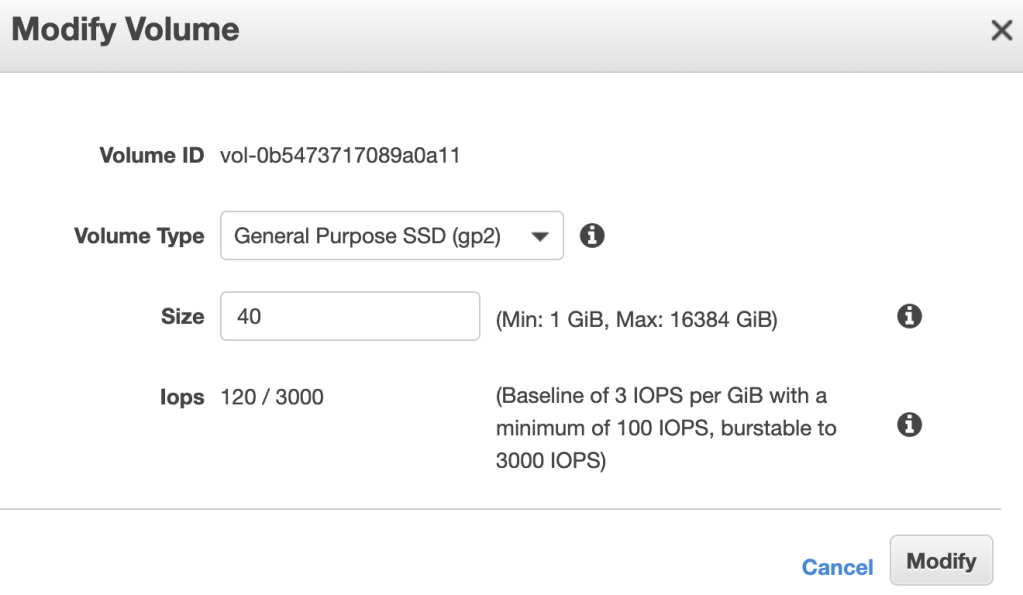
1. Increase disk size from AWS console:

Volumes -> choose disk -> Actions -> Modify Volume -> enter new value in Size field:

2. Use the lsblk command to display information about the block devices attached to your instance:

# lsblk
..
nvme0n1     259:11   0   40G  0 disk
└─nvme0n1p1 259:12   0   35G  0 part /

The root volume, /dev/nvme0n1, has a partition, /dev/nvme0n1p1. While the size of the root volume reflects the new size, 40 GB, the size of the partition reflects the original size, 35 GB, and must be extended before you can extend the file system.

3. To extend the partition on the root volume, use the following growpart command:

# growpart /dev/nvme0n1 1

CHANGED: partition=1 start=2048 old: size=73398239 end=73400287 new: size=83883999 end=83886047

4. Verify new size:

# lsblk
..
nvme0n1     259:11   0   40G  0 disk
└─nvme0n1p1 259:12   0   40G  0 part /

5. Use the df -Th command to verify the size of the file system for root volume:

# df -Th /

Filesystem     Type  Size  Used Avail Use% Mounted on
/dev/nvme0n1p1 xfs    35G  4.2G   31G  12% /

6. From the above output, we see that filesystem is XFS, grow it using xfs_growfs

# xfs_growfs -d /

meta-data=/dev/nvme0n1p1         isize=256    agcount=36, agsize=262080 blks
         =                       sectsz=512   attr=2, projid32bit=1
         =                       crc=0        finobt=0 spinodes=0 rmapbt=0
         =                       reflink=0
data     =                       bsize=4096   blocks=9174779, imaxpct=25
         =                       sunit=0      swidth=0 blks
naming   =version 2              bsize=4096   ascii-ci=0 ftype=1
log      =internal               bsize=4096   blocks=2560, version=2
         =                       sectsz=512   sunit=0 blks, lazy-count=1
realtime =none                   extsz=4096   blocks=0, rtextents=0
data blocks changed from 9174779 to 10485499

If filesystem is ext2, ext3, or ext4, you should use resize2fs.

7. Check new size:

# df -Th /

Filesystem     Type  Size  Used Avail Use% Mounted on
/dev/nvme0n1p1 xfs    40G  4.2G   36G  11% /
Advertisement

Resize ASM disks in GCP (FG enabled cluster)

Increasing disks in GCP is an online procedure and you don’t have to stop the VM.

1. If the node is a database node, stop all local database instances running on the node.

2. Go to the Disks page -> click the name of the disk that you want to resize -> click Edit -> enter the new size in Size field -> Save.

Please note that all data disks (not quorum disk) must be increased under the same diskgroup, otherwise ASM will not let you to have different sized disks.

Choose another data disks and repeat the same steps.

3. Run the following on database nodes via root user:

# for i in /sys/block/*/device/rescan; do echo 1 > $i; done

4. Check new disk sizes:

If it is Fg cluster, Phys_GiB column must show increased size:

[root@rac1 ~]# flashgrid-dg show -G DATA
...
------------------------------------------------------------
FailGroup ASM_Disk_Name Drive Phys_GiB  ASM_GiB  Status
------------------------------------------------------------
RAC1 RAC1$SHARED_2 /dev/flashgrid/rac1.shared-2 15 10 ONLINE
RAC2 RAC2$SHARED_2 /dev/flashgrid/rac2.shared-2 15 10 ONLINE
RACQ RACQ$SHARED_3 /dev/flashgrid/racq.shared-3 1  1  ONLINE
------------------------------------------------------------

In case it is a normal cluster, OS_MB must show increased size:

# su - grid
$ sqlplus / as sysasm
SQL> select TOTAL_MB/1024,OS_MB/1024 from v$asm_disk where GROUP_NUMBER=2;

TOTAL_MB/1024 OS_MB/1024
------------- ----------
	   10	      15
	   10	      15
	    1	       1

5. Connect to the ASM from any database node and run:

# su - grid
$ sqlplus / as sysasm
SQL> ALTER DISKGROUP DATA RESIZE ALL; 

The above command will resize all disks in the specified diskgroup based on their size returned by OS.

6. Check new sizes:

Fg cluster:

[root@rac1 ~]# flashgrid-dg show -G DATA
...
------------------------------------------------------------
RAC1 RAC1$SHARED_2 /dev/flashgrid/rac1.shared-2 15 15 ONLINE
RAC2 RAC2$SHARED_2 /dev/flashgrid/rac2.shared-2 15 15 ONLINE
RACQ RACQ$SHARED_3 /dev/flashgrid/racq.shared-3 1  1  ONLINE
------------------------------------------------------------

Normal cluster:

SQL> select TOTAL_MB/1024,OS_MB/1024 from v$asm_disk where GROUP_NUMBER=2 ;

TOTAL_MB/1024 OS_MB/1024
------------- ----------
	   15	      15
	   15	      15
	    1	       1

Phys_GiB and ASM_GiB should have the same increased size, which means disks are resized and you can use extended space.

Resize ASM disks in Azure (FG enabled cluster)

1. If the node is a database node, stop all local database instances running on the node.

2. Stop database VM from Azure console. In azure you are not able to resize disks while VM is running, so we need to stop it first.

3. Increase all database disks belonging to the same diskgroup to the desired size. Make sure disks in the same diskgroup have the same sizes.

To resize disk, click VM -> Disks -> choose data disk (in my case 10GB disk is a DATA disk)

After clicking the above disk, you will be redirected to the following screen, choose Configuration -> enter desired disk size (in my case I’ve changed from 10 to 15) -> Save

4. Start the database node.

5. Repeat 1-4 steps for the next database nodes (no need to increase disks for quorum, it is only necessary for the database nodes)

6. Check new disk sizes:

If it is Fg cluster, Phys_GiB column must show increased size:

[root@rac1 ~]# flashgrid-dg show -G DATA
...
------------------------------------------------------------
FailGroup ASM_Disk_Name Drive Phys_GiB  ASM_GiB  Status
------------------------------------------------------------
RAC1    RAC1$LUN2     /dev/flashgrid/rac1.lun2 15  10 ONLINE
RAC2    RAC2$LUN2     /dev/flashgrid/rac2.lun2 15  10 ONLINE
RACQ    RACQ$LUN3     /dev/flashgrid/racq.lun3  1  1  ONLINE
------------------------------------------------------------

In case it is a normal cluster, OS_MB must show increased size:

# su - grid
$ sqlplus / as sysasm
SQL> select TOTAL_MB/1024,OS_MB/1024 from v$asm_disk where GROUP_NUMBER=2 ;

TOTAL_MB/1024 OS_MB/1024
------------- ----------
	   10	      15
	   10	      15
	    1	       1

7. Connect to the ASM from any database node and run:

# su - grid
$ sqlplus / as sysasm
SQL> ALTER DISKGROUP DATA RESIZE ALL; 

The above command will resize all disks in the specified diskgroup based on their size returned by OS.

8. Check new sizes:

Fg cluster:

[root@rac1 ~]# flashgrid-dg show -G DATA
...
------------------------------------------------------------
FailGroup ASM_Disk_Name Drive Phys_GiB  ASM_GiB  Status
------------------------------------------------------------
RAC1    RAC1$LUN2     /dev/flashgrid/rac1.lun2 15  15 ONLINE
RAC2    RAC2$LUN2     /dev/flashgrid/rac2.lun2 15  15 ONLINE
RACQ    RACQ$LUN3     /dev/flashgrid/racq.lun3  1  1  ONLINE
------------------------------------------------------------

Normal cluster:

SQL> select TOTAL_MB/1024,OS_MB/1024 from v$asm_disk where GROUP_NUMBER=2 ;

TOTAL_MB/1024 OS_MB/1024
------------- ----------
	   15	      15
	   15	      15
	    1	       1

Phys_GiB and ASM_GiB should have the same increased size, which means disks are resized and you can use extended space.

Resize ASM disks in AWS (FG enabled cluster)

  1. Connect to AWS console https://console.aws.amazon.com
  2. On the left side -> under the section ELASTIC BLOCK STORE -> choose Volumes
  3. Choose necessary disk -> click Actions button -> choose Modify Volume -> change Size
    Please note that all data disks (not quorum disk) must be increased under the same diskgroup, otherwise ASM will not let you to have different sized disks.

Choose another data disks and repeat the same steps.

4. Run the following on database nodes via root user:

# for i in /sys/block/*/device/rescan; do echo 1 > $i; done

5. Check that disks have correct sizes:

# flashgrid-node

6. Connect to the ASM instance from any database node and run:

[grid@rac1 ~]$ sqlplus / as sysasm
SQL*Plus: Release 19.0.0.0.0 - Production on Fri Aug 23 10:17:50 2019
Version 19.4.0.0.0
Copyright (c) 1982, 2019, Oracle.  All rights reserved.
Connected to:
Oracle Database 19c Enterprise Edition Release 19.0.0.0.0 - Production
Version 19.4.0.0.0

SQL> alter diskgroup GRID resize all; 
Diskgroup altered.