Backup and restore LUN0 and OS disk in Azure

==================================Backup process


1. Configure backup for rac2 which includes only LUN0 (+ OS disk, by default)

Backup configuration script from CLI: 

az backup protection enable-for-vm --resource-group marirac --vault-name vault485 --vm rac2 --policy-name  mkpolicy --disk-list-setting include --diskslist 0

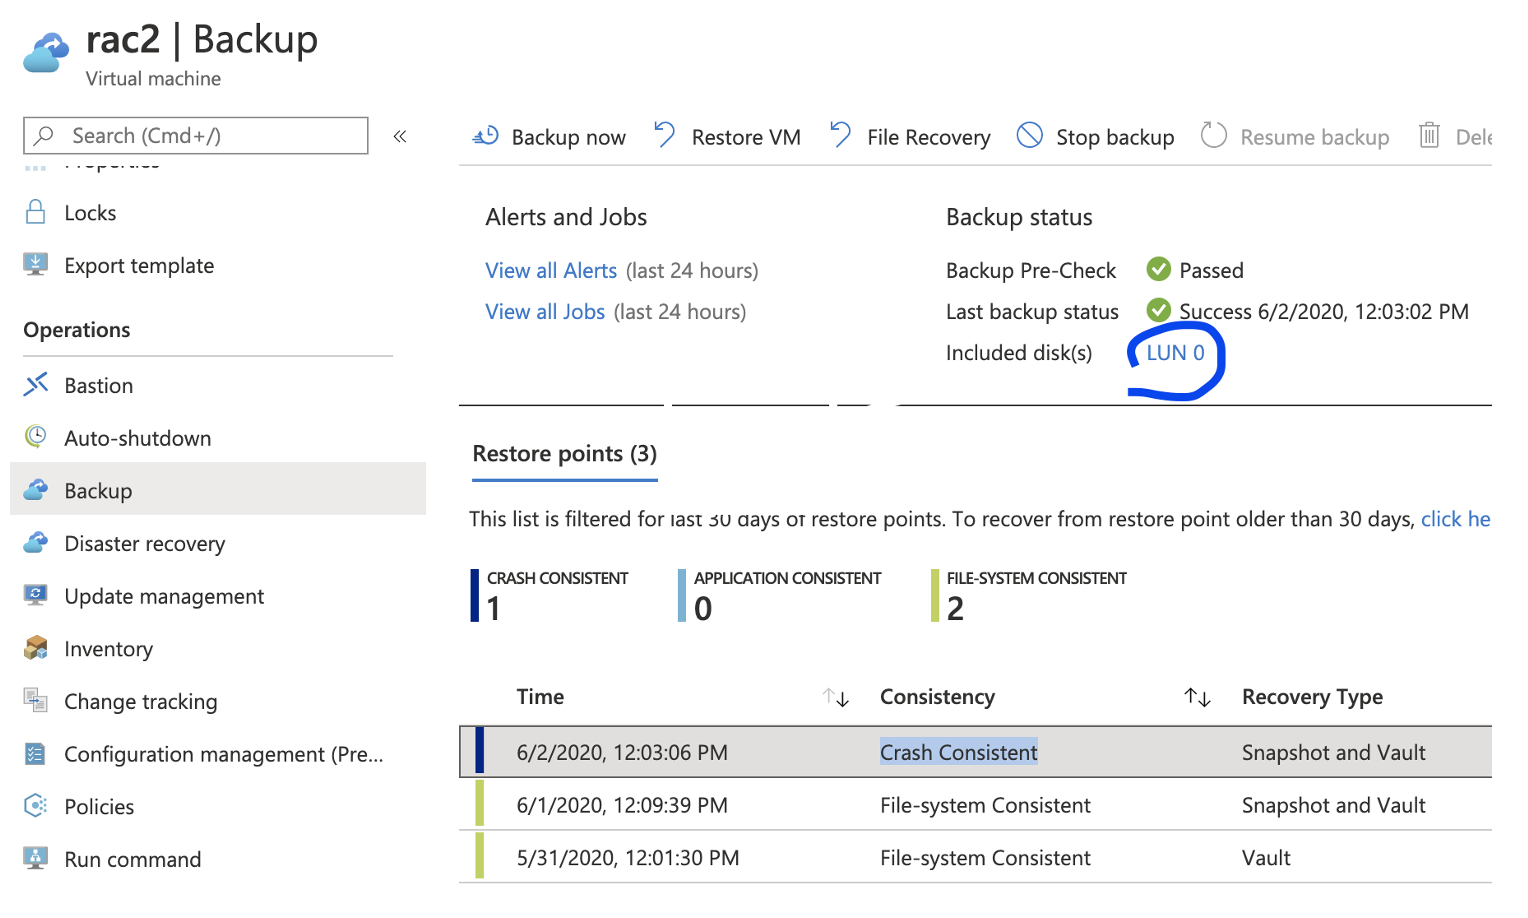
Check settings from Portal: 


2. Create test files on / and /u01

[root@rac2 ~]# touch /u01/mari_u01
[root@rac2 ~]# ll /u01/mari_u01
-rw-r–r– 1 root root 0 Jun  2 15:24 /u01/mari_u01

[root@rac2 ~]# touch /mari_root
[root@rac2 ~]# ll /mari_root
-rw-r–r– 1 root root 0 Jun  2 15:24 /mari_root


==================================Restore process

1. Find the latest restore point from Azure CLI:

az backup recoverypoint list --vault-name vault485 --resource-group marirac -c rac2 -i rac2 --backup-management-type AzureIaasVM


2. Restore OS and LUN0 disks:

az backup restore restore-disks --resource-group marirac --vault-name vault485 -c rac2 -i rac2  --target-resource-group marirac --storage-account mzx41qmarivol2asrcache --diskslist 0 --rp-name 5638874691908752817


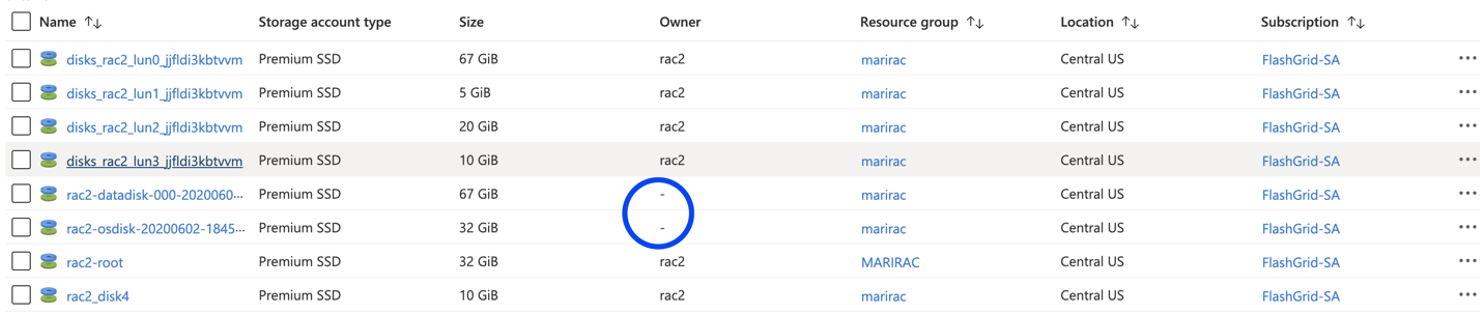
The above script restores them as managed disks, that are not attached to anything. Note restore did not replace the disk, it just restores as a new disk. 


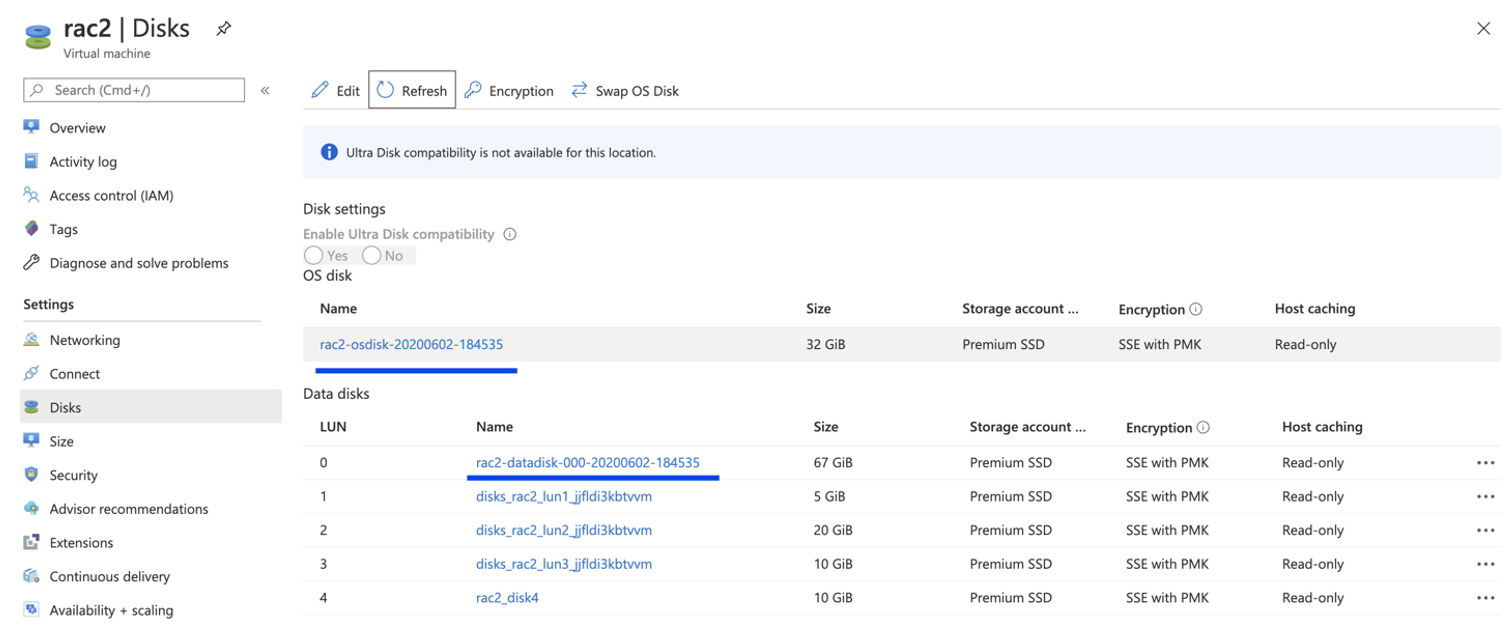
3. To replace disks do the following:

Detach old LUN0 -> Save -> Attach restored disk as Lun 0. 

To replace existing OS disk with restored one, click Switch OS disk and then start the VM. 


4. Check that files are not there anymore:

[root@rac2 ~]#  ll /mari_root
ls: cannot access /mari_root: No such file or directory

[root@rac2 ~]# ll /u01/mariu01
ls: cannot access /u01/mariu01: No such file or directory

Advertisement

Backup best practices for Oracle Clusterware

I recommend you to backup clusterware related files after initial setup and at any change. The backup files can save you from OCR, OLR corruption during GI patch. If any of the files become corrupted you will be able to recover it in several minutes (or seconds). Depends on the failure, you may lose several hours to recover your cluster to the state it was before something happened.

Here are the steps to protect your cluster:

1. Backup ASM spfile initially and at any change.

There are several ways to backup ASM spfile using spcopy, spbackup or create pfile=<backup location> from spfile.

To locate the Oracle ASM SPFILE, use the ASMCMD spget command:

ASMCMD> spget
+GRID/myrac/ASMPARAMETERFILE/registry.253.974466047

Copy the Oracle ASM SPFILE to the backup location:

ASMCMD> spbackup +GRID/myrac/ASMPARAMETERFILE/registry.253.974466047 /backup/spfileasm.ora

2. Backing up ASM password file once should be enough. If you change password for pwfile users or add another user into the list, then make a new backup.

Locate the password file using the ASMCMD pwget command.

ASMCMD> pwget --asm
+GRID/orapwASM

Back up the password file to another location with the pwcopy command.

ASMCMD> pwcopy +GRID/orapwASM  /backup/orapwASM 
copying +GRID/orapwASM -> /backup/orapwASM

3. Use md_backup command to create a backup file containing metadata for one or more disk groups.

To backup metadata for all disk groups, do the following:

ASMCMD> md_backup /tmp/dgmetabackup

Disk group metadata to be backed up: DATA
Disk group metadata to be backed up: FRA
Disk group metadata to be backed up: GRID

In case you need to backup metadata only for a specific disk group, use -G option.

4. Backup OLR on each node.

If OLR is missing or corrupted, clusterware can’t be started on that node. So make manual backup initially and after any change:

Do the following on each node:

# ocrconfig -local -manualbackup

Copy generated file to the backup location:

# cp /u01/app/12.2.0/grid/cdata/rac1/backup_20180510_230359.olr /backup/

Or change default backup location to /backup before making the actual backup:

# ocrconfig -local -backuploc /backup

# ocrconfig -local -manualbackup

5. Mirror and Backup OCR.

You should configure OCR in two independent disk groups. Typically, this is the work area and the recovery area. At least two OCR locations should be configured.

# ocrconfig -add +FRA

There are automatic OCR backups that are taken in the past 4 hours, 8 hours, 12 hours, and in the last day and week.

You can also manually backup OCR before applying any patch or upgrade GI home:

# ocrconfig -manualbackup

Regularly save taken backup to another location using the following way:

Identify the latest backup (manual or automatic):

[grid@rac1 ~]$ ocrconfig -showbackup
rac1 2018/05/10 13:06:18 +GRID:/myrac/OCRBACKUP/backup00.ocr.289.975762375 830990544
..

Copy it to the backup location:

$ ocrconfig -copy +GRID:/myrac/OCRBACKUP/backup00.ocr.289.975762375 /backup/backup00.ocr

Or change default backup locations to another diskgroup other than GRID:

# ocrconfig -backuploc +FRA


Create Oracle Backup Job in Backup Exec

It is very easy to backup Oracle from Backup Exec than Netbackup 🙂 So let’s discuss how to do it.

Some details:

Client Server IP: 10.0.1.100
Client Hostname: orcl_node
Media Server IP: 192.168.1.100

You should have installed RALUS Agent(Backup Exec client software) on client machine, if not see my post “Install Backup Exec Client(Remote Agent) on Linux”(There is also Agent configuration, but we will discuss this configuration in this post also, so just see the client installation section)

1. Configurations on client side

1.1 Oracle user (user that is the oracle software owner) must be in the beoper group.

# id oracle
uid=501(oracle) gid=503(oinstall) groups=503(oinstall),501(asmdba),504(dba),505(oper)

# usermod -G asmdba,dba,oper,beoper oracle

# id oracle
uid=501(oracle) gid=503(oinstall) groups=503(oinstall),501(asmdba),504(dba),505(oper),506(beoper)

1.2. Configure RALUS agent on client machine

# /opt/VRTSralus/bin/AgentConfig

Symantec Backup Exec Remote Agent Utility
     Choose one of the following options:
     1. Configure database access
     2. Configure Oracle instance information
     3. Quit
     Please enter your selection: 1

Configuring machine information
     Choose one of the following options:
     1. Add system credentials for Oracle operations
     2. Edit system credentials used for Oracle operations
     3. Remove system credentials used for Oracle operations
     4. View system credentials used for Oracle operations
     5. Quit
     Please enter your selection: 1
     Enter a user name that has local system credentials: oracle
     Enter the password:
     Re-enter password:
     Validating credentials…….
     Do you want to use a custom port to connect to the media server during Oracle operations? (Y/N): N
     Commit Oracle operation settings to the configuration file? (Y/N): Y
     SUCCESS: Successfully added the entry to the configuration file.

Configuring machine information
     Choose one of the following options:
     1. Add system credentials for Oracle operations
     2. Edit system credentials used for Oracle operations
     3. Remove system credentials used for Oracle operations
     4. View system credentials used for Oracle operations
     5. Quit
     Please enter your selection: 5

Symantec Backup Exec Remote Agent Utility
     Choose one of the following options:
     1. Configure database access
     2. Configure Oracle instance information
     3. Quit
     Please enter your selection: 2

If this computer is a RAC node, you must perform additional steps for configuration before you continue. Refer to the readme for these additional steps.

Configuring the Oracle Agent
Choose one of the following options:
1. Add a new Oracle instance to protect
2. Edit an existing Oracle instance
3. Delete an existing Oracle instance
4. View Oracle instance entries that have been added in the Remote Agent Utility
5. Quit
Please enter your selection: 1
     Select an Oracle instance to configure
Entry 1. orcl
Enter the number 0 to go back
Enter your selection: 1
     Enter the Oracle database SYSDBA user name: SYS
Enter the Oracle database SYSDBA password:
Re-enter password:
Validating credentials…….
Enter the media server name or IP address:      The length of the entered data is greater than the maximum permitted length.
Enter the media server name or IP address: 192.168.1.100
     Do you use a recovery catalog? (Y/N):N
     Do you want to use a customized job template? (Y/N): N
     Commit Oracle operation settings to the configuration file? (Y/N): Y
     Created symbolic link for /opt/VRTSralus/bin/libobk.so at /u01/app/oracle/product/11.2.0/db_1/lib/libobk.so
SUCCESS: Successfully added the entry to the configuration file.

Configuring the Oracle Agent
Choose one of the following options:
1. Add a new Oracle instance to protect
2. Edit an existing Oracle instance
3. Delete an existing Oracle instance
4. View Oracle instance entries that have been added in the Remote Agent Utility
5. Quit
Please enter your selection: 5

Symantec Backup Exec Remote Agent Utility
Choose one of the following options:
1. Configure database access
2. Configure Oracle instance information
3. Quit
Please enter your selection: 3

2. Configurations on media server side

Run Backup Exec from start menu.

2.1 Adding client info.

From the menu bar click Tools->Options

Backup_Exec_Tools_Options

In Job Defaults section –> Oracle –> click button Modify list

image

Click New button –> again New button –> and again New button

Fill the fields,

Username: oracle
Password:
Confirm Password:
Account Name: oracle

image

click OK

image

click OK.

image

click OK -> click OK –> click OK

2.2 Creating backup job.

From the left pane-> Backup Tasks-> New job

image

In Source section->Selections

Selection list name: Enter the name you want, let it be Oracle-test

Check View by Resource->All Resources-> Favorite Resources->orcl-node->Oracle Database “orcl”..->Tablespaces

image

I will not discuss all sections in detail, they are self-explanatory..

In Settings section-> Oracle –> choose Backup method and other necessary options like Delete backed up archive log files and so on…

image

By default job will run immediately after clicking the Submit button , but if you want to configure the schedule of your job , do the following:

In Frequency section –>Schedule->  choose Run according to schedule-> click Edit Schedule Details button and choose your appropriate schedule..

For example if you want your backup to run everyday at 1:00AM and no later than 11:00AM, click Day Interval –> check Every and write 1

image

In Time Window, fill :

Start no earlier than: 1:00AM
and no later than: 11:00AM

image

Click OK.

Click Submit button.

That’s it.

How to catalog backup located on TAPE in RMAN?

If you are using Symantec Netbackup as a backup server, the following command will be useful for you:

1. To list available files located on tape taken by some client, run the following:

# /usr/openv/netbackup/bin/bplist -C r2n1 -t 4 -l -R /

where,

-C     client name
-t     is a policy type , where 4 means Oracle
-l     shows more details info
-R    recursively
/     root directory

–output

-rw-rw---- oracle oinstall 18939648K Aug 11 04:48 /al_dMEDIA_s3941_p1_t791009326_T20120811

2.  In my case this backuppiece is taken by r2n1 client and now I am cataloging it on orcl client. That’s why I need to pass additional parameters to channel. If these clients are the same , parameters are not necessary. (If you have some problem, like orcl can’t see r2n1’s backups see my post about alternate client)

RMAN> CONFIGURE CHANNEL DEVICE TYPE 'SBT_TAPE' PARMS 'ENV=(NB_ORA_CLIENT=r2n1,NB_ORA_SERV=JUS-BACKUP01)';

RMAN> catalog device type 'SBT_TAPE' backuppiece 'al_dMEDIA_s3941_p1_t791009326_T20120811';

3. If you want to clear your configuration do the following,or skip this step.

CONFIGURE CHANNEL DEVICE TYPE 'SBT_TAPE' CLEAR;

That’s all, good luck!

Tablespace Backup Using Cron on Linux

Let’s do all things, step by step:

1. Create directories for Backup, Script and Logs.

mkdir -p /u02/Backup/Backup

mkdir -p /u02/Backup/Scripts

mkdir -p /u02/Backup/Logs

2. Create backup script.

export ORACLE_BASE=/u01/app/oracle

export ORACLE_HOME=/u01/app/oracle/product/11.2.0/db_1

export ORACLE_SID=my_sid

$ORACLE_HOME/bin/rman target / msglog /u02/Backup/Logs/BackupTBS_MYTABLESPACE.log append << EOF

run{

backup tablespace MYTAVLESPACE format '/u02/Backup/Backup/BackupTBS_MYTABLESPACE_%T.bkp';

delete noprompt backup of tablespace MYTABLESPACE completed before 'SYSDATE-1';

}

EOF

save this script as  MYTABLESPACE_disk_backup.sh

3. Change permissions and owner of this file.

chown oracle:oinstall MYTABLESPACE_disk_backup.sh

chmod a+x MYTABLESPACE_disk_backup.sh

4. Create cron job.

su - oracle

crontab -e

--add the following line(this script will run at 8:00 PM everyday)

00 20 * * * /u02/Backup/Scripts/MYTABLESPACE_disk_backup.sh

cron format is the following:

minute (0-59), hour (0-23, 0 = midnight), day (1-31), month (1-12), weekday (0-6, 0 = Sunday)
*                    *                                    *                *                   *

asterisk means –> every

5. Reload cron service

su -

service crond reload

That is all.

Setup netbackup to send mails

1. Installing and configuring BLAT 1.1 Download BLAT from here  http://sourceforge.net/projects/blat/ 1.2 Extract files, copy blat.exe and paste it into C:\Windows\System32 (indicate the correct path for your System32). 1.3 From the command line run the following:

> cd C:\Windows\System32
> blat -install <email server addr> <sender's addr>

Note: <sender’s addr> is the valid email account, which will be the primary sender of the email notifications. Example:

> blat -install mailserver.company.ge useraccount@company.ge

1.4 Testing the installation validity. Create a text file, for example, C:\textfile.txt with some text into it. And run the following from command line:

> blat C:\textfile.txt –s some_subject –to useraccount@company.ge

If blat is working,  useraccount@company.ge account should receive the mail. 2. Configuring nbmail.cmd script. 2.1 This script should be located in <install_path>\Veritas\NetBackup\bin , if not , go to the <install_path>\Veritas\NetBackup\bin\goodies and copy nbmail.cmd to <install_path>\Veritas\NetBackup\bin and then modify the script by the following way: For NetBackup 4.5 and 5.x systems find the following:

@rem @blat %3 -s %2 -t %1 -i NetBackup -server WARTHOG –q

For NetBackup 6.0 or 7.0 systems find the following:

@REM @IF "%~4"=="" (
@REM blat %3 -s %2 -t %1 -i NetBackup -server WARTHOG –q
@REM ) ELSE (
@REM blat %3 -s %2 -t %1 -i NetBackup -server WARTHOG -q -attach %4
@REM )

2.2 Remove all “@REM”. 2.3 Replace “WARTHOG” with the mail server name: For NetBackup 4.5 and 5.x systems find the following:

@rem @blat %3 -s %2 -t %1 -i NetBackup -server mailserver.company.ge –q

For NetBackup 6.0 or 7.0 systems find the following:

@REM @IF "%~4"=="" (
@REM blat %3 -s %2 -t %1 -i NetBackup -server mailserver.company.ge –q
@REM ) ELSE (
@REM blat %3 -s %2 -t %1 -i NetBackup -server mailserver.company.ge -q -attach %4
@REM )

3 Configure Netbackup to send mails to recipients.

3.1 Open Netbackup Administration Console We will use Master Servers and/or Clients properties under “NetBackup Management”-> “Host Properties”.

1. If you want NetBackup to send notification just  about Failed backups, do the following(just):

1.1 Write the mail address(or addresses, separated by commas) to where email notification should be sent  into “Master Servers” –> Properties –> “Global Attributes“->”Administrator email address“(It will cause Symantec to send mails about backups that ended with non-zero status)

2.  If you want to receive notifications about Failed and Successful backups as well, do the following:

2.1 Write the mail address(or addresses, separated by commas) to where email notification should be sent  into “Master Servers” –> Properties –> “Universal Settings” –> “Client Administrator’s email

and  check  “Server sends mail”(means server where netbackup is installed will send) or “Client sends mail”(if client, that is backed up, can send mails)….I prefer to check  “Server sends mail”.

2.2  Under  “Clients“->Properties –> “Universal Settings” check “Server sends mail”(if you’ve checked it in “Master Servers” –> Properties –> “Universal Settings”) or “Client sends mail”(if you’ve checked it in “Master Servers” –> Properties –> “Universal Settings”). So do the same for clients as you did  for master server, or it will fail.

and  in “Client Administrator’s email” write the mail address(or addresses, separated by commas) to where email notification should be sent.

That is all.